Setting Rich Presence
Overview
Section titled “Overview”Rich Presence allows you to display detailed information about what players are doing in your game. Users can see this information in their Discord profile and friends list and use it to join their friends' games with Game Invites.
Prerequisites
Section titled “Prerequisites”Before you begin, make sure you have:
- Set up the Discord Social SDK
- Connected to Discord with a valid client instance
Understanding Rich Presence
Section titled “Understanding Rich Presence”Rich Presence allows you to display detailed information about players' actions in your game. Users can see this information in various places in Discord, including:
- User profiles
- Friend lists
- Server member lists
Each Activity contains fields that describe the following:
| Field | Description | Purpose |
|---|---|---|
name |
Game or app name | Displayed in the user's profile |
type |
Activity type | What the player is doing (e.g., "Playing", "Watching", "Listening") |
details |
What the player is doing | Main activity description (e.g., "Playing Capture the Flag") |
state |
Their current status | Secondary status (e.g., "In Queue", "In Match, "In a group") |
party |
Party information | Shows party size and capacity (e.g., "2 of 4") |
timestamps |
Activity duration | Shows elapsed or remaining time |
assets |
Custom artwork | Game/map thumbnails and character icons |
secrets |
Join/spectate tokens | Enable Game Invite functionality |
supportedPlatforms |
Platform flags | Control where join buttons appear |
See below for examples of how to set these fields in your code.
Customizing Rich Presence
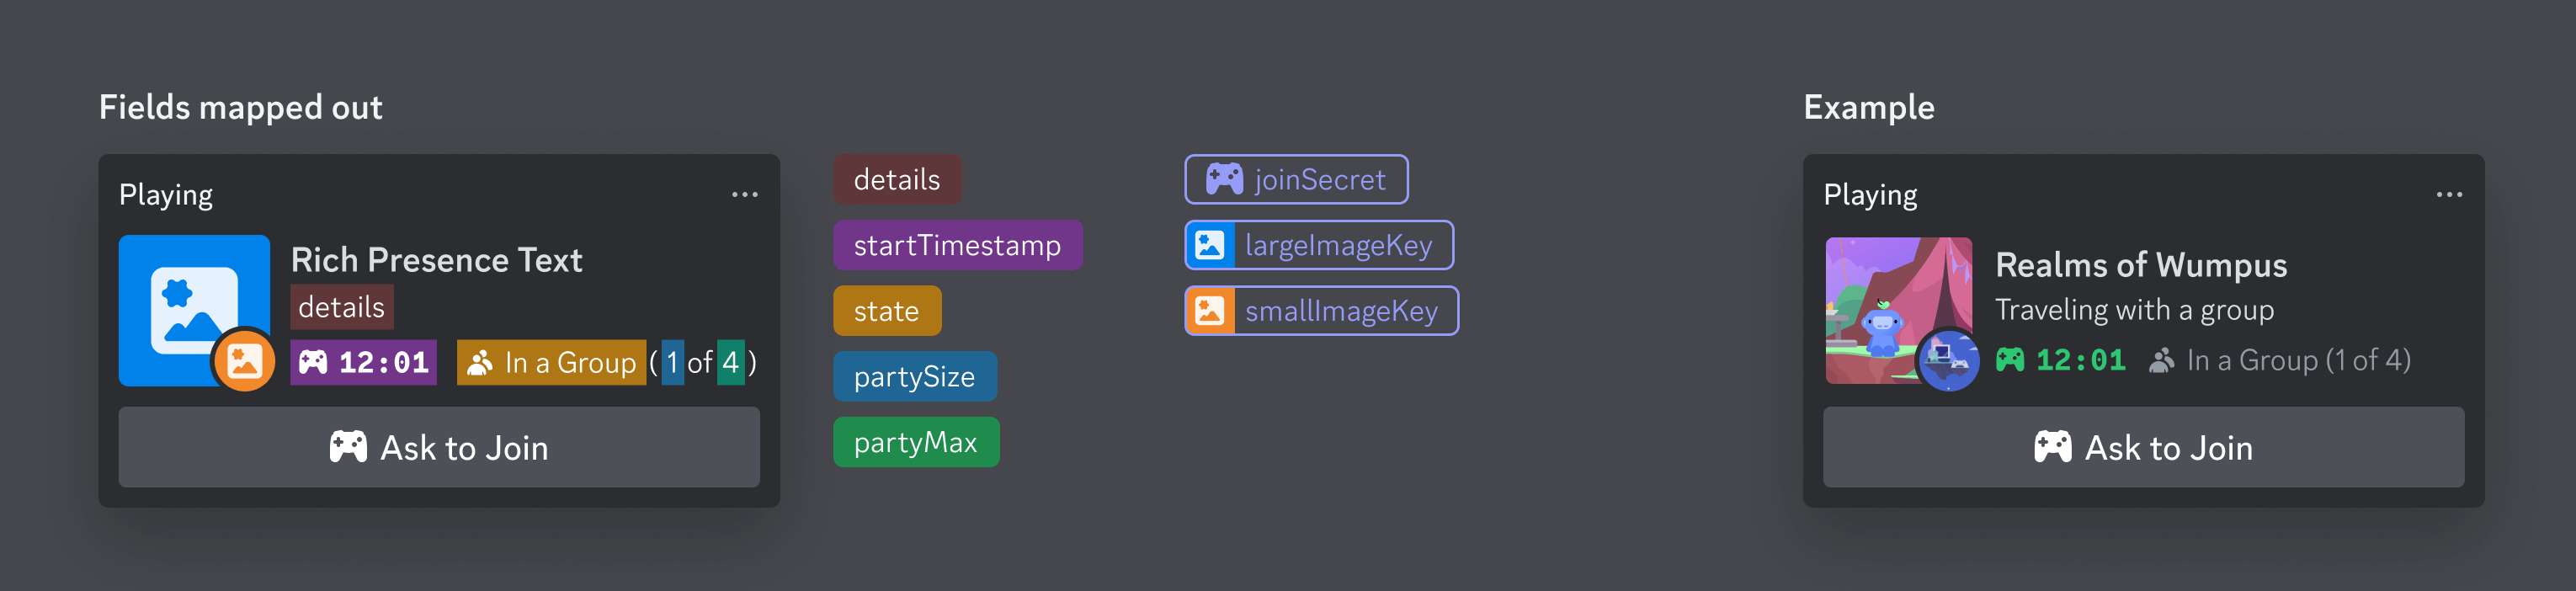
Section titled “Customizing Rich Presence”When displayed in Discord, Rich Presence has three main components:
Playing "Your Game Name"          <- Line 1: Game name (automatic)
Capture the Flag | 2 - 1          <- Line 2: Details field
In a group (2 of 3)               <- Line 3: State + Party info
You can control how lines 2 and 3 are rendered in Discord, here's the breakdown:
- Line 1,
Playing "game name"is powered by the name of your game (or application) on Discord. - Line 2,
Capture the flag | 2 - 1is powered by thedetailsfield in the activity, and this should generally try to describe what the player is currently doing. You can even include dynamic data such as a match score here. - Line 3,
In a group (2 of 3)describes the party the player is in. "Party" is used to refer to a group of players in a shared context, such as a lobby, server, team, etc. The first half,In a groupis powered by the state field in the activity, and the second half,(2 of 3)is powered by the party field in the activity and describes how many people are in the current party and how big the party can get.
This diagram visually shows the field mapping:
Setting an Invite Image
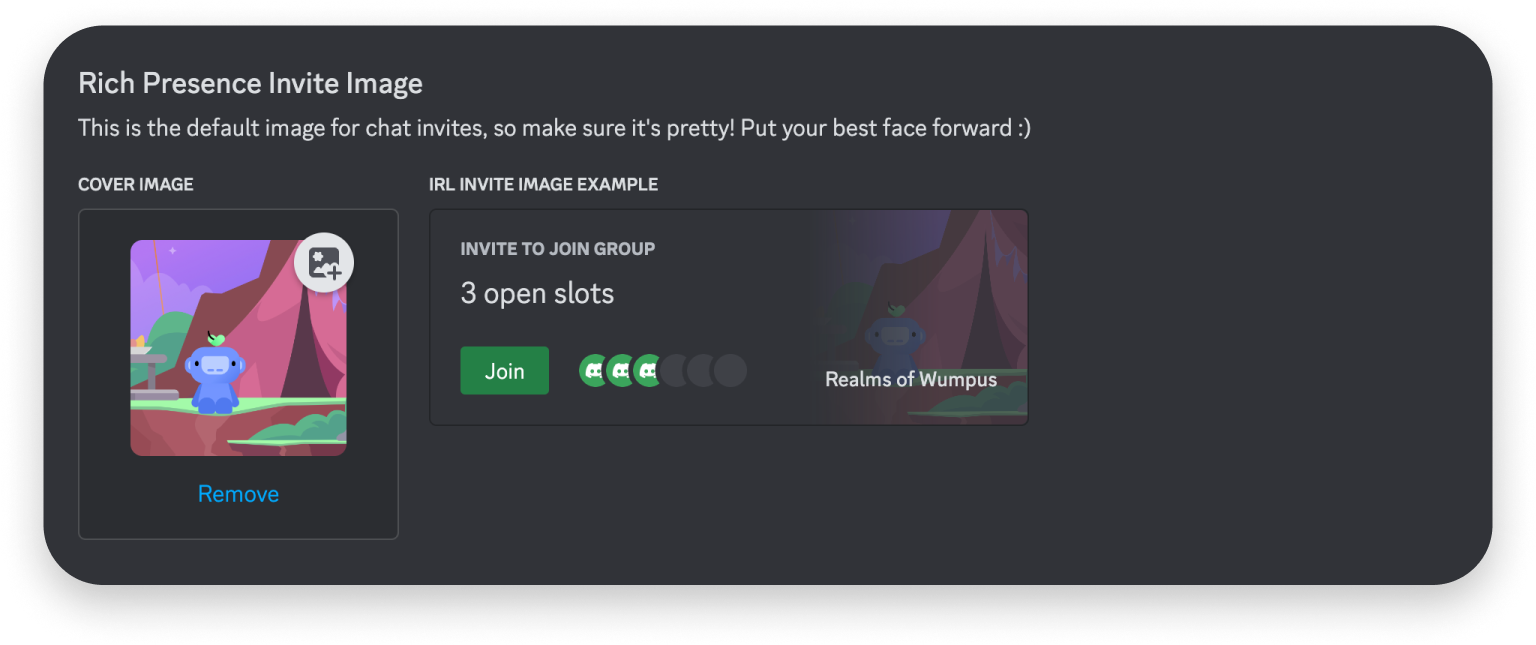
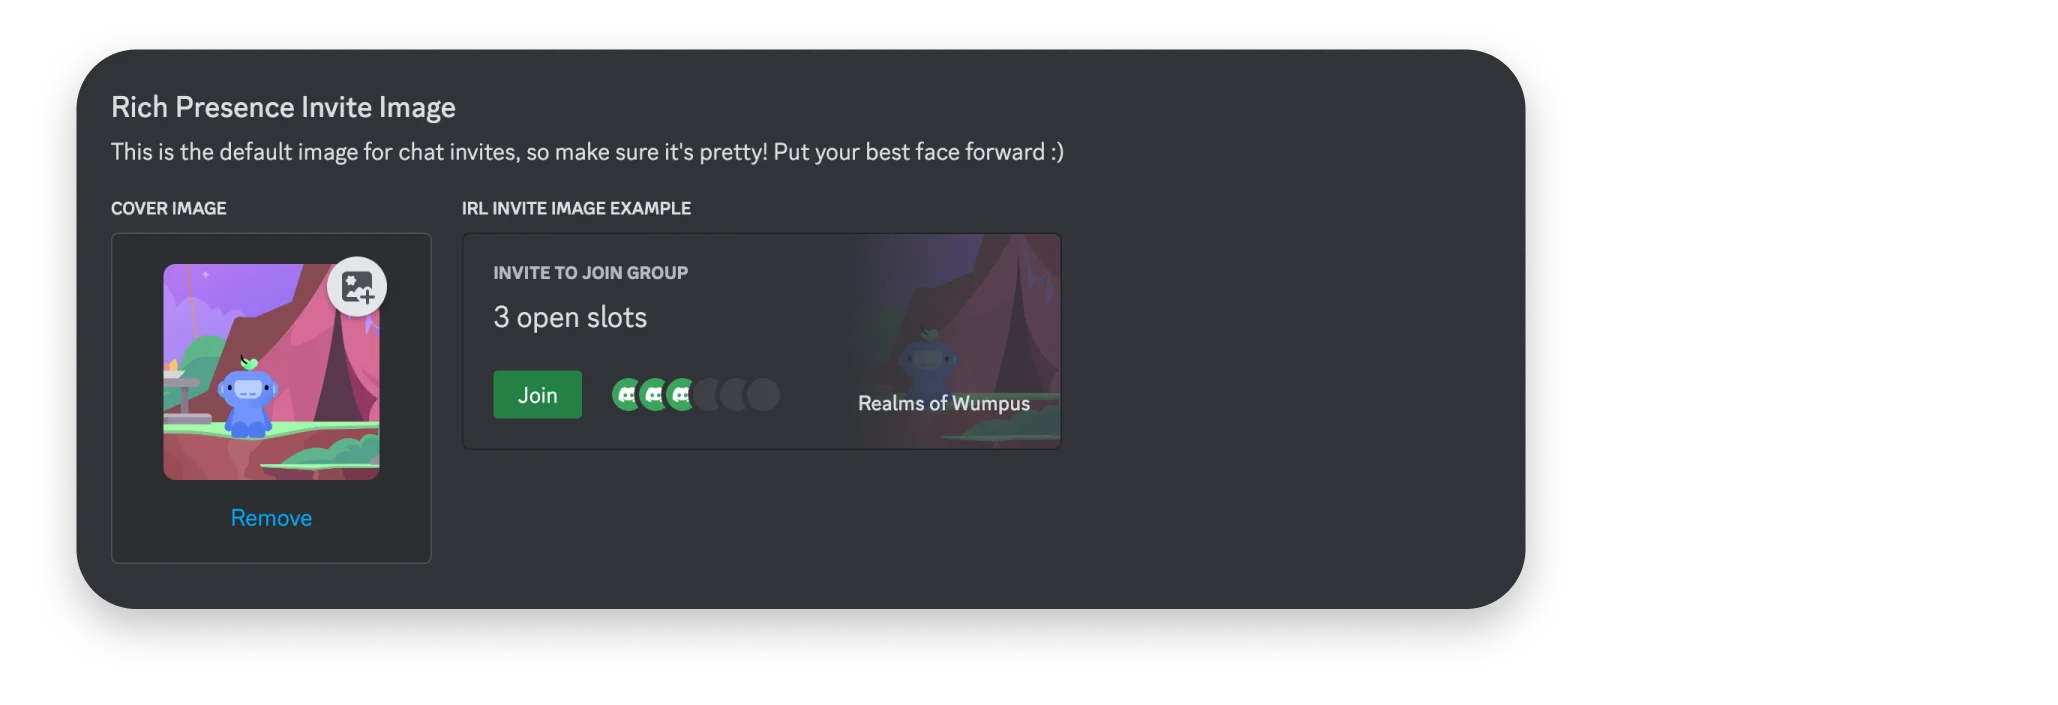
Section titled “Setting an Invite Image”The Rich Presence invite image appears when invites are sent for a 3rd party game or app using the Discord Social SDK. After uploading an invite image for your app, you can see a preview of it to the right (under "IRL Invite Image Example").
Uploading Assets
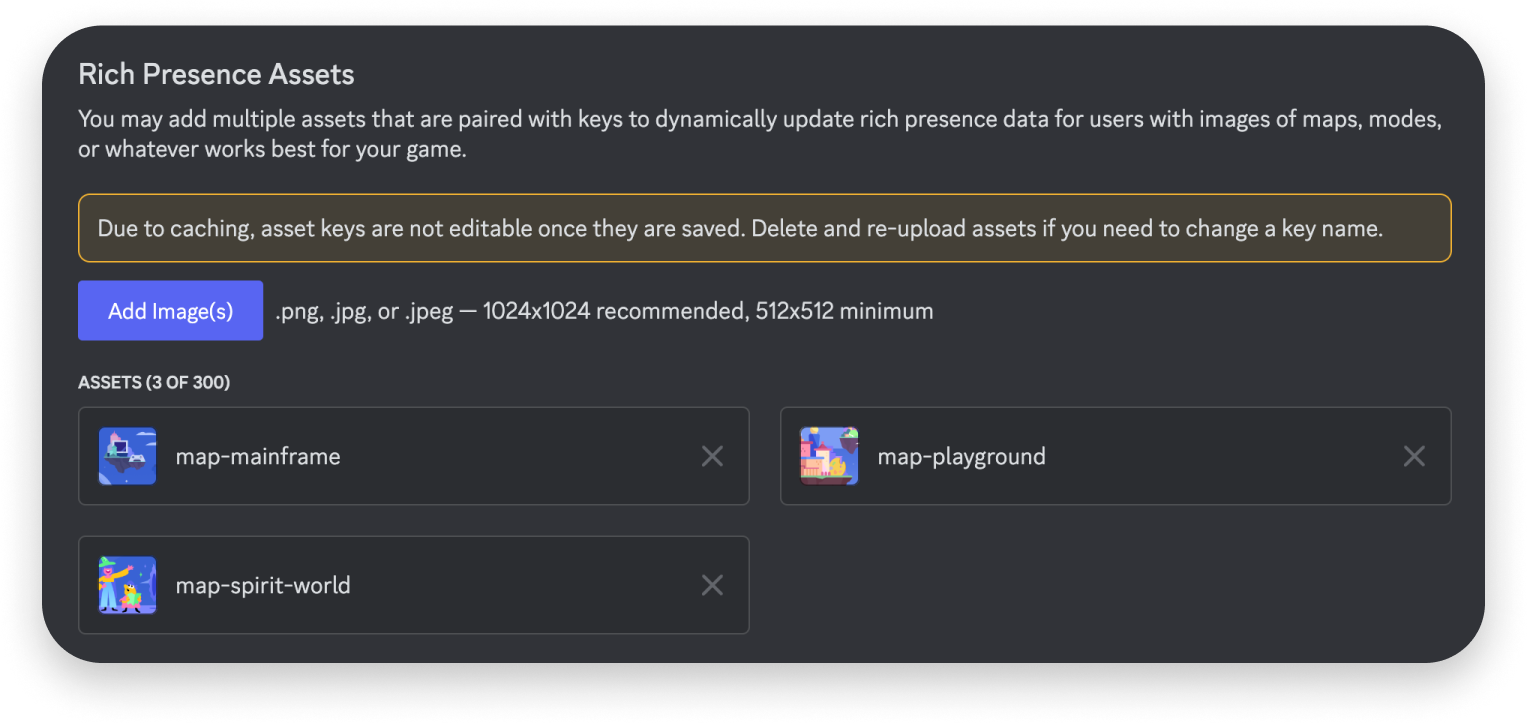
Section titled “Uploading Assets”While integrating Rich Presence, you'll likely want to upload custom art assets for your app. For all Rich Presence assets, it's highly recommended to make them 1024 x 1024.
To add custom assets for Rich Presence, navigate to your app's settings and click Rich Presence on the left-hand sidebar. On the Art Assets page, you can upload two different types of assets.
Up to 300 custom assets can be added to your app for later use when setting Rich Presence for a Discord user. These assets can be anything that help orient others to what a user is doing inside of your Activity or 3rd party game.
If you need more than 300 custom assets or want to use images stored somewhere else, you can also specify an external URL as long it still has the proper dimensions and size. Unlike uploaded assets, external URLs also support GIF, animated WebP, and AVIF.
When uploading Rich Presence assets, the asset keys will automatically be changed to lowercase. You can see this reflected in your app's settings after saving a newly uploaded asset, and you should keep it in mind when referencing any asset keys in your code.
Once you've uploaded these assets, you can use the asset key to reference them in your code when Setting Assets in Rich Presence.
Setting Details and State
Section titled “Setting Details and State”Here's a simple example setting the details and state of a Rich Presence activity:
// Create a new activity
discordpp::Activity activity;
activity.SetType(discordpp::ActivityTypes::Playing);
activity.SetDetails("Battle Creek");
activity.SetState("In Competitive Match");

// Update the presence
client->UpdateRichPresence(activity, [](discordpp::ClientResult result) {
  if (result.Successful()) {
    std::cout << "✅ Rich presence updated!\n";
  }
});
Setting the Application Name
Section titled “Setting the Application Name”By default, Rich Presence displays your application's name as it's registered on Discord (the top line of Rich Presence, e.g. Playing "My Game: Chapter Two"). You can override this displayed name by setting the name field on the activity with Activity::SetName before calling Client::UpdateRichPresence:
// Override the displayed application name (top line of Rich Presence)
activity.SetName("My Game: Chapter Two");Setting Timestamps
Section titled “Setting Timestamps”You can include timestamps in your Rich Presence to display a live timer, such as how long a player has been in their current activity or how much time is left in a timed match. Timestamps are ActivityTimestamps set as Unix timestamps in seconds.
The direction of the timer is determined by which field you set:
- Set the start time only to count up and show elapsed time (e.g.
12:34 elapsed). - Set the end time to count down and show the remaining time (e.g.
12:34 left).
Count up (elapsed time)
Section titled “Count up (elapsed time)”To show how long the player has been in the activity, set ActivityTimestamps::SetStart to a time in the past, such as the current time. The timer counts up from that point.
// Counting up: elapsed time since the activity started
discordpp::ActivityTimestamps timestamps;
// time(nullptr) returns the current Unix time in seconds, so the timer starts now
timestamps.SetStart(time(nullptr));
activity.SetTimestamps(timestamps);
Count down (time remaining)
Section titled “Count down (time remaining)”To show how long until a timed activity ends, set ActivityTimestamps::SetEnd to a time in the future. The timer counts down to that point.
// Counting down: time remaining until the activity ends (one hour from now)
discordpp::ActivityTimestamps timestamps;
// time(nullptr) is the current Unix time in seconds; + 3600 sets the end one hour from now
timestamps.SetEnd(time(nullptr) + 3600);
activity.SetTimestamps(timestamps);
Setting Assets
Section titled “Setting Assets”Once you've uploaded assets to your app, you can reference them using their asset key in your code to set custom artwork in Rich Presence. Here's an example of an asset with the key of "map-mainframe", "tank-avatar", and "invite-cover-image":
// Setting Activity Assets
discordpp::ActivityAssets assets;
assets.SetLargeImage("map-mainframe");
assets.SetLargeText("Mainframe");
assets.SetSmallImage("tank-avatar");
assets.SetSmallText("Tank");
assets.SetInviteCoverImage("invite-cover-image"); // Used for Game Invites
activity.SetAssets(assets);Setting Field URLs
Section titled “Setting Field URLs”You can set URLs for details, state, assets.large_image and assets.small_image in Rich Presence. When present, these URLs will make the corresponding image/text into clickable links.
activity.SetState("Playing on Mainframe");
activity.SetStateUrl("https://example.com/maps/mainframe");
activity.SetDetails("Rank #1337 in global leaderboard");
activity.SetDetailsUrl("https://example.com/leaderboard/global");

discordpp::ActivityAssets assets;
assets.SetLargeImage("map-mainframe");
assets.SetLargeText("Mainframe");
assets.SetLargeUrl("https://example.com/maps/mainframe");
assets.SetSmallImage("tank-avatar");
assets.SetSmallText("Tank");
assets.SetSmallUrl("https://example.com/classes/tank");

activity.SetAssets(assets);
Setting Buttons
Section titled “Setting Buttons”You can add up to two custom buttons to a player's Rich Presence. Each button has a label and a URL, making them a direct call to action for anyone viewing the presence — link out to your game's store page, website, or community server.
discordpp::ActivityButton buyButton;
buyButton.SetLabel("Buy On Steam!");
buyButton.SetUrl("https://store.steampowered.com/app/AppID/GameName/");

discordpp::ActivityButton communityButton;
communityButton.SetLabel("Join the Community!");
communityButton.SetUrl("https://discord.gg/your-discord-url-or-id");

activity.AddButton(buyButton);
activity.AddButton(communityButton);ActivityButton buyButton = new ActivityButton();
buyButton.SetLabel("Buy On Steam!");
buyButton.SetUrl("https://store.steampowered.com/app/AppID/GameName/");
ActivityButton communityButton = new ActivityButton();
communityButton.SetLabel("Join the Community!");
communityButton.SetUrl("https://discord.gg/your-discord-url-or-id");
activity.AddButton(buyButton);
activity.AddButton(communityButton);UDiscordActivityButton* BuyButton = NewObject<UDiscordActivityButton>();
BuyButton->Init();
BuyButton->SetLabel("Buy On Steam!");
BuyButton->SetUrl("https://store.steampowered.com/app/AppID/GameName/");
UDiscordActivityButton* CommunityButton = NewObject<UDiscordActivityButton>();
CommunityButton->Init();
CommunityButton->SetLabel("Join the Community!");
CommunityButton->SetUrl("https://discord.gg/your-discord-url-or-id");
Activity->AddButton(BuyButton);
Activity->AddButton(CommunityButton);Configuring Status Text
Section titled “Configuring Status Text”By default, Rich Presence will display the game's name in the user's status text. You can override this behavior by setting a status display type.
// uses the game's name in the status text (default)
activity.SetStatusDisplayType(discordpp::StatusDisplayTypes::Name);

// uses the activity's state field in the status text
activity.SetStatusDisplayType(discordpp::StatusDisplayTypes::State);

// uses the activity's details field in the status text
activity.SetStatusDisplayType(discordpp::StatusDisplayTypes::Details);
Setting Party and Join Secret
Section titled “Setting Party and Join Secret”You can also include party details and a join secret in your Rich Presence to power Game Invites. Check out the Game Invites guide for more information.
// Setting Party Details
discordpp::ActivityParty party;
party.SetId("party1234");
party.SetCurrentSize(1);
party.SetMaxSize(5);
activity.SetParty(party);

// Setting Join Secret details
discordpp::ActivitySecrets secrets;
secrets.SetJoin("your-join-secret");
activity.SetSecrets(secrets);
Setting Supported Platforms
Section titled “Setting Supported Platforms”You can set the supported platforms for your game in Rich Presence. This will control where the join buttons appear in Discord.
If you only want the join button to appear on desktop, you can set the supported platforms like this:
activity.SetSupportedPlatforms(discordpp::ActivityGamePlatforms::Desktop);See the ActivityGamePlatforms enum for all supported platforms.
Rich Presence Without Authentication
Section titled “Rich Presence Without Authentication”Unlike most other features of the Discord Social SDK, Rich Presence can be set without authentication. Instead of
using Client::Connect to authenticate with Discord, you can use Rich Presence functionality by directly communicating
with a running Discord client through RPC (Remote Procedure Call).
Requirements
Section titled “Requirements”- The Discord desktop client must be running on the user's machine, or — on Android — the Discord app must be installed and signed in
- Your application must be registered with Discord and have a valid Application ID
This direct approach makes Rich Presence integration much simpler for developers who only need basic presence functionality while a Discord client is available.
Setting Up Direct Rich Presence
Section titled “Setting Up Direct Rich Presence”To use Rich Presence without authentication, simply:
- Set your application ID using
Client::SetApplicationId - Configure your activity details
- Call
Client::UpdateRichPresence
auto client = std::make_shared<discordpp::Client>();

// Set the application ID (no Connect() call needed)
client->SetApplicationId(APPLICATION_ID);

// Configure rich presence details
discordpp::Activity activity;
activity.SetType(discordpp::ActivityTypes::Playing);
activity.SetState("In Competitive Match");
activity.SetDetails("Rank: Diamond II");

// Update rich presence
client->UpdateRichPresence(
    activity, [](const discordpp::ClientResult &result) {
      if (result.Successful()) {
        std::cout << "🎮 Rich Presence updated successfully!\n";
      } else {
        std::cerr << "❌ Rich Presence update failed";
      }
    });
Next Steps
Section titled “Next Steps”Now that you've set up Rich Presence, you might want to explore:
Managing Game Invites
Allow players to invite friends to join their game session or party.
Managing Lobbies
Bring players together in a shared lobby with invites, text chat, and voice comms.
Design Guidelines for Rich Presence
Best practices for Rich Presence UI/UX.
Need help? Join the Discord Developers Server and share questions in the #social-sdk-dev-help channel for support from the community.
If you encounter a bug while working with the Social SDK, please report it here: https://dis.gd/social-sdk-bug-report
Change Log
Section titled “Change Log”| Date | Changes |
|---|---|
| August 3, 2026 | Added Android support for Rich Presence without authentication |
| June 24, 2026 | Clarified count-up vs count-down timestamps |
| June 5, 2026 | Added Setting the Application Name section |
| March 31, 2026 | Added Setting Buttons section |
| March 17, 2025 | Initial release |