Getting Started with C++ and the Discord Social SDK
Overview
Section titled “Overview”This guide will walk you through integrating the Discord Social SDK into a new standalone C++ project. By the end, you'll have an application that can:
- Authenticate users with Discord
- Set up logging and status monitoring
- Start the SDK and establish a connection
- Request the number of Discord friends the player has
- Set the player's rich presence for your game
Prerequisites
Section titled “Prerequisites”We are going to make a simple C++ console application for this guide. Make sure you have the following prerequisites:
- Basic understanding of C++ and your platform's build system
- C++ Compiler and Build System that supports C++20 or greater.
- A network connection that can access Discord's API endpoints.
Let's walk through the steps in detail.
Step 1: Create a Discord Developer Team
Section titled “Step 1: Create a Discord Developer Team”Before you start, you'll need to create a developer team on the Discord Developer Portal. This team will be used to manage your Discord applications and SDK integrations.
If you already have a team configured, you can skip this step.
- Create a developer team on the Discord Developer Portal.
Later, you can invite your team members to your new team to collaborate on your integration.
Step 2: Create a Discord Application
Section titled “Step 2: Create a Discord Application”- Create a new application on the Discord Developer Portal and assign it to your team.
- Add a redirect URL in the OAuth2 tab:
- For desktop applications:
http://127.0.0.1/callback(this can be changed later). - See
discordpp::Client::Authorizefor more details on setting up more advanced redirect URIs.
- For desktop applications:
- Enable the
Public Clienttoggle in the OAuth2 tab.
Step 3: Enable Discord Social SDK for Your App
Section titled “Step 3: Enable Discord Social SDK for Your App”Once you've created your Discord application, you'll need to enable the Discord Social SDK for it.
- From the Discord Developer Portal, select your newly created application from Step 2.
- In the left sidebar for your app, locate and click the Getting Started link under
Discord Social SDK. - Fill out the form to share details about your game.
- Click
Submitand the Social SDK will be enabled for your application. - Once enabled, you'll find binaries for the Social SDK under Downloads.
Step 4: Download the Discord SDK for C++
Section titled “Step 4: Download the Discord SDK for C++”- Click on the Downloads link under the Discord Social SDK section of the sidebar.
- Select the latest version from the version dropdown and download the SDK for C++.
Runtime Dependencies
Section titled “Runtime Dependencies”When shipping with the Social SDK, ensure you bundle the runtime dependencies:
- Windows: Ensure
discord_partner_sdk.dllis in your executable directory. - Linux/macOS: Make sure the
libdiscord_partner_sdk.so/libdiscord_partner_sdk.dylibfiles are accessible viaLD_LIBRARY_PATHor placed next to your binary.
Step 5: Project Setup
Section titled “Step 5: Project Setup”To utilize the Discord Social SDK with C++, the following requirements must be met:
discordpp.his included in your C++ source code.- The appropriate SDK libraries for your platform are linked in your build system:
- Windows:
discord_partner_sdk.dll - Linux:
libdiscord_partner_sdk.so - macOS:
libdiscord_partner_sdk.dylib
- Windows:
All of which can be found in the SDK download archive.
Let's see this in action by starting with a folder for our project and the Social SDK dependency:
mkdir MyGame
cd MyGame
mkdir lib
Unzip the Social SDK archive into the lib directory. You should end up with a discord_social_sdk folder under lib when complete.
Within the MyGame directory, create a CMakeLists.txt file:
touch CMakeLists.txtAdd the following contents to the CMakeLists.txt file to set up the Social SDK dependency appropriately for your operating system:
cmake_minimum_required(VERSION 3.10)
project(DiscordSDKExample)

set(CMAKE_CXX_STANDARD 20)
set(CMAKE_CXX_STANDARD_REQUIRED True)

add_executable(DiscordSDKExample main.cpp)

# Define some handy Social SDK variables
set(DISCORD_SDK_ROOT "${CMAKE_SOURCE_DIR}/lib/discord_social_sdk")
set(DISCORD_SDK_LIB_DIR "${DISCORD_SDK_ROOT}/lib/release")
set(DISCORD_SDK_BIN_DIR "${DISCORD_SDK_ROOT}/bin/release")
set(DISCORD_SDK_INCLUDE_DIR "${DISCORD_SDK_ROOT}/include")

# Include for Social SDK headers
target_include_directories(DiscordSDKExample PRIVATE ${DISCORD_SDK_INCLUDE_DIR})

# Platform-specific Social SDK library paths
if(WIN32)
    set(DISCORD_LIB_PATH "${DISCORD_SDK_LIB_DIR}/discord_partner_sdk.lib")
    set(DISCORD_SHARED_LIB "${DISCORD_SDK_BIN_DIR}/discord_partner_sdk.dll")
elseif(APPLE)
    set(DISCORD_LIB_PATH "${DISCORD_SDK_LIB_DIR}/libdiscord_partner_sdk.dylib")
    set(DISCORD_SHARED_LIB "${DISCORD_SDK_LIB_DIR}/libdiscord_partner_sdk.dylib")
else() # Linux
    set(DISCORD_LIB_PATH "${DISCORD_SDK_LIB_DIR}/libdiscord_partner_sdk.so")
    set(DISCORD_SHARED_LIB "${DISCORD_SDK_LIB_DIR}/libdiscord_partner_sdk.so")
endif()

# Link the Social SDK library
target_link_libraries(DiscordSDKExample PRIVATE ${DISCORD_LIB_PATH})

# Set the runtime search path (RPATH) for Linux and macOS
if(UNIX)
    # Use RPATH when building
    set(CMAKE_BUILD_WITH_INSTALL_RPATH TRUE)
    # Set the RPATH to use the lib directory relative to the executable
    set(CMAKE_INSTALL_RPATH "$ORIGIN")
    if(APPLE)
        set(CMAKE_INSTALL_RPATH "@executable_path")
    endif()
endif()

# Copy Social SDK shared library to output directory, so it's available at runtime.
add_custom_command(TARGET DiscordSDKExample POST_BUILD
    COMMAND ${CMAKE_COMMAND} -E copy_if_different
    "${DISCORD_SHARED_LIB}"
    $<TARGET_FILE_DIR:DiscordSDKExample>
)
Create a main.cpp file:
touch main.cppLet's add the following code to main.cpp:
#define DISCORDPP_IMPLEMENTATION
#include "discordpp.h"
#include <iostream>
#include <thread>
#include <atomic>
#include <string>
#include <functional>
#include <csignal>

// Replace with your Discord Application ID
const uint64_t APPLICATION_ID = 123456789012345678;

// Create a flag to stop the application
std::atomic<bool> running = true;

// Signal handler to stop the application
void signalHandler(int signum) {
  running.store(false);
}

int main() {
  std::signal(SIGINT, signalHandler);
  std::cout << "🚀 Initializing Discord SDK...\n";

  // Create our Discord Client
  auto client = std::make_shared<discordpp::Client>();

  // Keep application running to allow SDK to receive events and callbacks
  while (running) {
      std::this_thread::sleep_for(std::chrono::milliseconds(10));
  }

  return 0;
}
Compile and run the project:
mkdir build && cd build
cmake ..
cmake --build .
./DiscordSDKExample
Although we've not done much yet other than create an instance of the client, you should see the following output printed to the console:
🚀 Initializing Discord SDK...Troubleshooting
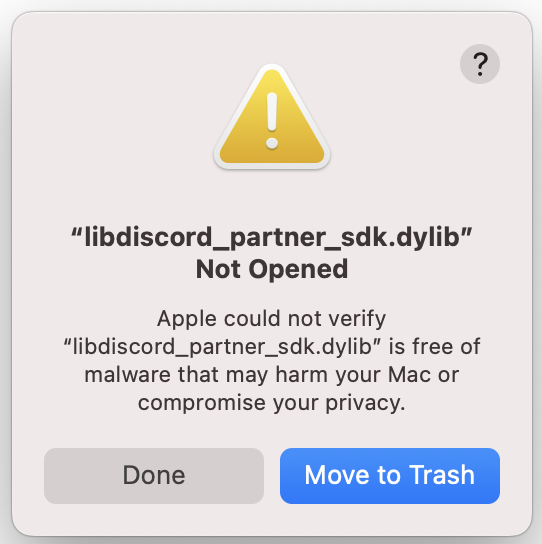
Section titled “Troubleshooting”Mac libdiscord_partner_sdk.dylib Not Opened
On Mac you may get the error "libdiscord_partner_sdk.dylib" Not Opened because Apple couldn't verify it. If this happens press Done on the popup.
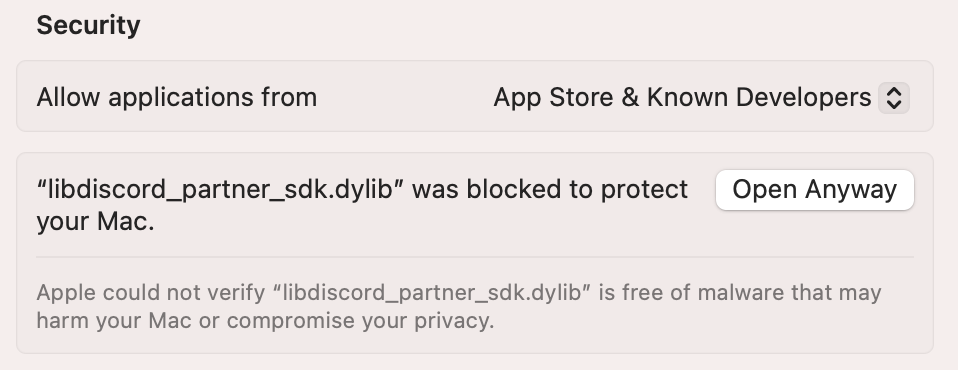
You'll need to open your System Settings > Privacy & Security and scroll down to the Security section. It will tell you "libdiscord_partner_sdk.dylib" was blocked to protect your Mac. Press Open Anyway and try running again.
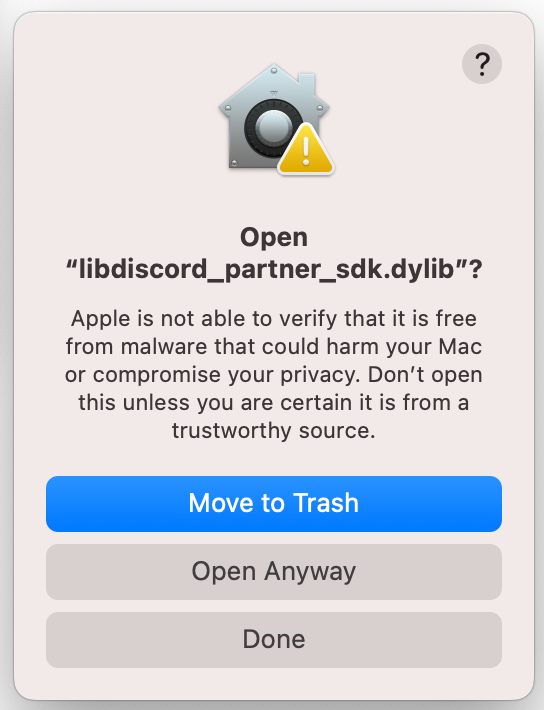
Now when you get the pop up you'll have the option to select Open Anyway and it will be able to use it successfully.
Step 6: Setting Up SDK Event Handling
Section titled “Step 6: Setting Up SDK Event Handling”Let's add some event handlers to monitor what's happening with our Discord connection. We'll set up two important callbacks:
- A logging callback to see what the SDK is doing
- A status callback to know when we can start using Discord features
Adding Logging Support
Section titled “Adding Logging Support”First, let's add logging so we can see what's happening:
client->AddLogCallback([](auto message, auto severity) {
  std::cout << "[" << EnumToString(severity) << "] " << message << std::endl;
}, discordpp::LoggingSeverity::Info);
Monitoring Connection Status
Section titled “Monitoring Connection Status”Next, let's add a status callback that tells us when we're ready to use Discord features:
client->SetStatusChangedCallback([client](discordpp::Client::Status status, discordpp::Client::Error error, int32_t errorDetail) {
  std::cout << "🔄 Status changed: " << discordpp::Client::StatusToString(status) << std::endl;

  if (status == discordpp::Client::Status::Ready) {
    std::cout << "✅ Client is ready! You can now call SDK functions.\n";
  } else if (error != discordpp::Client::Error::None) {
    std::cerr << "❌ Connection Error: " << discordpp::Client::ErrorToString(error) << " - Details: " << errorDetail << std::endl;
  }
});
main.cpp with event handling
#define DISCORDPP_IMPLEMENTATION
#include "discordpp.h"
#include <iostream>
#include <thread>
#include <atomic>
#include <string>
#include <functional>
#include <csignal>

// Replace with your Discord Application ID
const uint64_t APPLICATION_ID = 123456789012345678;

// Create a flag to stop the application
std::atomic<bool> running = true;

// Signal handler to stop the application
void signalHandler(int signum) {
    running.store(false);
}

int main() {
    std::signal(SIGINT, signalHandler);
    std::cout << "🚀 Initializing Discord SDK...\n";

    // Create Discord Client
    auto client = std::make_shared<discordpp::Client>();

    // Set up logging callback
    client->AddLogCallback([](auto message, auto severity) {
      std::cout << "[" << EnumToString(severity) << "] " << message << std::endl;
    }, discordpp::LoggingSeverity::Info);

    // Set up status callback to monitor client connection
    client->SetStatusChangedCallback([client](discordpp::Client::Status status, discordpp::Client::Error error, int32_t errorDetail) {
      std::cout << "🔄 Status changed: " << discordpp::Client::StatusToString(status) << std::endl;

      if (status == discordpp::Client::Status::Ready) {
        std::cout << "✅ Client is ready! You can now call SDK functions.\n";
      } else if (error != discordpp::Client::Error::None) {
        std::cerr << "❌ Connection Error: " << discordpp::Client::ErrorToString(error) << " - Details: " << errorDetail << std::endl;
      }
    });

    // Keep application running to allow SDK to receive events and callbacks
    while (running) {
      std::this_thread::sleep_for(std::chrono::milliseconds(10));
    }

    return 0;
}What These Callbacks Do
Section titled “What These Callbacks Do”- The logging callback shows you what's happening behind the scenes
- The status callback tells you when you're connected and ready to use Discord features
To get to a [Client::Status::Ready] state, we need to authenticate with Discord. We'll do that shortly.
Step 7: Run Callbacks
Section titled “Step 7: Run Callbacks”Once you've registered callbacks with the SDK, you'll need to execute them in the event loop of your program. Add something like this to your game's main event loop or tick function.
Let's add RunCallbacks to our main loop:
 // Keep application running to allow SDK to receive events and callbacks
  while (running) {
    discordpp::RunCallbacks();
    std::this_thread::sleep_for(std::chrono::milliseconds(10));
  }
Step 8: Account Linking with Discord
Section titled “Step 8: Account Linking with Discord”In this step, we'll implement OAuth2 authentication to support account-linking with Discord. This process will:
- Open the Discord app or a browser window for Discord login
- Get an authorization code
- Exchange it for an access token
- Connect to Discord
Add the Authentication Code
Section titled “Add the Authentication Code”Add this code to your main.cpp after setting up the status callback:
// Generate OAuth2 code verifier for authentication
auto codeVerifier = client->CreateAuthorizationCodeVerifier();

// Set up authentication arguments
discordpp::AuthorizationArgs args{};
args.SetClientId(APPLICATION_ID);
args.SetScopes(discordpp::Client::GetDefaultPresenceScopes());
args.SetCodeChallenge(codeVerifier.Challenge());

// Begin authentication process
client->Authorize(args, [client, codeVerifier](auto result, auto code, auto redirectUri) {
  if (!result.Successful()) {
    std::cerr << "❌ Authentication Error: " << result.Error() << std::endl;
    return;
  } else {
    std::cout << "✅ Authorization successful! Getting access token...\n";

    // Exchange auth code for access token
    client->GetToken(APPLICATION_ID, code, codeVerifier.Verifier(), redirectUri,
      [client](discordpp::ClientResult result,
      std::string accessToken,
      std::string refreshToken,
      discordpp::AuthorizationTokenType tokenType,
      int32_t expiresIn,
      std::string scope) {
        std::cout << "🔓 Access token received! Establishing connection...\n";
        // Next Step: Update the token and connect
    });
  }
});
What's Happening Here?
Section titled “What's Happening Here?”- We create a code verifier for OAuth2 PKCE security
- Set up authorization arguments with your app ID and required scopes
- Start the auth flow with
Client::Authorize, which opens a browser - When authorized, we exchange the code for an access token
Testing It Out
Section titled “Testing It Out”- Build and run your program
- A browser window should open asking you to authorize your app
- After authorizing, watch the console for the "🔓 Access token received!" message
If you run into any issues:
- Double check your APPLICATION_ID is correct
- Ensure you've added the redirect URL in your Discord Developer Portal
- Check the console for specific error messages
main.cpp with Account Linking
#define DISCORDPP_IMPLEMENTATION
#include "discordpp.h"
#include <iostream>
#include <thread>
#include <atomic>
#include <string>
#include <functional>
#include <csignal>

// Replace with your Discord Application ID
const uint64_t APPLICATION_ID = 123456789012345678;

// Create a flag to stop the application
std::atomic<bool> running = true;

// Signal handler to stop the application
void signalHandler(int signum) {
    running.store(false);
}

int main() {
    std::signal(SIGINT, signalHandler);
    std::cout << "🚀 Initializing Discord SDK...\n";

    // Create our Discord Client
    auto client = std::make_shared<discordpp::Client>();

    // Set up logging callback
    client->AddLogCallback([](auto message, auto severity) {
      std::cout << "[" << EnumToString(severity) << "] " << message << std::endl;
    }, discordpp::LoggingSeverity::Info);

    // Set up status callback to monitor client connection
    client->SetStatusChangedCallback([client](discordpp::Client::Status status, discordpp::Client::Error error, int32_t errorDetail) {
      std::cout << "🔄 Status changed: " << discordpp::Client::StatusToString(status) << std::endl;

      if (status == discordpp::Client::Status::Ready) {
        std::cout << "✅ Client is ready! You can now call SDK functions.\n";
      } else if (error != discordpp::Client::Error::None) {
        std::cerr << "❌ Connection Error: " << discordpp::Client::ErrorToString(error) << " - Details: " << errorDetail << std::endl;
      }
    });

    // Generate OAuth2 code verifier for authentication
    auto codeVerifier = client->CreateAuthorizationCodeVerifier();

    // Set up authentication arguments
    discordpp::AuthorizationArgs args{};
    args.SetClientId(APPLICATION_ID);
    args.SetScopes(discordpp::Client::GetDefaultPresenceScopes());
    args.SetCodeChallenge(codeVerifier.Challenge());

    // Begin authentication process
    client->Authorize(args, [client, codeVerifier](auto result, auto code, auto redirectUri) {
      if (!result.Successful()) {
        std::cerr << "❌ Authentication Error: " << result.Error() << std::endl;
        return;
      } else {
        std::cout << "✅ Authorization successful! Getting access token...\n";

        // Exchange auth code for access token
        client->GetToken(APPLICATION_ID, code, codeVerifier.Verifier(), redirectUri,
          [client](discordpp::ClientResult result,
          std::string accessToken,
          std::string refreshToken,
          discordpp::AuthorizationTokenType tokenType,
          int32_t expiresIn,
          std::string scope) {
            std::cout << "🔓 Access token received! Establishing connection...\n";
            // Next Step: Update the token and connect
        });
      }
    });

    // Keep application running to allow SDK to receive events and callbacks
    while (running) {
      discordpp::RunCallbacks();
      std::this_thread::sleep_for(std::chrono::milliseconds(10));
    }

    return 0;
}
Step 9: Connect the SDK to Discord
Section titled “Step 9: Connect the SDK to Discord”Now that we have our access token, let's connect to Discord! This involves two steps:
- Updating the SDK with our access token with
Client::UpdateToken. - Establishing the connection with
Client::Connect.
Find the comment // Next Step: Update the token and connect within client->UpdateToken(), and add the
following code after:
// Next Step: Update the token and connect
client->UpdateToken(discordpp::AuthorizationTokenType::Bearer,  accessToken, [client](discordpp::ClientResult result) {
  if(result.Successful()) {
    std::cout << "🔑 Token updated, connecting to Discord...\n";
    client->Connect();
  }
});
What's Happening Here?
Section titled “What's Happening Here?”client->UpdateToken()tells the SDK to use our access token for Discord API calls- Once the token is updated, we call
client->Connect()in the callback - The SDK will begin connecting asynchronously
- Our status callback (from Step 6) will tell us when we're ready
Testing the Connection
Section titled “Testing the Connection”- Run your program
- Watch for these status messages in order:
- "🔑 Token updated, connecting to Discord..."
- "🔄 Status changed: Connecting" (also "Connected" and "Ready")
- "✅ Client is ready! You can now call SDK functions."
Troubleshooting
Section titled “Troubleshooting”If you don't see "Ready" status:
- Check that your access token is valid
- Ensure you have internet connectivity
- Look for error messages in the status callback
- Verify your
APPLICATION_IDis correct
Now that your client is in a ready state, we can start implementing Discord social features.
main.cpp with SDK connection
#define DISCORDPP_IMPLEMENTATION
#include "discordpp.h"
#include <iostream>
#include <thread>
#include <atomic>
#include <string>
#include <functional>
#include <csignal>

// Replace with your Discord Application ID
const uint64_t APPLICATION_ID = 1349146942634065960;

// Create a flag to stop the application
std::atomic<bool> running = true;

// Signal handler to stop the application
void signalHandler(int signum) {
    running.store(false);
}

int main() {
    std::signal(SIGINT, signalHandler);
    std::cout << "🚀 Initializing Discord SDK...\n";

    // Create our Discord Client
    auto client = std::make_shared<discordpp::Client>();

    // Set up logging callback
    client->AddLogCallback([](auto message, auto severity) {
      std::cout << "[" << EnumToString(severity) << "] " << message << std::endl;
    }, discordpp::LoggingSeverity::Info);

    // Set up status callback to monitor client connection
    client->SetStatusChangedCallback([client](discordpp::Client::Status status, discordpp::Client::Error error, int32_t errorDetail) {
      std::cout << "🔄 Status changed: " << discordpp::Client::StatusToString(status) << std::endl;

      if (status == discordpp::Client::Status::Ready) {
        std::cout << "✅ Client is ready! You can now call SDK functions.\n";
      } else if (error != discordpp::Client::Error::None) {
        std::cerr << "❌ Connection Error: " << discordpp::Client::ErrorToString(error) << " - Details: " << errorDetail << std::endl;
      }
    });

    // Generate OAuth2 code verifier for authentication
    auto codeVerifier = client->CreateAuthorizationCodeVerifier();

    // Set up authentication arguments
    discordpp::AuthorizationArgs args{};
    args.SetClientId(APPLICATION_ID);
    args.SetScopes(discordpp::Client::GetDefaultPresenceScopes());
    args.SetCodeChallenge(codeVerifier.Challenge());

    // Begin authentication process
    client->Authorize(args, [client, codeVerifier](auto result, auto code, auto redirectUri) {
      if (!result.Successful()) {
        std::cerr << "❌ Authentication Error: " << result.Error() << std::endl;
        return;
      } else {
        std::cout << "✅ Authorization successful! Getting access token...\n";

        // Exchange auth code for access token
        client->GetToken(APPLICATION_ID, code, codeVerifier.Verifier(), redirectUri,
          [client](discordpp::ClientResult result,
          std::string accessToken,
          std::string refreshToken,
          discordpp::AuthorizationTokenType tokenType,
          int32_t expiresIn,
          std::string scope) {
            std::cout << "🔓 Access token received! Establishing connection...\n";
            // Next Step: Update the token and connect
            client->UpdateToken(discordpp::AuthorizationTokenType::Bearer,  accessToken, [client](discordpp::ClientResult result) {
              if(result.Successful()) {
                std::cout << "🔑 Token updated, connecting to Discord...\n";
                client->Connect();
              }
            });
        });
      }
    });

    // Keep application running to allow SDK to receive events and callbacks
    while (running) {
      discordpp::RunCallbacks();
      std::this_thread::sleep_for(std::chrono::milliseconds(10));
    }

    return 0;
}
Step 10: Access Discord Relationships
Section titled “Step 10: Access Discord Relationships”Let's access the user's Discord relationships (friends list) and display the count. This will help you understand how to access and use Discord data in your game.
Within client->SetStatusChangedCallback(), add the following after status == discordpp::Client::Status::Ready
code to view how many friends you have in Discord:
// Access initial relationships data
std::cout << "👥 Friends Count: " << client->GetRelationships().size() << std::endl;
What This Code Does
Section titled “What This Code Does”Client::GetRelationshipsgives you immediate access to the current friend list
Example Output
Section titled “Example Output”👥 Friends Count: 42Testing It Out
Section titled “Testing It Out”- Run your program
- Wait for the initial friend count
Troubleshooting
Section titled “Troubleshooting”If you're not seeing relationship data:
- Verify your OAuth2 scopes include relationships access
- Ensure you're connected (Status::Ready)
- Check that you have friends on Discord
- Look for errors in the logging callback
Next, we'll learn how to show your game's activity on Discord with Rich Presence!
main.cpp with friends count
#define DISCORDPP_IMPLEMENTATION
#include "discordpp.h"
#include <iostream>
#include <thread>
#include <atomic>
#include <string>
#include <functional>
#include <csignal>

// Replace with your Discord Application ID
const uint64_t APPLICATION_ID = 1349146942634065960;

// Create a flag to stop the application
std::atomic<bool> running = true;

// Signal handler to stop the application
void signalHandler(int signum) {
    running.store(false);
}

int main() {
    std::signal(SIGINT, signalHandler);
    std::cout << "🚀 Initializing Discord SDK...\n";

    // Create our Discord Client
    auto client = std::make_shared<discordpp::Client>();

    // Set up logging callback
    client->AddLogCallback([](auto message, auto severity) {
      std::cout << "[" << EnumToString(severity) << "] " << message << std::endl;
    }, discordpp::LoggingSeverity::Info);

    // Set up status callback to monitor client connection
    client->SetStatusChangedCallback([client](discordpp::Client::Status status, discordpp::Client::Error error, int32_t errorDetail) {
      std::cout << "🔄 Status changed: " << discordpp::Client::StatusToString(status) << std::endl;

      if (status == discordpp::Client::Status::Ready) {
        std::cout << "✅ Client is ready! You can now call SDK functions.\n";

        // Access initial relationships data
        std::cout << "👥 Friends Count: " << client->GetRelationships().size() << std::endl;

      } else if (error != discordpp::Client::Error::None) {
        std::cerr << "❌ Connection Error: " << discordpp::Client::ErrorToString(error) << " - Details: " << errorDetail << std::endl;
      }
    });

    // Generate OAuth2 code verifier for authentication
    auto codeVerifier = client->CreateAuthorizationCodeVerifier();

    // Set up authentication arguments
    discordpp::AuthorizationArgs args{};
    args.SetClientId(APPLICATION_ID);
    args.SetScopes(discordpp::Client::GetDefaultPresenceScopes());
    args.SetCodeChallenge(codeVerifier.Challenge());

    // Begin authentication process
    client->Authorize(args, [client, codeVerifier](auto result, auto code, auto redirectUri) {
      if (!result.Successful()) {
        std::cerr << "❌ Authentication Error: " << result.Error() << std::endl;
        return;
      } else {
        std::cout << "✅ Authorization successful! Getting access token...\n";

        // Exchange auth code for access token
        client->GetToken(APPLICATION_ID, code, codeVerifier.Verifier(), redirectUri,
          [client](discordpp::ClientResult result,
          std::string accessToken,
          std::string refreshToken,
          discordpp::AuthorizationTokenType tokenType,
          int32_t expiresIn,
          std::string scope) {
            std::cout << "🔓 Access token received! Establishing connection...\n";
            // Next Step: Update the token and connect
            client->UpdateToken(discordpp::AuthorizationTokenType::Bearer,  accessToken, [client](discordpp::ClientResult result) {
              if(result.Successful()) {
                std::cout << "🔑 Token updated, connecting to Discord...\n";
                client->Connect();
              }
            });
        });
      }
    });

    // Keep application running to allow SDK to receive events and callbacks
    while (running) {
      discordpp::RunCallbacks();
      std::this_thread::sleep_for(std::chrono::milliseconds(10));
    }

    return 0;
}
Step 11: Set Rich Presence
Section titled “Step 11: Set Rich Presence”Let's show your game's activity on Discord using Rich Presence. This feature lets players see what others are doing in your game directly in their Discord friends list.
Add Rich Presence Code
Section titled “Add Rich Presence Code”Right after the line where we called client->GetRelationships() let's add the following code to set the your rich
presence:
// Configure rich presence details
discordpp::Activity activity;
activity.SetType(discordpp::ActivityTypes::Playing);
activity.SetState("In Competitive Match");
activity.SetDetails("Rank: Diamond II");

// Update rich presence
client->UpdateRichPresence(activity, [](discordpp::ClientResult result) {
  if(result.Successful()) {
    std::cout << "🎮 Rich Presence updated successfully!\n";
  } else {
    std::cerr << "❌ Rich Presence update failed";
  }
});
What This Code Does
Section titled “What This Code Does”- Creates an
Activityobject to represent what the player is doing - Sets basic information like:
- The activity type (Playing)
- Current state ("In Competitive Match")
- Additional details ("Rank: Diamond II")
- Updates your rich presence on Discord
Testing It Out
Section titled “Testing It Out”- Run your program
- Watch for the console message "🎮 Rich Presence updated successfully!"
- Check your Discord profile, you should see:
- "Playing [Your Game]"
- "In Competitive Match"
- "Rank: Diamond II"
Troubleshooting
Section titled “Troubleshooting”If you don't see your presence:
- Ensure you're connected ([
Client::Status::Ready]) - Check the callback for error messages
- Verify your activity settings are valid
- Make sure you're not invisible on Discord
main.cpp complete
#define DISCORDPP_IMPLEMENTATION
#include "discordpp.h"
#include <iostream>
#include <thread>
#include <atomic>
#include <string>
#include <functional>
#include <csignal>

// Replace with your Discord Application ID
const uint64_t APPLICATION_ID = 1349146942634065960;

// Create a flag to stop the application
std::atomic<bool> running = true;

// Signal handler to stop the application
void signalHandler(int signum) {
    running.store(false);
}

int main() {
    std::signal(SIGINT, signalHandler);
    std::cout << "🚀 Initializing Discord SDK...\n";

    // Create our Discord Client
    auto client = std::make_shared<discordpp::Client>();

    // Set up logging callback
    client->AddLogCallback([](auto message, auto severity) {
      std::cout << "[" << EnumToString(severity) << "] " << message << std::endl;
    }, discordpp::LoggingSeverity::Info);

    // Set up status callback to monitor client connection
    client->SetStatusChangedCallback([client](discordpp::Client::Status status, discordpp::Client::Error error, int32_t errorDetail) {
      std::cout << "🔄 Status changed: " << discordpp::Client::StatusToString(status) << std::endl;

      if (status == discordpp::Client::Status::Ready) {
        std::cout << "✅ Client is ready! You can now call SDK functions.\n";

        // Access initial relationships data
        std::cout << "👥 Friends Count: " << client->GetRelationships().size() << std::endl;

        // Configure rich presence details
        discordpp::Activity activity;
        activity.SetType(discordpp::ActivityTypes::Playing);
        activity.SetState("In Competitive Match");
        activity.SetDetails("Rank: Diamond II");

        // Update rich presence
        client->UpdateRichPresence(activity, [](discordpp::ClientResult result) {
          if(result.Successful()) {
            std::cout << "🎮 Rich Presence updated successfully!\n";
          } else {
            std::cerr << "❌ Rich Presence update failed";
          }
        });

      } else if (error != discordpp::Client::Error::None) {
        std::cerr << "❌ Connection Error: " << discordpp::Client::ErrorToString(error) << " - Details: " << errorDetail << std::endl;
      }
    });

    // Generate OAuth2 code verifier for authentication
    auto codeVerifier = client->CreateAuthorizationCodeVerifier();

    // Set up authentication arguments
    discordpp::AuthorizationArgs args{};
    args.SetClientId(APPLICATION_ID);
    args.SetScopes(discordpp::Client::GetDefaultPresenceScopes());
    args.SetCodeChallenge(codeVerifier.Challenge());

    // Begin authentication process
    client->Authorize(args, [client, codeVerifier](auto result, auto code, auto redirectUri) {
      if (!result.Successful()) {
        std::cerr << "❌ Authentication Error: " << result.Error() << std::endl;
        return;
      } else {
        std::cout << "✅ Authorization successful! Getting access token...\n";

        // Exchange auth code for access token
        client->GetToken(APPLICATION_ID, code, codeVerifier.Verifier(), redirectUri,
          [client](discordpp::ClientResult result,
          std::string accessToken,
          std::string refreshToken,
          discordpp::AuthorizationTokenType tokenType,
          int32_t expiresIn,
          std::string scope) {
            std::cout << "🔓 Access token received! Establishing connection...\n";
            // Next Step: Update the token and connect
            client->UpdateToken(discordpp::AuthorizationTokenType::Bearer,  accessToken, [client](discordpp::ClientResult result) {
              if(result.Successful()) {
                std::cout << "🔑 Token updated, connecting to Discord...\n";
                client->Connect();
              }
            });
        });
      }
    });

    // Keep application running to allow SDK to receive events and callbacks
    while (running) {
      discordpp::RunCallbacks();
      std::this_thread::sleep_for(std::chrono::milliseconds(10));
    }

    return 0;
}
Conclusion
Section titled “Conclusion”Congratulations! You've successfully integrated the Discord Social SDK into your C++ application. Let's review what you've accomplished:
What You've Built
Section titled “What You've Built”- ✅ Created a Discord application and configured OAuth2
- ✅ Set up SDK logging and status monitoring
- ✅ Implemented user authentication flow
- ✅ Retrieved Discord relationships data
- ✅ Added Rich Presence support
Key Concepts Learned
Section titled “Key Concepts Learned”- How to initialize and configure the Discord SDK
- Managing authentication and connections
- Working with Discord's social features
- Handling asynchronous callbacks
- Monitoring SDK status and events
Next Steps
Section titled “Next Steps”You have successfully set up the Discord Social SDK with C++ and authenticated with Discord! You can now use the SDK to add more social features in your project.
Creating a Unified Friends List
Create a unified friends list combining Discord and game-specific friendships
Setting Rich Presence
Customize your game's rich presence to show more advanced information and game invites
Managing Game Invites
Allow players to invite friends to join their game session or party.
Need help? Join the Discord Developers Server and share questions in the #social-sdk-dev-help channel for support from the community.
If you encounter a bug while working with the Social SDK, please report it here: https://dis.gd/social-sdk-bug-report
Change Log
Section titled “Change Log”| Date | Changes |
|---|---|
| May 20, 2026 | Updated required C++ standard to C++20 with 1.9 release |
| March 17, 2025 | initial release |