Account Linking on Mobile
Overview
Section titled “Overview”This guide explains how to implement OAuth2 authentication for mobile users (iOS and Android), allowing them to link their Discord accounts with your game on mobile devices.
Mobile authentication uses deep linking to provide a seamless experience. When the Discord mobile app is installed, users are automatically redirected to Discord to authorize your game, then returned to your game via a custom URL scheme.
Key Differences from Desktop Authentication
Section titled “Key Differences from Desktop Authentication”Mobile platforms have unique requirements that differ from desktop:
- Custom URL schemes (deep links) are required instead of HTTP redirects
- PKCE (Proof Key for Code Exchange) is mandatory for all mobile apps using deep links, regardless of whether you're using a public or confidential client
- Platform-specific configuration is required (Info.plist for iOS, AndroidManifest.xml for Android)
Prerequisites
Section titled “Prerequisites”Before you begin, make sure you have:
- Read the Core Concepts guide to understand:
- OAuth2 authentication flow
- Discord application setup
- SDK initialization
- Set up your development environment with:
- Discord application created in the Developer Portal
- Discord Social SDK version 1.5 or higher downloaded and configured
- Basic account linking flow working on desktop
If you haven't completed these prerequisites, we recommend first following the Getting Started guide.
Configure OAuth2 Redirect URI
Section titled “Configure OAuth2 Redirect URI”For OAuth2 to work correctly on mobile, you must first register the correct redirect URI for your app in the Discord Developer Portal.
| Platform | Redirect URI |
|---|---|
| Mobile (iOS & Android) | discord-YOUR_APP_ID:/authorize/callback (replace YOUR_APP_ID with your Discord application ID) |
Unity Setup
Section titled “Unity Setup”Please follow the Unity Getting Started guide for general setup instructions. There are additional mobile-specific configurations you'll need to complete:
iOS Configuration
Section titled “iOS Configuration”1. Configure URL Scheme in Unity Project Settings
Section titled “1. Configure URL Scheme in Unity Project Settings”To enable Client::Authorize support, configure a callback URL scheme:
- Open Project Settings:
Edit -> Project Settings... - Navigate to the
Playersection - Select the
iOStab - Under
Other Settings, locateSupported URL Schemes - Add
discord-YOUR_APP_IDto the list (e.g., if your application ID is123456, adddiscord-123456)
2. Set Microphone Usage Description
Section titled “2. Set Microphone Usage Description”In the same Player settings page:
- Set
Microphone Usage Descriptionto a valid description - This string will be displayed by iOS when microphone permissions are requested
- Required for voice support
3. Configure Info.plist for Deep Linking
Section titled “3. Configure Info.plist for Deep Linking”For native authentication to work, you must update your Info.plist to include the discord scheme:
<key>LSApplicationQueriesSchemes</key>
<array>
  <string>discord</string>
</array>
This allows your app to detect if the Discord mobile app is installed and deep-link into it for authentication.
4. Enable Background Voice Support (Optional)
Section titled “4. Enable Background Voice Support (Optional)”To enable voice support while your game is backgrounded:
- Edit your
Info.plistto enable the appropriate background modes - A build postprocessor is supplied in the Unity sample project that you may copy into your own project, located at
Assets/Scripts/Editor/VoicePostBuildProcessor.cs
Android Configuration
Section titled “Android Configuration”1. Configure Custom URL Scheme
Section titled “1. Configure Custom URL Scheme”Client::Authorize requires an activity with a custom URL scheme to be added to your application manifest:
- An example build processor is provided in the Unity sample project at
Assets/Scripts/Editor/AndroidPostBuildProcessor.cs - Alternatively, manually add an intent filter to your
AndroidManifest.xml:
<activity android:name="com.discord.socialsdk.AuthenticationActivity"
android:exported="true">
  <intent-filter>
    <action android:name="android.intent.action.VIEW" />
    <category android:name="android.intent.category.DEFAULT" />
    <category android:name="android.intent.category.BROWSABLE" />
    <data android:scheme="discord-YOUR_APP_ID" />
  </intent-filter>
</activity>
Replace YOUR_APP_ID with your actual Discord application ID (e.g., discord-1234567890123456789).
2. Add androidx.browser Dependency
Section titled “2. Add androidx.browser Dependency”Authorization requires androidx.browser as a Gradle dependency:
- If you use Google External Dependency Manager in your project, a suitable dependencies XML file is provided as part of the Unity plugin
- Otherwise, you'll need to add this dependency manually to your
build.gradle:
dependencies {
    implementation 'androidx.browser:browser:1.8.0'
    // Your other dependencies...
}
3. Android Permissions
Section titled “3. Android Permissions”The Android SDK uses the following permissions:
<uses-permission android:name="android.permission.INTERNET" />
<uses-permission android:name="android.permission.RECORD_AUDIO" />
<uses-permission android:name="android.permission.FOREGROUND_SERVICE" />
<uses-permission android:name="android.permission.FOREGROUND_SERVICE_MICROPHONE" />
<uses-permission android:name="android.permission.FOREGROUND_SERVICE_MEDIA_PLAYBACK" />
<uses-permission android:name="android.permission.MODIFY_AUDIO_SETTINGS" />
<uses-permission android:name="android.permission.BLUETOOTH" /> <!-- SDK <= 30 -->
<uses-permission android:name="android.permission.BLUETOOTH_CONNECT" /> <!-- SDK >= 31 -->Unreal Engine Setup
Section titled “Unreal Engine Setup”Please follow the Unreal Engine Getting Started guide for general setup instructions. For mobile-specific configuration, you only need to configure your Discord Application ID in the project settings.
Configure Discord Application ID
Section titled “Configure Discord Application ID”To enable mobile authentication in Unreal Engine:
- Open Project Settings (
Edit -> Project Settings...) - Search for
discordin the search bar - Under the Discord Social SDK section, enter your Discord Application ID
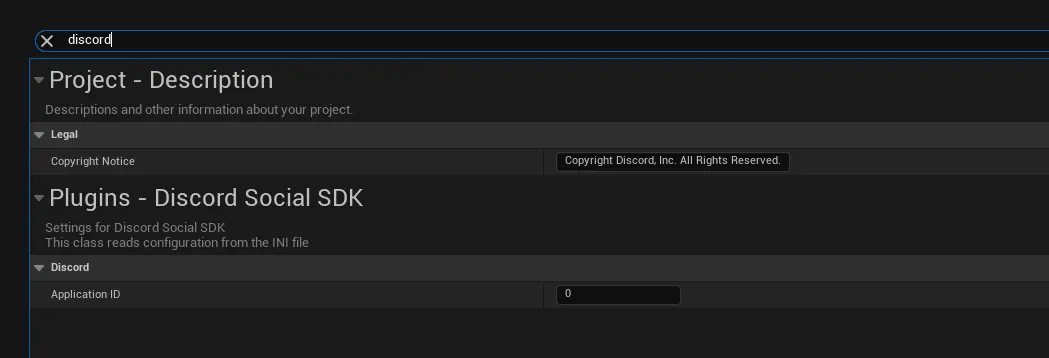
This setting configures the custom URL scheme (discord-YOUR_APP_ID) for deep linking on both iOS and Android platforms automatically.
C++ Standalone Setup
Section titled “C++ Standalone Setup”The Discord Social SDK may be used as a C++ library in a standard iOS or Android project. Follow the steps below for your platform:
iOS Setup
Section titled “iOS Setup”1. Create and Configure Xcode Project
Section titled “1. Create and Configure Xcode Project”- Create an Objective-C iOS project in Xcode
- Add
discord_partner_sdk.xcframeworkto your project
2. Configure Build Settings
Section titled “2. Configure Build Settings”- Add the xcframework to
Build Phases -> Link Binary with Librariesif needed - In the
Generaltab, underFrameworks, Libraries and Embedded Content:- Set
discord_partner_sdk.xcframeworkto Embed & Sign
- Set
3. Configure Background Audio (Optional)
Section titled “3. Configure Background Audio (Optional)”To maintain voice connectivity while backgrounded:
- Configure background audio modes in your
Info.plistusing theSigning & Capabilitiestab - Select Audio, AirPlay, and Picture in Picture, not Voice over IP
- See Configuring your app for Media Playback for detailed instructions
4. Register URL Scheme
Section titled “4. Register URL Scheme”To enable Client::Authorize support, register the appropriate URL scheme in your Info.plist:
<key>CFBundleURLTypes</key>
<array>
    <dict>
        <key>CFBundleURLSchemes</key>
        <array>
            <string>discord-YOUR_APP_ID</string>
        </array>
    </dict>
</array>
<key>LSApplicationQueriesSchemes</key>
<array>
    <string>discord</string>
</array>
Replace YOUR_APP_ID with your application ID from the Discord Developer Portal (e.g., if your app ID is 123456, register discord-123456).
5. Include SDK Headers
Section titled “5. Include SDK Headers”In a C++ or Objective-C++ (.mm) source file:
#define DISCORDPP_IMPLEMENTATION // Define this in exactly ONE file
#include <discord_partner_sdk/discordpp.h>6. Run Callbacks in Game Loop
Section titled “6. Run Callbacks in Game Loop”In your main game loop, make sure to call:
discordpp::RunCallbacks();Android Setup
Section titled “Android Setup”1. Create Android Project
Section titled “1. Create Android Project”Create an Android game project based on the Game Activity (C++) template.
2. Add SDK as Dependency
Section titled “2. Add SDK as Dependency”Add discord_partner_sdk.aar as a dependency in your Gradle project:
- Add the AAR to a directory (e.g.,
app/libs) - In your
app/build.gradle, add to dependencies:
dependencies {
    implementation files("libs/discord_partner_sdk.aar")
}
3. Enable Prefab
Section titled “3. Enable Prefab”Ensure Prefab is enabled in your Gradle build. See Native Dependencies in AARs for details.
4. Configure CMake
Section titled “4. Configure CMake”In your CMakeLists.txt:
find_package(discord_partner_sdk REQUIRED CONFIG)
target_link_libraries(your_target discord_partner_sdk::discord_partner_sdk)
5. Include SDK Headers
Section titled “5. Include SDK Headers”In your C++ source:
#define DISCORDPP_IMPLEMENTATION // Define this in exactly ONE file
#include "discordpp.h"6. Initialize SDK in Activity
Section titled “6. Initialize SDK in Activity”In the onCreate method for your main activity (Java/Kotlin):
com.discord.socialsdk.DiscordSocialSdkInit.setEngineActivity(this);7. Run Callbacks in Game Loop
Section titled “7. Run Callbacks in Game Loop”In your main C++ loop:
discordpp::RunCallbacks();8. Configure Authorization Support
Section titled “8. Configure Authorization Support”To support Client::Authorize:
- Add
androidx.browserdependency (version 1.8 or later) to yourbuild.gradle:
dependencies {
    implementation 'androidx.browser:browser:1.8.0'
    // Your other dependencies...
}- Add the appropriate
AndroidManifest.xmlactivity registration:
<activity android:name="com.discord.socialsdk.AuthenticationActivity"
android:exported="true">
  <intent-filter>
    <action android:name="android.intent.action.VIEW" />
    <category android:name="android.intent.category.DEFAULT" />
    <category android:name="android.intent.category.BROWSABLE" />
    <data android:scheme="discord-YOUR_APP_ID" />
  </intent-filter>
</activity>
Replace YOUR_APP_ID with your actual Discord application ID (e.g., discord-1234567890123456789).
Understanding PKCE for Mobile
Section titled “Understanding PKCE for Mobile”What is PKCE?
Section titled “What is PKCE?”PKCE (Proof Key for Code Exchange, pronounced "pixie") is a security extension to OAuth2 that prevents authorization code interception attacks. It adds an extra layer of security by requiring both the client and server to prove they're part of the same authentication flow.
Why is PKCE Required on Mobile?
Section titled “Why is PKCE Required on Mobile?”This is because custom URL schemes don't have the same security guarantees as HTTPS redirects, making them vulnerable to interception attacks without PKCE.
How PKCE Works
Section titled “How PKCE Works”- Client generates a code verifier: A cryptographically random string
- Client creates a code challenge: A hashed version of the verifier
- Client sends code challenge with the authorization request
- Server stores the code challenge with the authorization code
- Client sends code verifier when exchanging the authorization code for a token
- Server verifies that the verifier matches the stored challenge
The Discord Social SDK handles the generation of the code verifier and challenge for you via Client::CreateAuthorizationCodeVerifier.
Authentication Flow for Public Clients
Section titled “Authentication Flow for Public Clients”If your app does not have a backend server and you've enabled Public Client in the Discord Developer Portal, you can use the SDK to handle the entire authentication flow, including PKCE.
Step 1: Create Code Verifier and Challenge
Section titled “Step 1: Create Code Verifier and Challenge”Use Client::CreateAuthorizationCodeVerifier to generate the PKCE values:
// Generate code verifier and challenge
auto codeVerifier = client->CreateAuthorizationCodeVerifier();
Step 2: Request Authorization
Section titled “Step 2: Request Authorization”Use Client::Authorize with the code challenge:
discordpp::AuthorizationArgs args{};
args.SetClientId(YOUR_DISCORD_APPLICATION_ID);
args.SetScopes(discordpp::Client::GetDefaultPresenceScopes());
args.SetCodeChallenge(codeVerifier.Challenge());

client->Authorize(args, [client, codeVerifier](
    discordpp::ClientResult result,
    std::string code,
    std::string redirectUri) {
  if (!result.Successful()) {
    std::cerr << "❌ Authorization Error: " << result.Error() << std::endl;
  } else {
    std::cout << "✅ Authorization successful! Exchanging code for token...\n";
    // Proceed to Step 3
  }
});
Step 3: User Approval
Section titled “Step 3: User Approval”After calling Client::Authorize, the SDK will:
- Deep-link into the Discord mobile app if installed
- Or open a browser if Discord is not installed
- Present the authorization screen to the user
Step 4: Exchange Authorization Code for Token
Section titled “Step 4: Exchange Authorization Code for Token”Once the user approves and your app receives the authorization code, exchange it for an access token using Client::GetToken with the code verifier:
client->GetToken(
    YOUR_DISCORD_APPLICATION_ID,
    code,
    codeVerifier.Verifier(),  // Critical: Pass the verifier
    redirectUri,
    [client](discordpp::ClientResult result,
        std::string accessToken,
        std::string refreshToken,
        discordpp::AuthorizationTokenType tokenType,
        int32_t expiresIn,
        std::string scope) {
      if (!result.Successful()) {
        std::cerr << "❌ Error getting token: " << result.Error() << std::endl;
        return;
      }

      std::cout << "🔓 Access token received! Establishing connection...\n";

      // Update token and connect
      client->UpdateToken(tokenType, accessToken, [client](discordpp::ClientResult result) {
        client->Connect();
      });
    });
Authentication Flow for Confidential Clients
Section titled “Authentication Flow for Confidential Clients”If your application has a backend server and uses a confidential client (with client secret), you must still implement PKCE on mobile, but the token exchange happens on your server.
Client-Side Implementation
Section titled “Client-Side Implementation”Step 1: Create Code Verifier and Challenge
Section titled “Step 1: Create Code Verifier and Challenge”Generate the PKCE values on the client:
// Generate code verifier and challenge
auto codeVerifier = client->CreateAuthorizationCodeVerifier();
Step 2: Request Authorization
Section titled “Step 2: Request Authorization”Pass the code challenge to the authorization request:
discordpp::AuthorizationArgs args{};
args.SetClientId(YOUR_DISCORD_APPLICATION_ID);
args.SetScopes(discordpp::Client::GetDefaultPresenceScopes());
args.SetCodeChallenge(codeVerifier.Challenge());

client->Authorize(args, [client, codeVerifier](
    discordpp::ClientResult result,
    std::string code,
    std::string redirectUri) {
  if (!result.Successful()) {
    std::cerr << "❌ Authorization Error: " << result.Error() << std::endl;
  } else {
    std::cout << "✅ Authorization successful!\n";

    // Send BOTH the authorization code AND the code verifier to your server
    SendToServer(code, redirectUri, codeVerifier.Verifier());
  }
});Server-Side Implementation
Section titled “Server-Side Implementation”Your server must include the code_verifier parameter when exchanging the authorization code for an access token:
import requests

API_ENDPOINT = 'https://discord.com/api/v10'
CLIENT_ID = 'YOUR_CLIENT_ID'
CLIENT_SECRET = 'YOUR_CLIENT_SECRET'

def exchange_code(code, redirect_uri, code_verifier):
    """
    Exchange authorization code for access token with PKCE verification.

    IMPORTANT: The code_verifier parameter is REQUIRED for mobile apps,
    even when using confidential clients with client secrets.
    """
    data = {
        'grant_type': 'authorization_code',
        'code': code,
        'redirect_uri': redirect_uri,
        'code_verifier': code_verifier,  # Required for mobile deep links
    }
    headers = {'Content-Type': 'application/x-www-form-urlencoded'}

    r = requests.post(
        f'{API_ENDPOINT}/oauth2/token',
        data=data,
        headers=headers,
        auth=(CLIENT_ID, CLIENT_SECRET)
    )
    r.raise_for_status()
    return r.json()
Example Response
Section titled “Example Response”{
"access_token": "<access token>",
"token_type": "Bearer",
"expires_in": 604800,
"refresh_token": "<refresh token>",
"scope": "sdk.social_layer"
}Client-Side: Update Token
Section titled “Client-Side: Update Token”Once your server returns the access token, update it in the SDK:
// Receive access token from your server
void OnTokenReceived(const std::string& accessToken) {
  client->UpdateToken(
      discordpp::AuthorizationTokenType::Bearer,
      accessToken,
      [client](discordpp::ClientResult result) {
    if (result.Successful()) {
      client->Connect();
    }
  });
}
Working with Tokens
Section titled “Working with Tokens”You'll want to store the access and refresh tokens for the player to use in future sessions.
Since access_tokens generally expire after 7 days. You'll need to use the refresh_token to refresh the
player's access token, which is covered under Refreshing Access Tokens.
Troubleshooting
Section titled “Troubleshooting”Common Issues
Section titled “Common Issues”iOS: Authorization Opens Browser Instead of Discord App
Section titled “iOS: Authorization Opens Browser Instead of Discord App”Problem: The authorization flow opens a browser instead of deep-linking to the Discord mobile app.
Solutions:
- Verify that
LSApplicationQueriesSchemesincludesdiscordin your Info.plist - Ensure the Discord mobile app is installed on the device
- Check that your redirect URI is correctly configured as
discord-YOUR_APP_ID:/authorize/callback
Android: Deep Link Not Working
Section titled “Android: Deep Link Not Working”Problem: After authorization, the app doesn't receive the callback.
Solutions:
- Verify your AndroidManifest.xml has the correct intent filter
- Ensure the
android:schemematches your redirect URI:discord-YOUR_APP_ID - Check that your activity is set to launch mode
singleTaskorsingleTopif you need to handle multiple intents
Token Exchange Fails with "invalid_grant"
Section titled “Token Exchange Fails with "invalid_grant"”Problem: Server-side token exchange returns an invalid_grant error.
Solutions:
- Most common: You forgot to include the
code_verifierparameter in the token exchange request - Verify you're sending the verifier (from
codeVerifier.Verifier()), not the challenge - Ensure the code hasn't expired (codes are short-lived)
- Check that the redirect URI matches exactly what was used in the authorization request
Next Steps
Section titled “Next Steps”Now that you've successfully implemented account linking on mobile, you can integrate more social features into your game.
Design: Signing In
Design guidelines for account linking and user authentication
Creating a Unified Friends List
Combine Discord and game friends into a single list for easy management.
Setting Rich Presence
Display game status and information to Discord friends.
Need help? Join the Discord Developers Server and share questions in the #social-sdk-dev-help channel for support from the community.
If you encounter a bug while working with the Social SDK, please report it here: https://dis.gd/social-sdk-bug-report
Change Log
Section titled “Change Log”| Date | Changes |
|---|---|
| September 8, 2026 | Clarified that native auth reuses an existing signed-in Discord app session |
| January 26, 2026 | Initial release |