Building Your First Activity in Discord
Activities are web-based games and apps that can be run within Discord. Activities are embedded in iframes within the Discord client, and can be launched from the App Launcher or when responding to interactions.
If this is your first time learning about Activities, check out the Activities Overview for more information and a collection of more advanced sample projects.
Introduction
Section titled “Introduction”In this guide, we'll be building a Discord app with a basic Activity that handles user authentication and fetches data using the API.
It assumes an understanding of JavaScript and async functions, and a basic understanding of frontend frameworks like React and Vue. If you are still learning to program, there are many free education resources to explore like The Odin Project, Codecademy, and Khan Academy.
What we'll be building
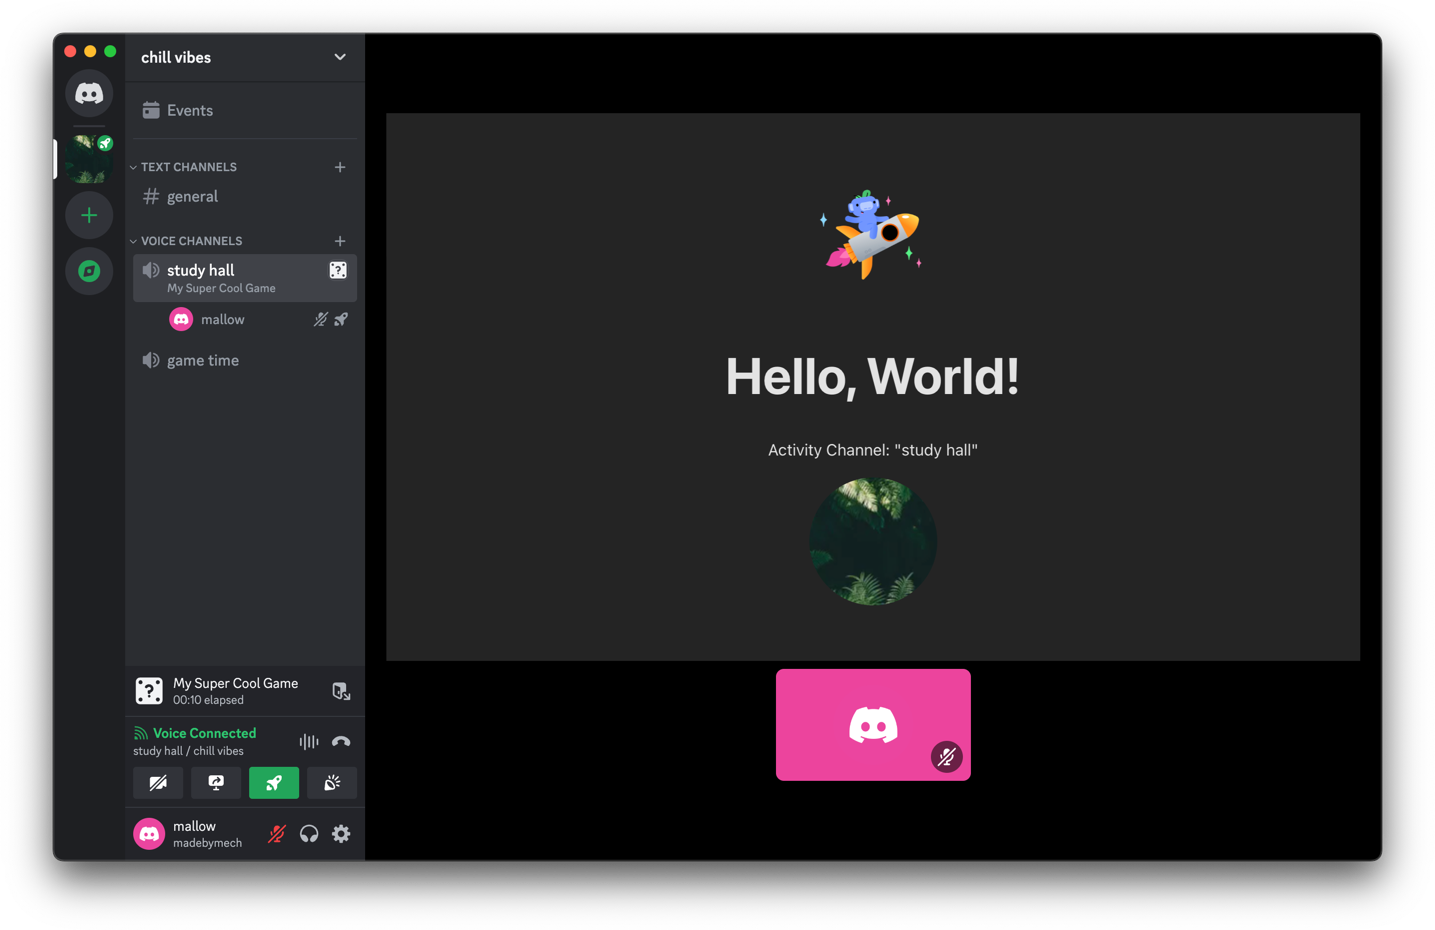
Resources used in this guide
- discord/getting-started-activity, a project template to get you started
- @discord/embedded-app-sdk, the SDK used to communicate between your app and Discord when building Activities
- Node.js, latest version
- Express, a popular JavaScript web framework we'll use to create a server to handle authentication and serve our app
- Vite, a build tool for modern JavaScript projects that will make your application easier to serve
- cloudflared, for bridging your local development server to the internet
Step 0: Enable Developer Mode
Section titled “Step 0: Enable Developer Mode”Before getting started, you need to enable Developer Mode for your Discord account if you don't already have it enabled. Developer Mode will allow you to run in-development Activities and expose resource IDs (like users, channels, and servers) in the client which can simplify testing. To enable Developer Mode:
- Go to your User Settings in your Discord client. On Desktop, you can access User Settings by clicking on the cogwheel icon near the bottom-left, next to your username.
- Click on Advanced tab from the left-hand sidebar and toggle on
Developer Mode.
Step 1: Setting up the project
Section titled “Step 1: Setting up the project”Before creating an app, let's set up our project code from the discord/getting-started-activity repository.
Open a terminal window and clone the project code:
git clone git@github.com:discord/getting-started-activity.gitThe sample project you cloned is broken into two parts:
clientis the sample Activity's frontend, built with vanilla JavaScript and integrated with Vite to help with local development.serveris a backend using vanilla JavaScript, Node.js, and Express. However, as you're building your own Activity, you can use whichever backend you prefer.
Project structure
├── client
├────── main.js       -> your Activity frontend
├────── index.html
├────── package.json
├────── rocket.png
├────── vite.config.js
├── server
├────── package.json
├────── server.js     -> your Activity backend
└── .env              -> your credentials, IDs and secrets
Install project dependencies
Section titled “Install project dependencies”Before creating our Discord app, let's quickly install your project's frontend dependencies.
Navigate to your project folder's client directory, which is where all the sample Activity's frontend code lives:
cd getting-started-activity/clientThen install the project's dependencies and start up the frontend for the sample Activity:
# install project dependencies
npm install

# start frontend
npm run dev
If you visit http://localhost:5173/ you should see a vanilla JS frontend template running with Vite.
While it's not much at the moment, in the following steps we'll connect it to the backend services, make it runnable in Discord, and power it up by populating it with data we pull from Discord APIs.
Step 1 Checkpoint
By the end of Step 1, you should have:
- An understanding of what Discord Activities are
- Developer Mode enabled on your Discord account
- Cloned the sample project to your development environment
- Installed the front-end dependencies (in the
clientfolder)
Step 2: Creating an app
Section titled “Step 2: Creating an app”With our project set up, let's create our app and configure the Activity. Create a new app in the developer portal if you don't have one already:
Create App
Enter a name for your app, select a development team, then press Create.
After you create your app, you'll land on the General Information page of the app's settings, where you can update basic information about your app like its description and icon.
Choose installation contexts
Section titled “Choose installation contexts”Apps in Discord can be installed to different installation contexts: servers, user accounts, or both.
The recommended and default behavior for apps is supporting both installation contexts, which lets the installer to choose the context during the installation flow. However, you can change the default behavior by changing the supported installation contexts in your app's settings.
Why do installation contexts matter?
As mentioned, installation contexts determine where your app can be installed. The installation context affect things like who can manage the installation, where the app's commands can appear, and the data returned in response to interactions.
- Apps installed in a server context (server-installed apps) must be authorized by a server member with the
MANAGE_GUILDpermission, and are visible to all members of the server. - Apps installed in a user context (user-installed apps) are visible only to the authorizing user, and therefore don't require any server-specific permissions. Apps installed to a user context are visible across all of the user's servers, DMs, and GDMs—however, they're limited to using commands.
Details about installation contexts is in the Application documentation and the Developing a User-Installable App tutorial.
Click on Installation in the left sidebar, then under Installation Contexts make sure both "User Install" and "Guild Install" are selected. This will make sure users can launch our app's Activity across Discord servers, DMs, and Group DMs.
Add a Redirect URI
Section titled “Add a Redirect URI”Next, we'll add a Redirect URI, which is where a user is typically redirected to after authorizing with your app when going through the standard OAuth flow. While setting up a Redirect URI is required, the Embedded App SDK automatically handles redirecting users back to your Activity when the RPC authorize command is called.
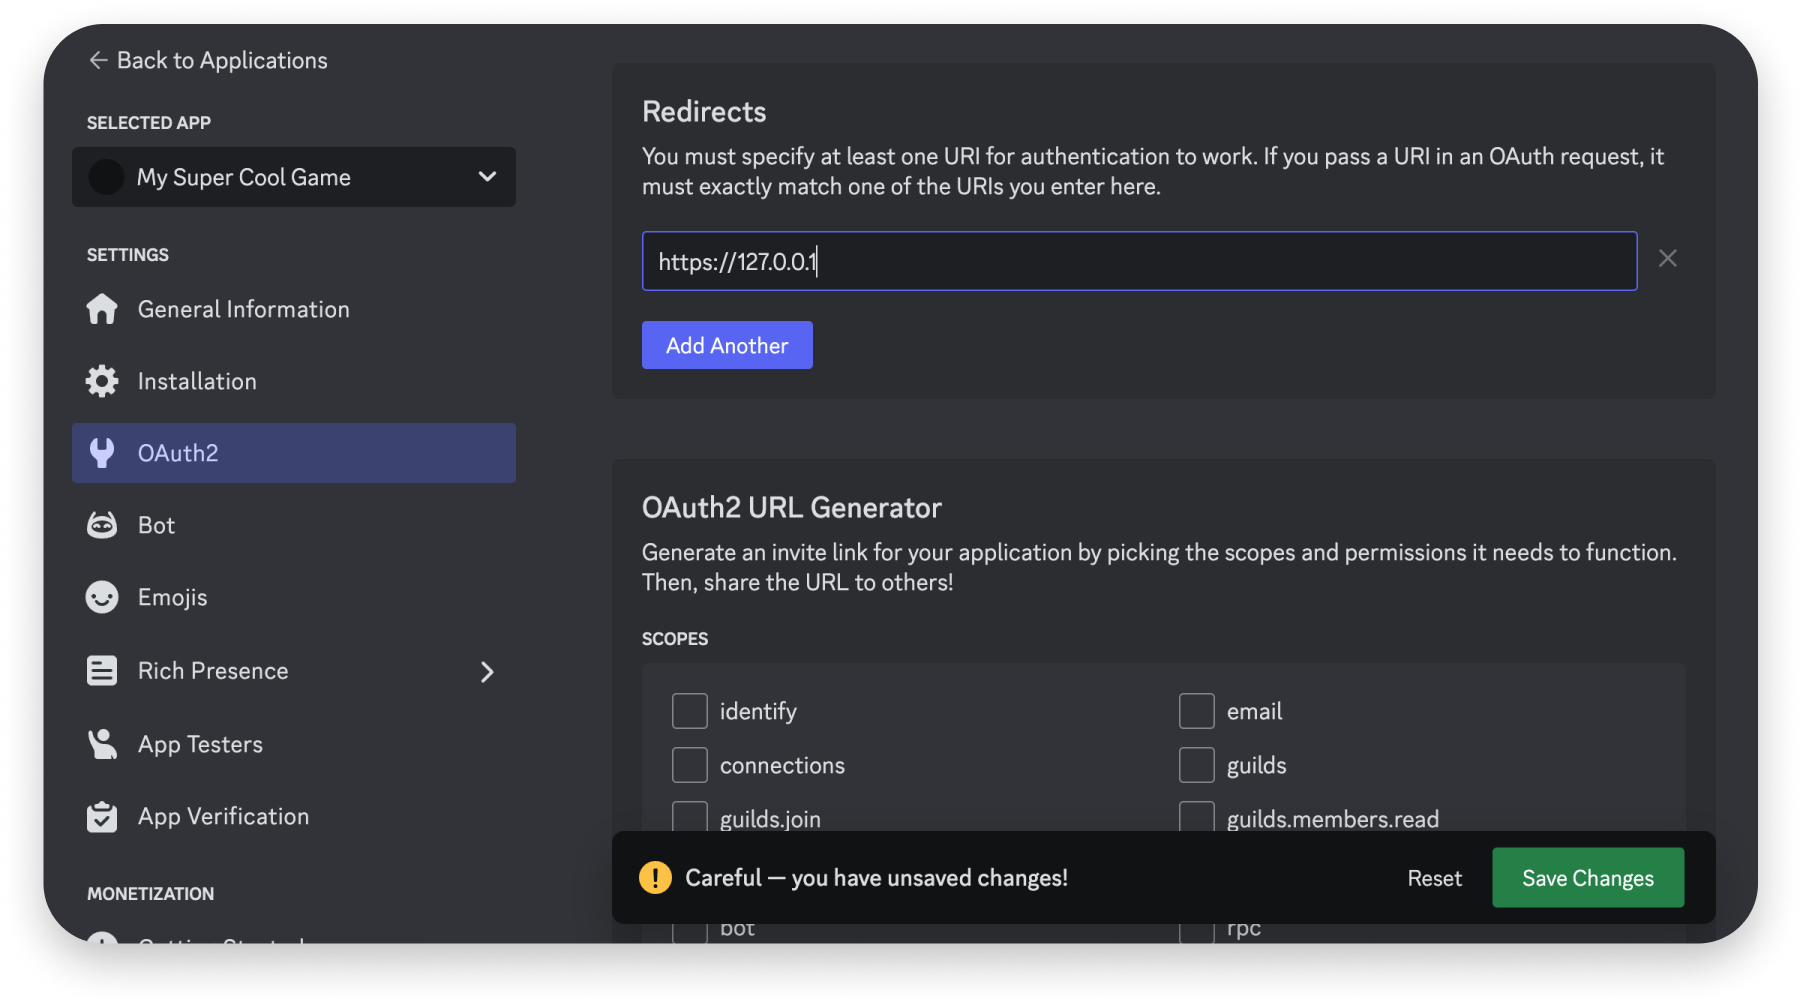
You can learn more about the OAuth flow and redirect URIs in the OAuth2 documentation, but since we're only authorizing in an Activity, we'll just use a placeholder value (https://127.0.0.1) and let the Embedded App SDK handle the rest.
Click on OAuth2 in your app's settings. Under Redirects, enter https://127.0.0.1 as a placeholder value then click Save Changes.
Fetch Your OAuth2 Credentials
Section titled “Fetch Your OAuth2 Credentials”To use information related to a user (like their username) or a server (like the server's avatar), your app must be granted specific OAuth scopes.
For our sample app, we'll be requesting three scopes: identify to access basic information about a user, guilds to access basic information about the servers a user is in, and applications.commands to install commands. We'll request these later on in the guide, but a full list of scopes you can request is in the OAuth2 documentation.
When requesting scopes later on, you'll need to pass your app's OAuth2 identifiers. For now, we'll copy these identifiers into your project's environment file.
In the root of your project, there is an example.env file. From the root of your project, run the following to copy it into a new .env file:
cp example.env .envBack in your app's settings, click on OAuth2:
- Client ID: Copy the value for Client ID and add it to your
.envfile asVITE_CLIENT_ID. This is the public ID that Discord associates with your app, and is almost always the same as your App ID. - Client Secret: Copy the value for Client Secret and add it to your
.envasDISCORD_CLIENT_SECRET. This is a private, sensitive identifier that your app will use to grant an OAuth2access_token, and should never be shared or checked into version control.
Step 2 Checkpoint
By the end of Step 2, make sure you have:
- Set up a placeholder Redirect URI
- Added your app's Client ID and Client Secret to your project's
.envfile.
Step 3: Setting Up the Embedded App SDK
Section titled “Step 3: Setting Up the Embedded App SDK”With our project and app set up, we're going to install and configure the Embedded App SDK which we'll use extensively through the rest of this guide.
The Embedded App SDK is a first-party SDK that handles the communication between Discord and your Activity with commands to interact with the Discord client (like fetching information about the channel) and events to listen for user actions and changes in state (like when a user starts or stops speaking).
Install the SDK
Section titled “Install the SDK”Back in our project's client directory from before (getting-started-activity/client), install the Embedded App SDK via NPM:
npm install @discord/embedded-app-sdkThis will add @discord/embedded-app-sdk to getting-started-activity/client/package.json and install the SDK in your node_modules folder.
Import the SDK in your Project
Section titled “Import the SDK in your Project”Once installed, we need to import it into our client code and instantiate it to start the handshake between our app and the Discord client.
To instantiate the SDK, we will use the environment variables we set up in Step 2.
We also set up a check for the ready event with an async/await function which allows us to output a log or perform other actions once the handshake was successful.
Add SDK initialization to frontend
In getting-started-activity/client/main.js, let's import and instantiate the SDK:
// Import the SDK
import { DiscordSDK } from "@discord/embedded-app-sdk";

import "./style.css";
import rocketLogo from '/rocket.png';

// Instantiate the SDK
const discordSdk = new DiscordSDK(import.meta.env.VITE_DISCORD_CLIENT_ID);

setupDiscordSdk().then(() => {
  console.log("Discord SDK is ready");
});

async function setupDiscordSdk() {
  await discordSdk.ready();
}

document.querySelector('#app').innerHTML = `
  <div>
    <img src="${rocketLogo}" class="logo" alt="Discord" />
    <h1>Hello, World!</h1>
  </div>
`;Step 3 Checkpoint
By the end of Step 3, make sure you have:
- Installed the Embedded App SDK to your project
- Imported the SDK in your project's
client/main.jsfile
Step 4: Running your app in Discord
Section titled “Step 4: Running your app in Discord”Let's ensure everything is wired up correctly, enable activities via the dev portal, and then run the Activity in Discord.
Run your app
Section titled “Run your app”First, we'll restart the sample app. Open a terminal window and navigate to your project directory's client folder, then start the client-side app:
cd client
npm run dev
Your app should start and you should see output similar to the following:
VITE v5.0.12  ready in 100 ms

➜  Local:   http://localhost:5173/
➜  Network: use --host to expose
➜  press h + enter to show help
We'll use the Local URL as our publicly-accessible URL in the next step.
Set up a public endpoint
Section titled “Set up a public endpoint”Next, we'll need to set up the public endpoint that serves the Activity's frontend. To do that, we'll create a tunnel with a reverse proxy. While we'll be using cloudflared in this guide, you can use ngrok or another reverse proxy solution if you prefer.
While your app is still running, open another terminal window and start a network tunnel that listens to the port from the last step (in this case, port 5173):
cloudflared tunnel --url http://localhost:5173When you run cloudflared, the tunnel will generate a public URL and you'll see output similar to the following:
Your quick Tunnel has been created! Visit it at (it may take some time to be reachable):
https://funky-jogging-bunny.trycloudflare.com
Copy the URL from the output, as we'll need to add it to our app's settings.
Set up your Activity URL Mapping
Section titled “Set up your Activity URL Mapping”Because Activities are in a sandbox environment and go through the Discord proxy, you'll need to add a public URL mapping to serve your application and make external requests in your Activity. Since we're developing locally, we'll use the public endpoint we just set up.
Back in your app's settings, click on the URL Mappings page under Activities on the left-hand sidebar. Enter the URL you generated from cloudflared in the previous step.
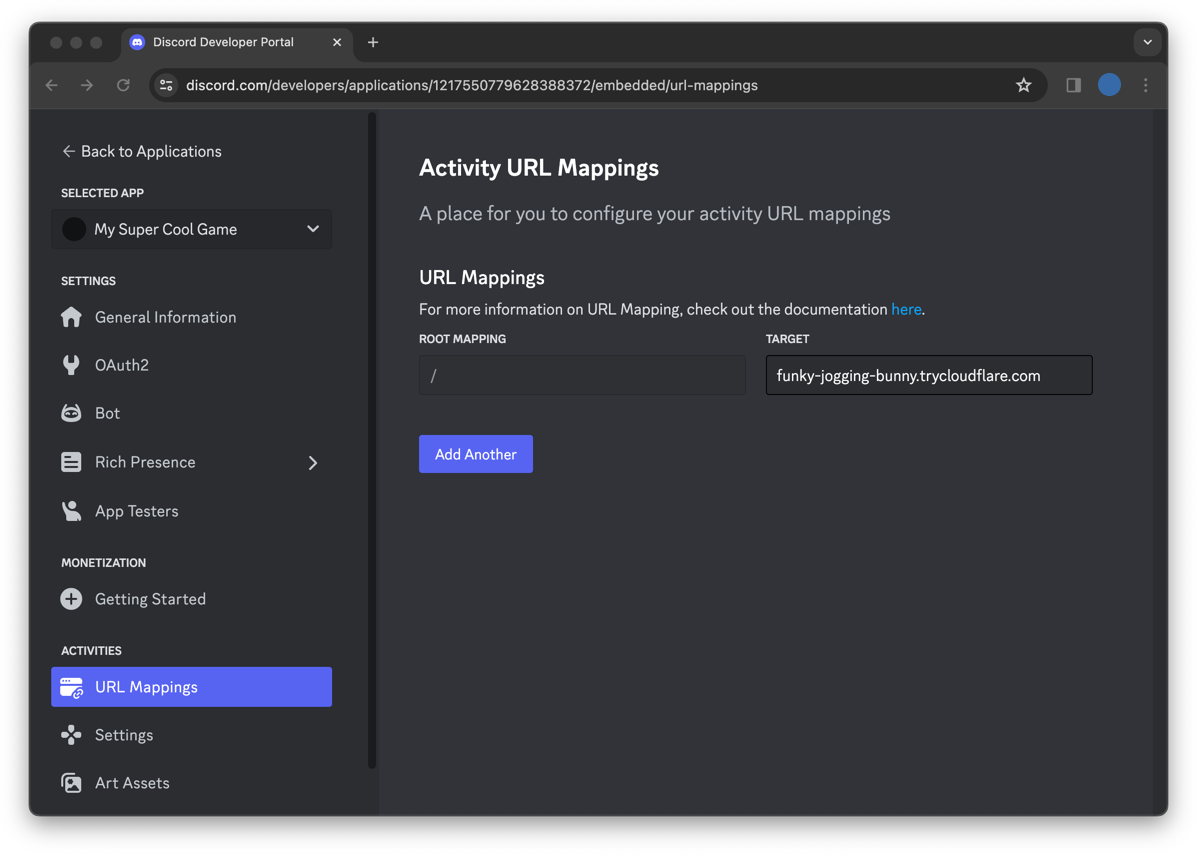
| PREFIX | TARGET |
|---|---|
/ |
funky-jogging-bunny.trycloudflare.com |
Read details about URL Mapping in the development guide.
Enable Activities
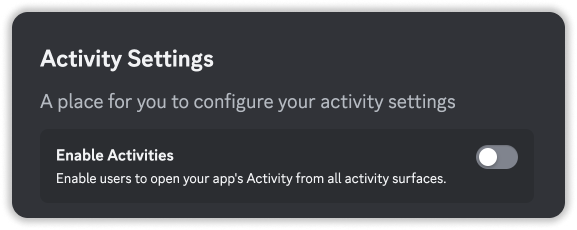
Section titled “Enable Activities”Next, we'll need to enable Activities for your app. On the left hand sidebar under Activities, click Settings.
Find the first checkbox, labeled Enable Activities. Turn it on 🎉
Default Entry Point Command
Section titled “Default Entry Point Command”When you enable Activities for your app, a default Entry Point command called "Launch" is automatically created. This Entry Point command is the primary way for users to launch your Activity in Discord.
By default, interactions with this command will result in Discord opening your Activity for the user and posting a message in the channel where it was launched from. However, if you prefer to handle the interactions in your app, you can update the handler field or create your own. Additional details are in the Entry Point command documentation and development guide.
Running your Activity in Discord
Section titled “Running your Activity in Discord”Now that we are pointing Discord to our locally running app, we can launch the Activity in Discord!
Navigate to your Discord test server and, in any voice and or text channel, open the App Launcher where your in-development Activity should be present. If you don't see your Activity, you should try searching for its name.
Clicking on your app will launch your locally running app from inside Discord!
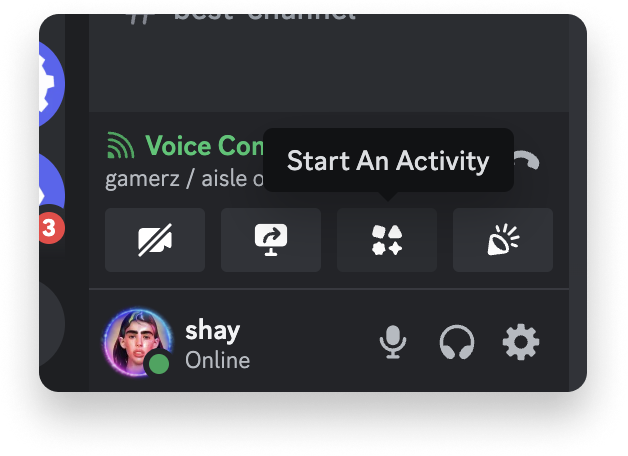
We're looking pretty good so far, but we haven't wired up any Discord functionality yet. Let's do that next.
Step 4 Checkpoint
By the end of Step 4, make sure you have:
- Set up a public endpoint
- Added an Activity URL Mapping in your app's settings
- Enabled Activities for your app
- Successfully launched your Activity in Discord
Step 5: Authorizing & authenticating users
Section titled “Step 5: Authorizing & authenticating users”To authenticate your Activity with the users playing it, we must finish implementing our server-side app and get it talking to the client-side app.
We will use express for this example, but any backend language or framework will work here.
OAuth2 Flow Diagram
This diagram illustrates the common pattern for granting a user an OAuth2 access_token:
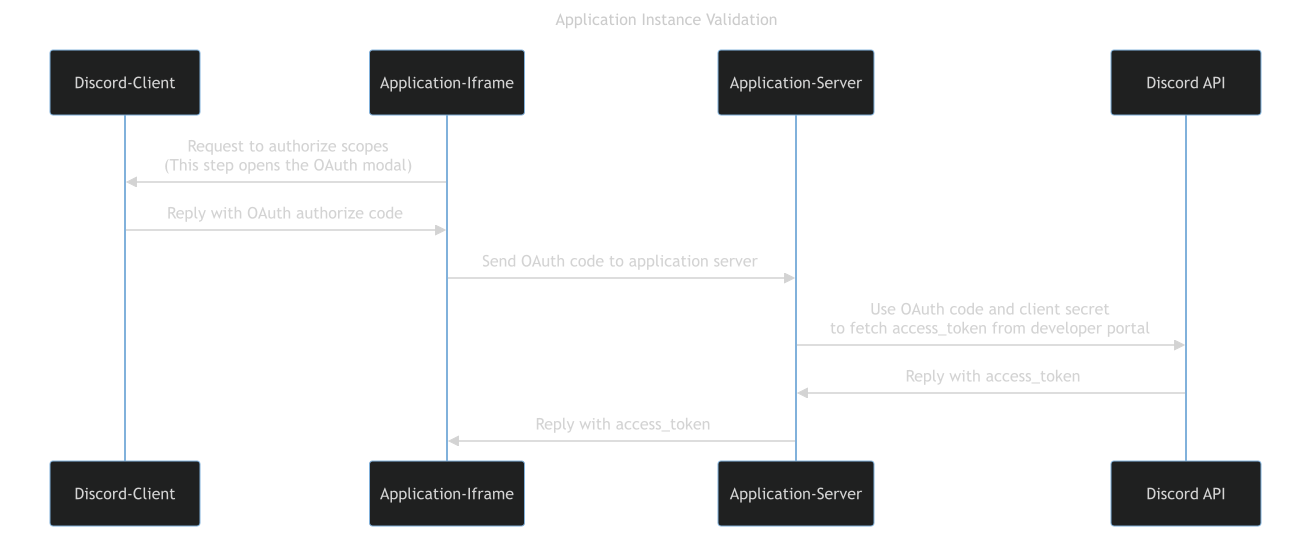
We will be implementing this pattern in this tutorial, but more example implementations can also be found in this sample project:
# move into our server directory
cd server

# install dependencies
npm install
We aren't going to edit the server code here, but it consists of a single POST route for /api/token that allows us to perform the OAuth2 flow from the server securely.
getting-started-activity/server/server.js
In the getting-started-activity/server/server.js file, the following code should already be present:
import express from "express";
import dotenv from "dotenv";
import fetch from "node-fetch";
dotenv.config({ path: "../.env" });

const app = express();
const port = 3001;

// Allow express to parse JSON bodies
app.use(express.json());

app.post("/api/token", async (req, res) => {

  // Exchange the code for an access_token
  const response = await fetch(`https://discord.com/api/oauth2/token`, {
    method: "POST",
    headers: {
      "Content-Type": "application/x-www-form-urlencoded",
    },
    body: new URLSearchParams({
      client_id: process.env.VITE_DISCORD_CLIENT_ID,
      client_secret: process.env.DISCORD_CLIENT_SECRET,
      grant_type: "authorization_code",
      code: req.body.code,
    }),
  });

  // Retrieve the access_token from the response
  const { access_token } = await response.json();

  // Return the access_token to our client as { access_token: "..."}
  res.send({access_token});
});

app.listen(port, () => {
  console.log(`Server listening at http://localhost:${port}`);
});
Now, start the project's backend server:
npm run devYou should output similar to the following:
> server@1.0.0 dev
> node server.js

Server listening at http://localhost:3001
We can now run our server and client-side apps in separate terminal windows. You can see other ways to set this up in the other sample projects.
Calling external resources from your activity
Section titled “Calling external resources from your activity”Before we call your backend activity server, we need to be aware of the Discord proxy and understand how to avoid any Content Security Policy (CSP) issues.
Learn more about this topic in the guides for Constructing a Full URL and Using External Resources.
Calling your backend server from your client
Section titled “Calling your backend server from your client”We're almost there! Now, we need our client application to communicate with our server so we can start the OAuth process and get an access token.
Calling the backend server
Copy the following code in your project's getting-started-activity/client/main.js file:
import { DiscordSDK } from "@discord/embedded-app-sdk";

import rocketLogo from '/rocket.png';
import "./style.css";

// Will eventually store the authenticated user's access_token
let auth;

const discordSdk = new DiscordSDK(import.meta.env.VITE_DISCORD_CLIENT_ID);

setupDiscordSdk().then(() => {
  console.log("Discord SDK is authenticated");

  // We can now make API calls within the scopes we requested in setupDiscordSDK()
  // Note: the access_token returned is a sensitive secret and should be treated as such
});

async function setupDiscordSdk() {
  await discordSdk.ready();
  console.log("Discord SDK is ready");

  // Authorize with Discord Client
  const { code } = await discordSdk.commands.authorize({
    client_id: import.meta.env.VITE_DISCORD_CLIENT_ID,
    response_type: "code",
    state: "",
    prompt: "none",
    scope: [
      "identify",
      "guilds",
      "applications.commands"
    ],
  });

  // Retrieve an access_token from your activity's server
  const response = await fetch("/api/token", {
    method: "POST",
    headers: {
      "Content-Type": "application/json",
    },
    body: JSON.stringify({
      code,
    }),
  });
  const { access_token } = await response.json();

  // Authenticate with Discord client (using the access_token)
  auth = await discordSdk.commands.authenticate({
    access_token,
  });

  if (auth == null) {
    throw new Error("Authenticate command failed");
  }
}

document.querySelector('#app').innerHTML = `
  <div>
    <img src="${rocketLogo}" class="logo" alt="Discord" />
    <h1>Hello, World!</h1>
  </div>
`;
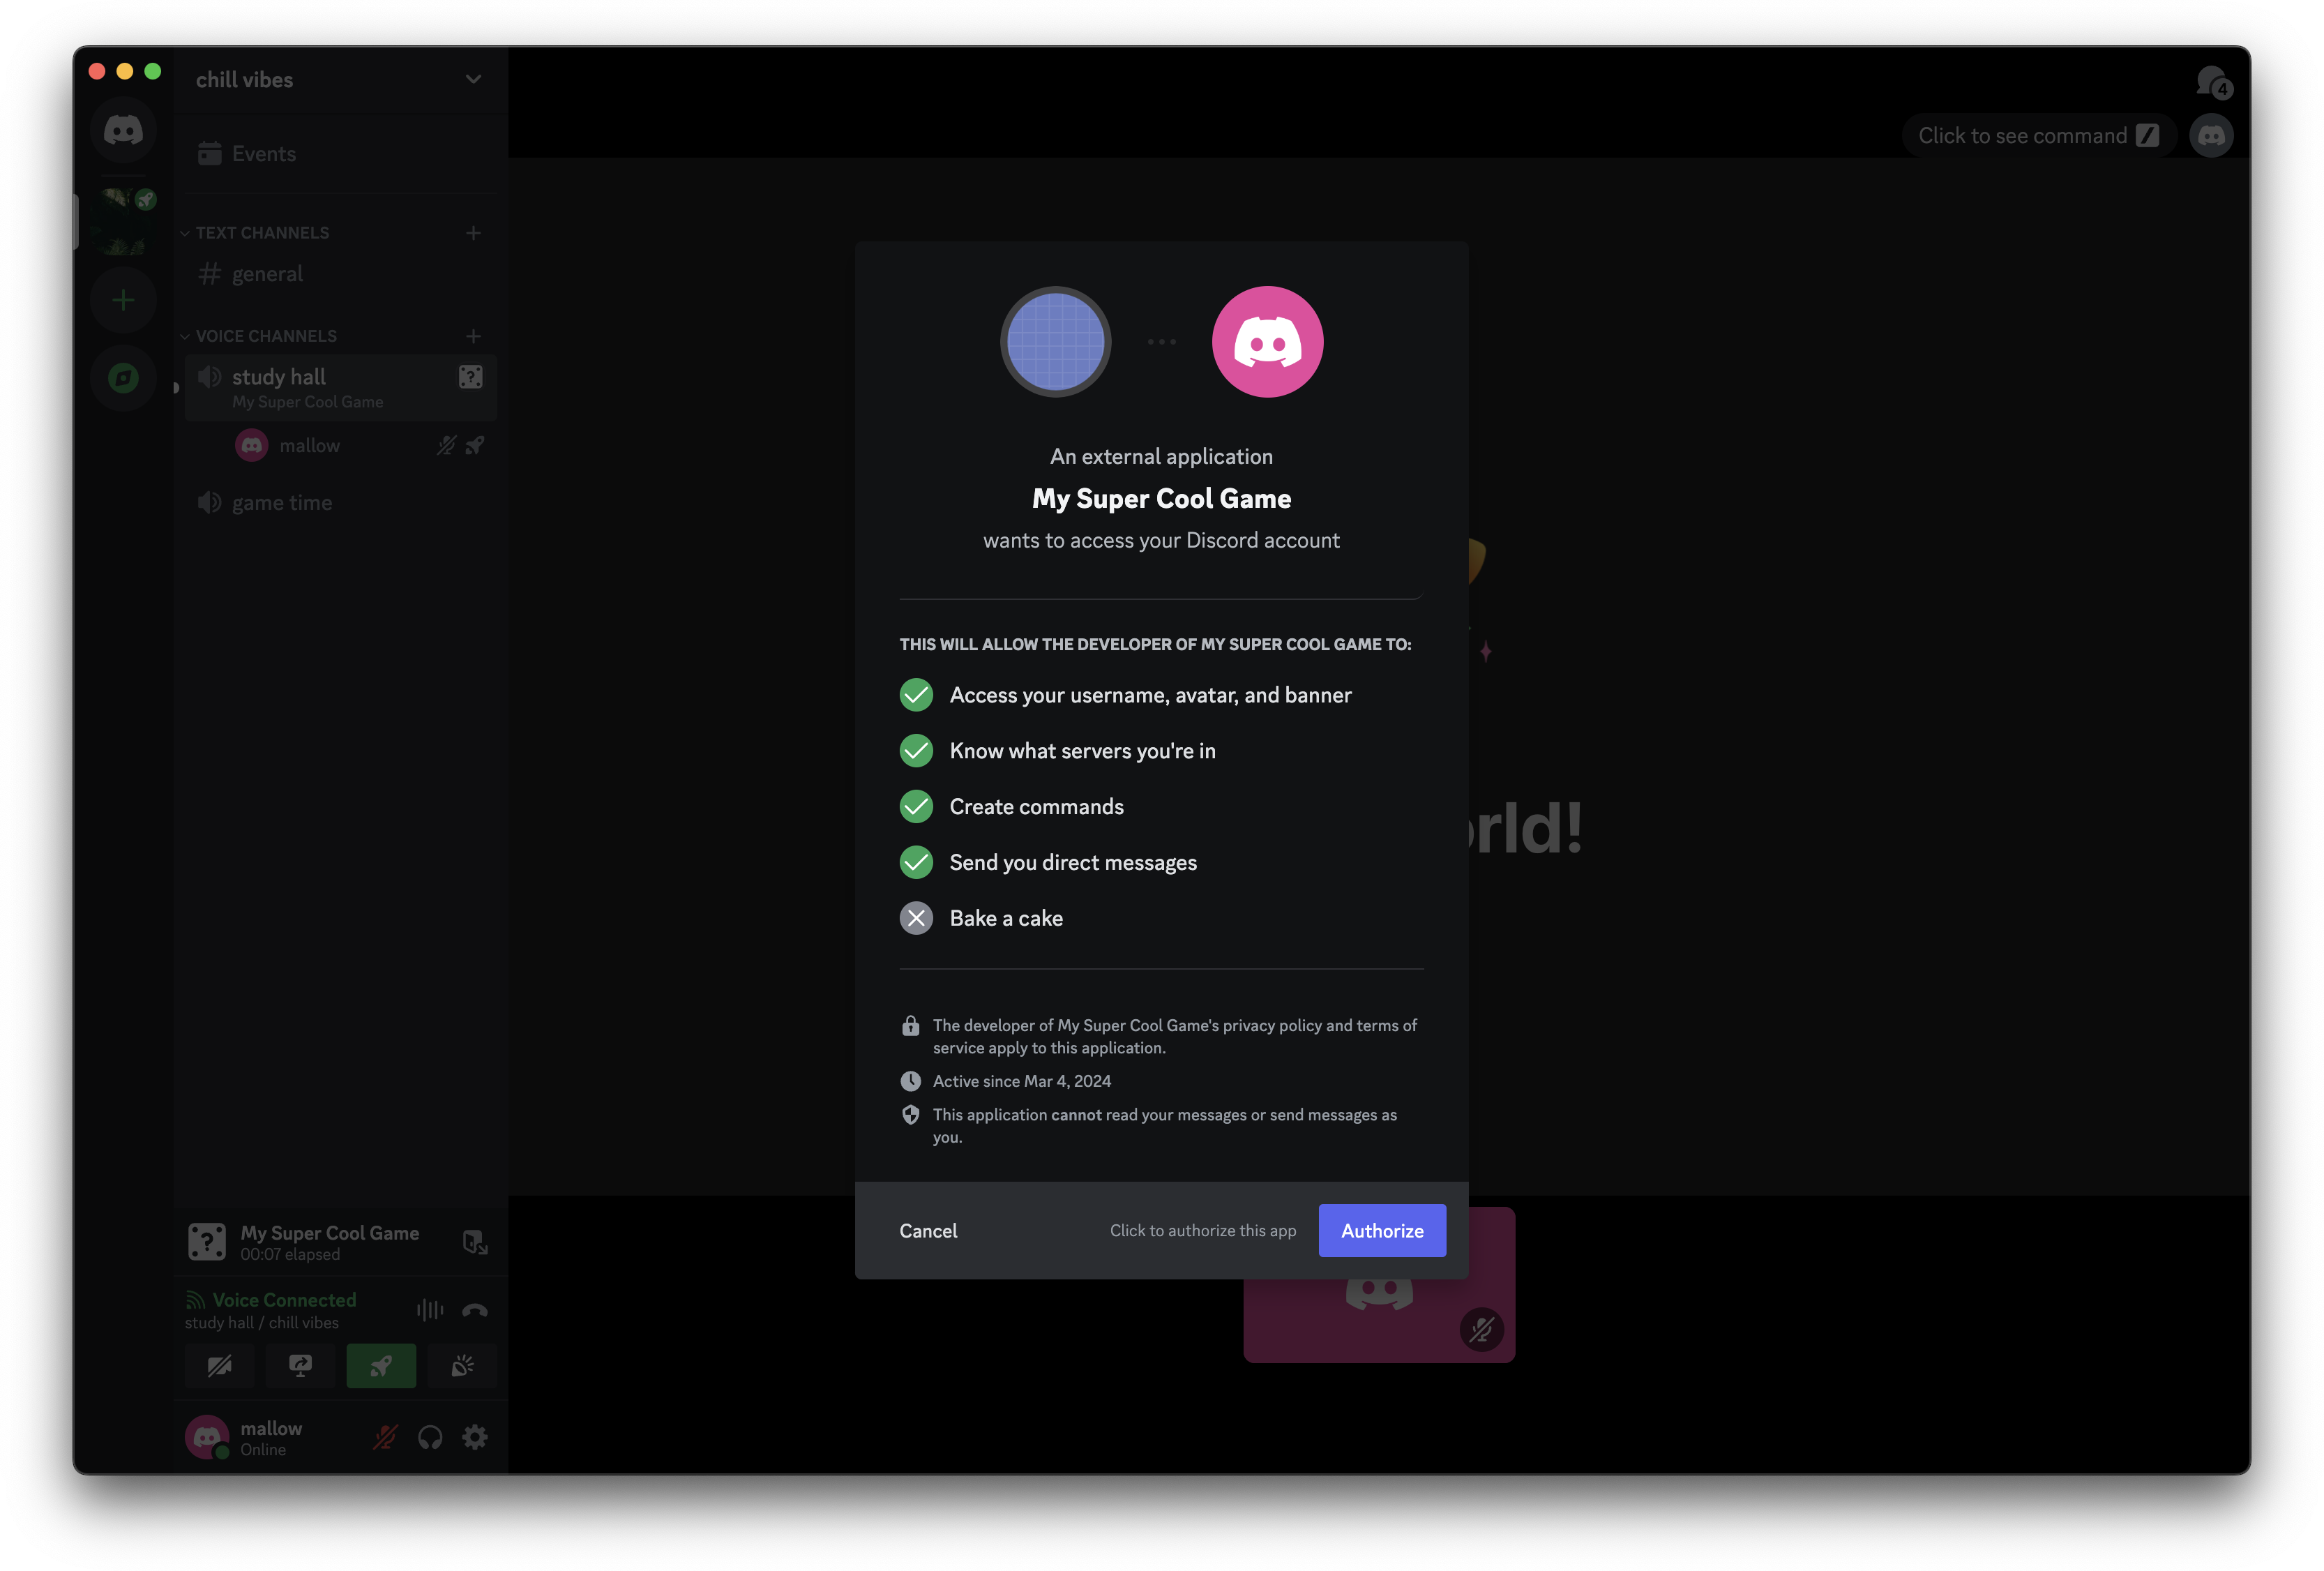
Now if we relaunch our app, we'll be prompted to authorize with Discord using the identify, guilds, and applications.commands scopes.
Step 5 Checkpoint
By the end of Step 5, make sure you have:
- Updated your
client/main.jsto call the backend to support user authorization and authentication - Been able to successfully complete the authorization flow for your app when opening your Activity
Step 6: Use the SDK to fetch the channel
Section titled “Step 6: Use the SDK to fetch the channel”Now that we have authenticated our users, we can start interacting with contextual Discord information that we can use in our application.
Let's use the SDK to get details about the channel that our activity is running in. We can do this by writing a new async function that uses the commands.getChannel SDK method.
Fetching a channel using the SDK
In the same getting-started-activity/client/main.js file, paste the following function:
async function appendVoiceChannelName() {
  const app = document.querySelector('#app');

  let activityChannelName = 'Unknown';

  // Requesting the channel in GDMs (when the guild ID is null) requires
  // the dm_channels.read scope which requires Discord approval.
  if (discordSdk.channelId != null && discordSdk.guildId != null) {
    // Over RPC collect info about the channel
    const channel = await discordSdk.commands.getChannel({channel_id: discordSdk.channelId});
    if (channel.name != null) {
      activityChannelName = channel.name;
    }
  }

  // Update the UI with the name of the current voice channel
  const textTagString = `Activity Channel: "${activityChannelName}"`;
  const textTag = document.createElement('p');
  textTag.textContent = textTagString;
  app.appendChild(textTag);
}
Now, update the callback after setupDiscordSdk() to call the function you just added:
setupDiscordSdk().then(() => {
  console.log("Discord SDK is authenticated");

  appendVoiceChannelName();
});
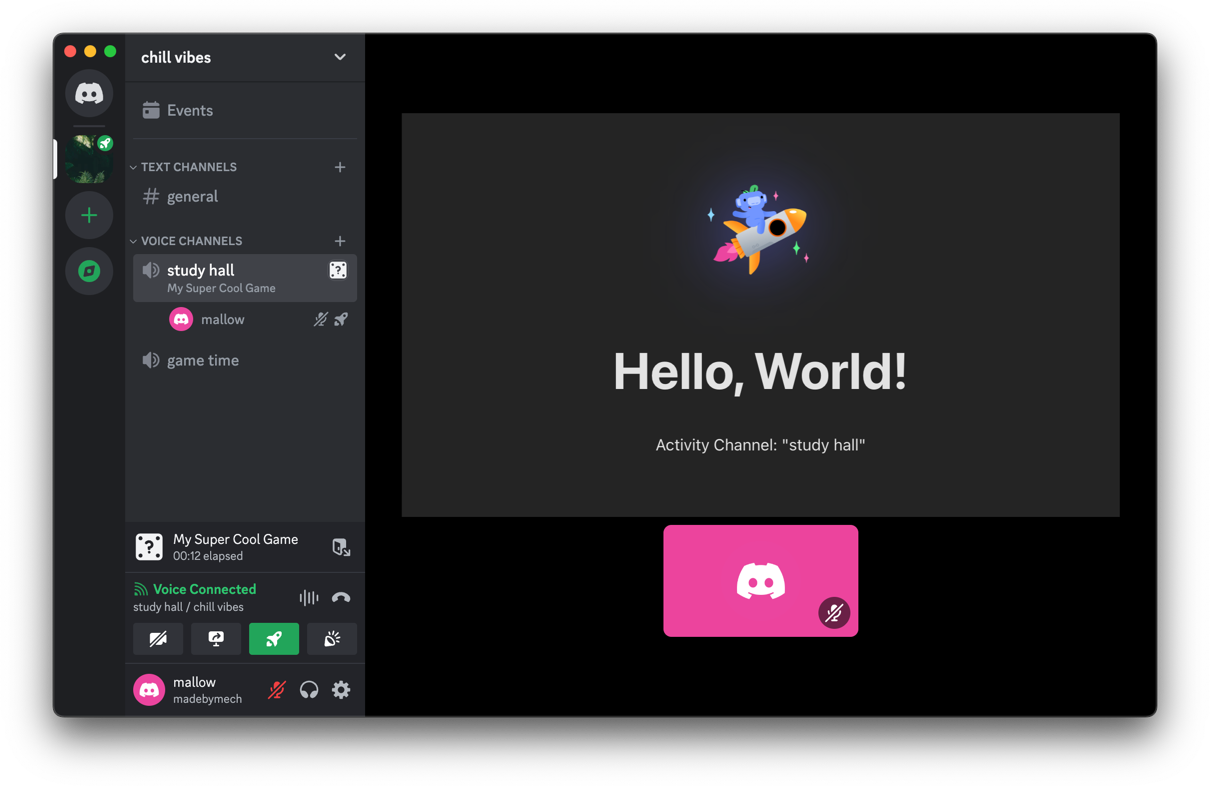
If you close and rejoin the Activity, you should now see the name of the current channel.
Step 6 Checkpoint
By the end of Step 6, make sure you have:
- Updated your
client/main.jscode to fetch the channel name using the SDK - Added a call to the new function in the callback for
setupDiscordSdk()
Step 7: Use the API to fetch the guild
Section titled “Step 7: Use the API to fetch the guild”Since we requested the identify and guilds scopes, you can also use the authorized access_token we received earlier to fetch those resources via the API.
In the following code block, we will:
- Call the
GET /users/@me/guildsendpoint withauth.access_tokento get a list of the guilds the authorizing user is in - Iterate over each guild to find the guild we are in based on the
guildIddefined in discordSdk - Create a new HTML image element with the guild avatar and append it to our frontend
Fetching information about the current server
In the same client/main.js file, add the following function:
async function appendGuildAvatar() {
  const app = document.querySelector('#app');

  // 1. From the HTTP API fetch a list of all of the user's guilds
  const guilds = await fetch(`https://discord.com/api/v10/users/@me/guilds`, {
    headers: {
      // NOTE: we're using the access_token provided by the "authenticate" command
      Authorization: `Bearer ${auth.access_token}`,
      'Content-Type': 'application/json',
    },
  }).then((response) => response.json());

  // 2. Find the current guild's info, including it's "icon"
  const currentGuild = guilds.find((g) => g.id === discordSdk.guildId);

  // 3. Append to the UI an img tag with the related information
  if (currentGuild != null) {
    const guildImg = document.createElement('img');
    guildImg.setAttribute(
      'src',
      // More info on image formatting here: https://docs.discord.com/developers/reference#image-formatting
      `https://cdn.discordapp.com/icons/${currentGuild.id}/${currentGuild.icon}.webp?size=128`
    );
    guildImg.setAttribute('width', '128px');
    guildImg.setAttribute('height', '128px');
    guildImg.setAttribute('style', 'border-radius: 50%;');
    app.appendChild(guildImg);
  }
}
Then, call the new function in the callback for setupDiscordSdk:
setupDiscordSdk().then(() => {
  console.log("Discord SDK is authenticated");

  appendVoiceChannelName();
  appendGuildAvatar();
});
If we relaunch our Activity, we will see the current server's avatar render in our Activity.
Step 7 Checkpoint
At this point, you should have your Activity up and running. For Step 7, you should have:
- Updated your
client/main.jscode to fetch the guild information using theGET /users/@me/guildsAPI endpoint - Added a call to the new function in the callback for
setupDiscordSdk()
Next Steps
Section titled “Next Steps”Congrats on building your first Activity! 🎉
This is an intentionally simple example to get you started with the communication between your Activity and Discord using the Embedded App SDK and APIs. From here, you can explore the Activities documentation and other resources.
Development Guides
Follow our Activities Development Guides for suggested development practices and considerations.
Sample Activity Projects
Try out the full range of Embedded App SDK features in the playground app, or explore some of the other examples
Discord Developers
Join our community to ask questions about the API, attend events hosted by the Discord platform team, and interact with other Activities developers