Developing A User-Installable App
Tutorial for creating Discord apps that can be installed to user accounts.
Discord apps can be installed to servers, users, or both. This guide will walk you through building a basic game integration app that is installable to both Discord users and servers.
While the tutorial will focus on supporting different installation contexts, we'll be building a basic game integration along the way with a wiki lookup with user-specific bookmarking and a server leaderboard. The app has four commands (/link, /profile, /leaderboard, and /wiki) that can be run in different installation and interaction contexts (which are concepts we'll dig into later in the tutorial).
Resources used in this guide
- GitHub repository where the code from this guide lives.
- discord-interactions, a library that provides types and helper functions for Discord apps.
- Express, a popular JavaScript web framework we'll use to create a server where Discord can send requests.
- ngrok, a tool that lets us tunnel our local server to a public URL where Discord can send requests.
Step 0: Project Setup
Section titled “Step 0: Project Setup”Before we dig in, you'll need the project code from the sample app repository.
Project structure
├── .env.sample -> sample .env file
├── app.js      -> main entrypoint for the app
├── commands.js -> slash command payloads + helpers
├── game.js     -> logic specific to the fake game
├── utils.js    -> utility functions and enums
├── package.json
├── README.md
└── .gitignoreIf you don't have NodeJS installed, install that first.
Now, clone the project code to your machine using the command line:
git clone https://github.com/discord/user-install-example.gitThen navigate to the directory and install the project's dependencies:
# navigate to directory
cd user-install-example

# install dependencies
npm install
With that out of the way, open your new project in the code editor of your choice, then we'll move ahead to setting up your Discord app.
Step 1: Creating an App
Section titled “Step 1: Creating an App”First, you'll need to create an app in the developer portal if you don't have one already:
Create App
Enter a name for your app, then press Create.
After you create your app, you'll land on the General Information page of the app's settings where you can update basic information about your app like its description and icon.
Fetching app credentials
Section titled “Fetching app credentials”While we're in your app's settings, we'll want to get a few sensitive values for your app, like its token and ID.
Back in your project folder, rename the .env.sample file to .env. .env is where we'll store all of your app's credentials.
We'll need three values from your app's settings for your .env file:
- On the General Information page, copy the value for Application ID. In
.env, replace<YOUR_APP_ID>with the ID you copied. - Back on the General Information page, copy the value for Public Key, which is used to ensure HTTP requests are coming from Discord. In
.env, replace<YOUR_PUBLIC_KEY>with the value you copied. - On the Bot page under Token, click "Reset Token" to generate a new bot token. In
.env, replace<YOUR_BOT_TOKEN>with your new token.
Now that you have the credentials you need, we'll configure your app to support different installation contexts.
Add Guild Members intent
Section titled “Add Guild Members intent”The sample app fetches members in the server when constructing a fake game leaderboard. Getting server members requires a special permission called a privileged intent, so we'll add that to our app.
Go to the Bot page and find the Privileged Gateway Intents section. Toggle "Server Member Intent" to be active.
Choosing Supported Installation Contexts
Section titled “Choosing Supported Installation Contexts”An app's installation context defines how it's installed: to a server, to a user, or both.
We're going to configure our app to support both installation contexts, and while that's a good default for most apps, some apps may only make sense in one context or the other.
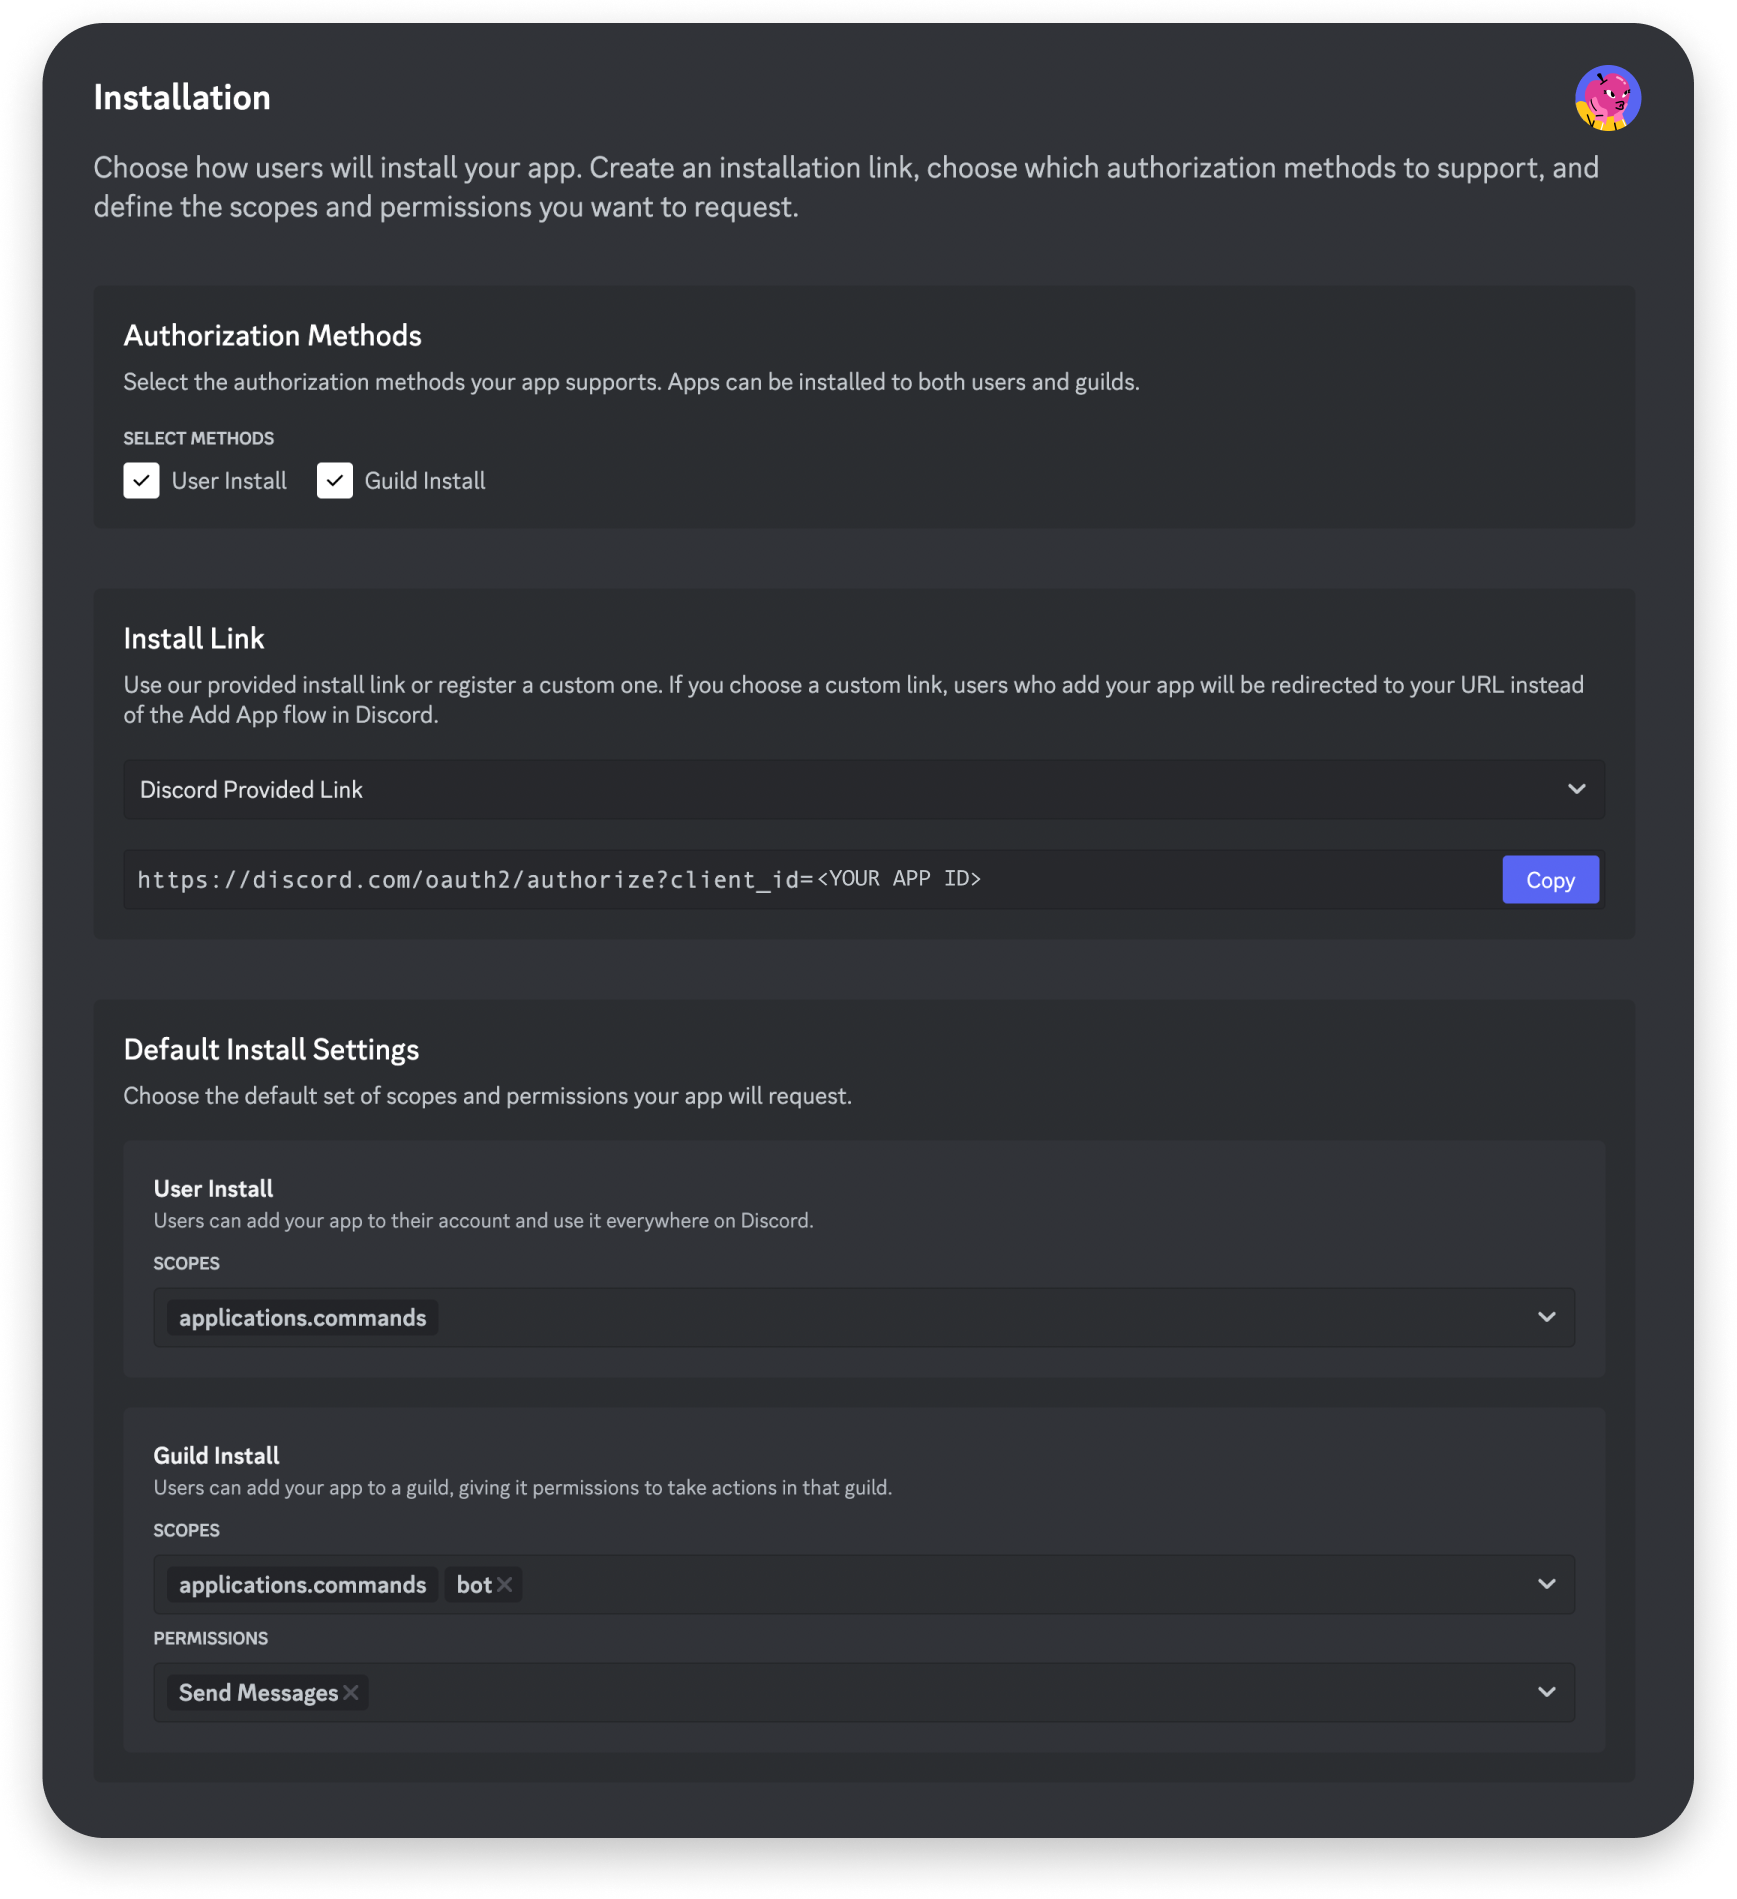
In your app's settings, go to the Installation page from the sidebar. Under Installation Contexts, check both User Install and Guild Install, then press Save Changes.
Configuring Default Install Settings
Section titled “Configuring Default Install Settings”The default install settings of your app determines the default scopes and bot user permissions for each supported installation context. At the moment, apps installed to a user context only support the applications.commands scope (which allows your app to install commands) in the default install settings.
Update Install Link
Section titled “Update Install Link”Before adding default install settings, we need to select Discord Provided Link for the app's install link. Under the Install Link section, select Discord Provided Link from the dropdown if it isn't already selected (it should be by default). Once its selected, the Default Install Settings will appear.
Adding Default Install Settings
Section titled “Adding Default Install Settings”Under the Default Install Settings section:
- For User Install, add the
applications.commandsscope - For Guild Install, add the
applications.commandsscope andbotscope. When you selectbot, a new Permissions menu will appear to select the bot user's permissions. Select any permissions that you may want for your app—for now, I'll just selectSend Messages.
After you've selected the scopes and permissions for your app, click Save Changes.
Installing your app
Section titled “Installing your app”Finally, we'll install your new app to both a test server and your user account so that we can test in both installation contexts.
Install to server
Section titled “Install to server”To install your app to your test server, copy the default Install Link for your app from the Installation page. Paste the link in your browser and hit enter, then select "Add to server" in the installation prompt.
Select your test server, and follow the installation prompt. Once your app is added to your test server, you should see it appear in the member list.
Install to user account
Section titled “Install to user account”Next, install your app to your user account. Paste the same Install Link in your browser and hit enter. This time, select "Add to my apps" in the installation prompt.
Follow the installation prompt to install your app to your user account. Once it's installed you can open a DM with it.
Step 2: Setting Up Commands
Section titled “Step 2: Setting Up Commands”Next, we'll register the application commands for our app. But before touching code, it's important to understand the concept of command contexts:
Contexts for application commands
Commands have two context fields that can be set when creating or updating a command which let you limit the supported install methods and surfaces in Discord for that command:
integration_typeslets you control which installation contexts a command is supported (user, guild, or both). For example, the/linkand/profilecommands we'll be creating are only available when the app is installed to a user.contextslets you set the interaction contexts, or the surfaces in Discord, where a command can be used (in a guild channel, in your bot user's DM, and within other DMs or GDMs). For example, the/leaderboardcommand we'll be creating is only available when the command is run from a guild channel.
More information and details about command contexts are in the contexts documentation, but for now we'll get a better understanding of contexts by using them in our sample app.
Commands in the sample project
Section titled “Commands in the sample project”We'll be setting up four commands for our sample app that all have slightly different contexts, which are included in the table below:
| Name | Description | Installation Contexts (integration_types) |
Interaction Contexts (contexts) |
|---|---|---|---|
/leaderboard |
View game leaderboard for the current server | GUILD_INSTALL |
GUILD |
/wiki |
Find information about game items and characters | GUILD_INSTALL, USER_INSTALL |
GUILD, BOT_DM, PRIVATE_CHANNEL |
/profile |
Get information about your game inventory and progress | USER_INSTALL |
GUILD, BOT_DM, PRIVATE_CHANNEL |
/link |
Link your game account to Discord | USER_INSTALL |
BOT_DM |
The payloads for our app's commands are in commands.js in the project folder in case you want to change any values or see what the command's context fields (integration_types and contexts) look like for each of the commands in the table above.
Registering the commands
Section titled “Registering the commands”Now let's register your app's commands so you can see them in Discord. In your project folder run:
npm run registerThe register command will call the Create Global Application Command endpoint for each of the command payloads in commands.js.
After your new commands have been created, you can go into Discord and look for the commands in the surfaces where we made them available:
- In channels within the guild you installed your app, you should see
/leaderboard,/wiki, and/profile - In channels within any of your guilds, you should see
/wikiand/profile - In your app's DM, you should see
/wiki,/profile, andlink - And finally, in DMs or GDMs with other users, you should see
/wikiand/profile
However, if you try to run any of the commands, you'll get an error :(
...let's fix that.
Step 3: Handling Interactivity
Section titled “Step 3: Handling Interactivity”To receive and handle interactive requests, we'll set up an Interactions Endpoint URL, which is a public URL where Discord sends your app's interactions.
Set up a public endpoint
Section titled “Set up a public endpoint”To set up a public endpoint we'll start our app, which runs an Express server, then use ngrok to expose our server publicly.
First, go to your project's folder and run the following to start your app:
npm run startThere should be some output indicating your app is running on port 3000. Behind the scenes, our app is ready to handle interactions from Discord, which includes verifying security request headers and responding to PING requests. We're skipping over a lot of the details in this tutorial, but details about preparing apps for interactions is in the Interactions Overview documentation.
Next, we'll start our ngrok tunnel. If you don't have ngrok installed locally, you can install it by following the instructions on the ngrok download page.
After ngrok is installed locally, open a new terminal and create a public endpoint that will forward requests to your Express server:
ngrok http 3000The output will include a Forwarding URL, which is the publicly-accessible URL we'll use for our Interactions Endpoint URL in the next step.
Configuring an interaction endpoint URL
Section titled “Configuring an interaction endpoint URL”Let's configure our app's Interaction Endpoint URL.
Go to your app's settings and on the General Information page under Interaction Endpoint URL, paste your new ngrok URL and append /interactions (it'll be something like https://84c5df474.ngrok-free.dev/interactions).
Click Save Changes and if all is well, your Interactions Endpoint URL should be verified by Discord.
Understanding metadata for interactions
Section titled “Understanding metadata for interactions”Now that our Interactions Endpoint URL is set up, we should now be able to run our app's commands. Go to your app's DM and run /profile, and your app should respond with a sample game profile.
Back on the command line, our app is logging incoming requests from Discord, so you can see what the request body for your command invocation looked like.
Sample interaction payload
The payload below is condensed to be more readable, but your interaction request body should look something like this:
{
  "app_permissions": "442368",
  "application_id": "234248956100616262",
  "authorizing_integration_owners": { "1": "1090372582781497424" },
  "channel": {
    // Partial channel object corresponding to channel_id
  },
  "channel_id": "1234563982236504123",
  "context": 1,
  "data": { "id": "1234358421659193405", "name": "link", "type": 1 },
  "entitlements": [],
  "id": "1234968734674853908",
  "locale": "en-US",
  "token": "a really long interactions token that your app can use to respond to the interactions",
  "type": 2,
  "user": {
    // Partial user object
  },
  "version": 1
}
To see which command was run, you can look at the data object.
However, for this tutorial, we're going to focus more on the metadata related to installation and interaction contexts. There are a few metadata fields you'll want to pay attention to when building an app that can be installed to multiple interaction contexts—
context
Section titled “context”context tells you which interaction context the command was invoked from. Since I triggered the command from my app's DM the context is 1 (or BOT_DM).
With interaction context, something to keep in mind in BOT_DM is only the DM with your bot user. If you run the same command in a DM with your bestie, or in a group DM, the interaction context will be PRIVATE_CHANNEL (2).
authorizing_integration_owners
Section titled “authorizing_integration_owners”authorizing_integration_owners provides data about any ID relevant to the installation context(s) associated with the interaction.
The keys in the object are the relevant installation context(s) (GUILD_INSTALL/"0" and/or USER_INSTALL/"1"). The values depend on the key, but for USER_INSTALL the key will always be the ID of the user that authorized your app.
Understanding the authorization owner can be helpful when handling interactions from message components for apps installed to a user, which is discussed more in the message component interactions section. Or you can find technical details in the Authorizing Integration Owners documentation.
app_permissions
Section titled “app_permissions”app_permissions are the bitwise set of permissions your app has in the place where the interaction was triggered. The permissions your app has will be different for DMs with your app, in servers, and G(DM)s with other users.
In the sample payload, the value is "442368".
These values can be helpful when deciding how you want your app to respond to the interaction. For example, perhaps you want your app to respond ephemerally when a specific command is invoked from a server, which the sample app does for the /profile command.
Using metadata for command interactions
Section titled “Using metadata for command interactions”As mentioned above, the /profile command for our app will respond ephemerally, meaning only the invoking user will see the response, when invoked from a server. If it's invoked within a DM with the bot user, it'll respond with a non-ephemeral message. In the project, you can see this logic in app.js when handling the /profile command:
Using context for the profile command
Below is the logic for handling the /profile command. When the context for the interaction is in a server, we'll make our interaction response ephemeral and add a button so the user can share their profile if they want.
// "profile" command
if (name === 'profile') {
  const profile = getFakeProfile(0);
  const profileEmbed = createPlayerEmbed(profile);

  // Use interaction context that the interaction was triggered from
  const interactionContext = req.body.context;

  // Construct `data` for our interaction response. The profile embed will be included regardless of interaction context
  let profilePayloadData = {
    embeds: [profileEmbed],
  };

  // If profile isn't run in a DM with the app, we'll make the response ephemeral and add a share button
  if (interactionContext !== 1) {
    // Make message ephemeral
    profilePayloadData['flags'] = 64;
    // Add button to components
    profilePayloadData['components'] = [
      {
        type: 1,
        components: [
          {
            type: 2,
            label: 'Share Profile',
            custom_id: 'share_profile',
            style: 2,
          },
        ],
      },
    ];
  }

  // Send response
  return res.send({
    type: InteractionResponseType.CHANNEL_MESSAGE_WITH_SOURCE,
    data: profilePayloadData,
  });
}
In the sample app code, we assign the value of context in the request body to a new interactionContext variable. Based on the context, we modify how we respond to the command interaction. If it was run in a guild or within a G(DM) other than the DM with the app's bot user, flags is set to 64 to make the response ephemeral, and a new button component is added so that the user can share their profile if they want.
Using metadata for message component interactions
Section titled “Using metadata for message component interactions”Message component interactions can be triggered by any user the component is visible to, regardless of the installation context. Since potentially any user can trigger the component, it can be helpful to use metadata to understand context about the installation.
Consider we added a new /game command supported in the USER_INSTALL installation context that a user could trigger to send a message to whatever guild or group DM they're in to ask others if they're interested in joining a game match:
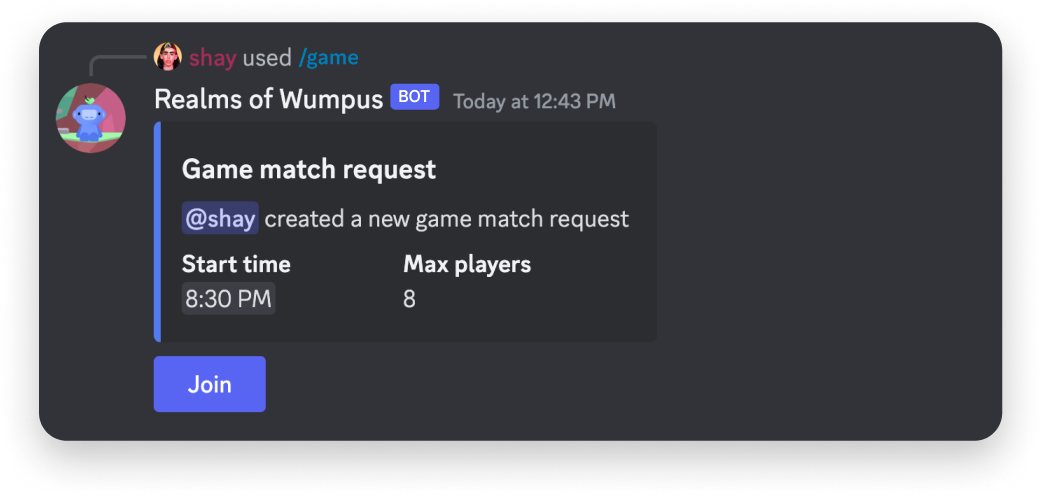
When someone clicks on the button, our app would care about two users when handling the interaction:
- User B, who clicked the "Join" button so our app can track who is interested in joining the match
- User A, who ran the
/gamecommand so our app can tell them who is interested in joining the match
There are two fields additional fields to know about that can be helpful in this scenario—
interaction_metadata
Section titled “interaction_metadata”Messages created in response to an interaction will include an interaction_metadata object which includes metadata related to the interaction.
authorizing_integration_owners
Section titled “authorizing_integration_owners”authorizing_integration_owners was touched on above, but it's worth highlighting again since it's most helpful when handling message component interactions for user-installed apps.
For user-installed apps, it can be used to differentiate between the user that installed an app and the user that triggered an app's interaction since messages sent in response to interactions (either an interaction response or a follow-up message) can be visible to users that don't have the app installed to their account.
Next Steps
Section titled “Next Steps”Yay~! At this point, you have an app that supports both installation contexts and understand the basics of using metadata to support different contexts. Now you can go explore the documentation for details, or play with the sample app to develop more complex features.