Hosting a Reddit API Discord app on Cloudflare Workers
When building Discord apps, your app can receive common events from the client as webhooks when users interact with your app through interactions like application commands or message components.
Discord will send these events to a pre-configured HTTPS endpoint (called an Interactions Endpoint URL in an app's configuration) as a JSON payload with details about the event.
This tutorial walks through building a Discord app powered by r/aww using JavaScript.
All of the code for this app can be found on GitHub.
Features and technologies used
Section titled “Features and technologies used”- Discord Interactions API (specifically slash commands)
- Cloudflare Workers for hosting
- Reddit API to send messages back to the user
Creating an app on Discord
Section titled “Creating an app on Discord”To start, we'll create the app through the Discord Developer Dashboard:
- Visit https://discord.com/developers/applications
- Click
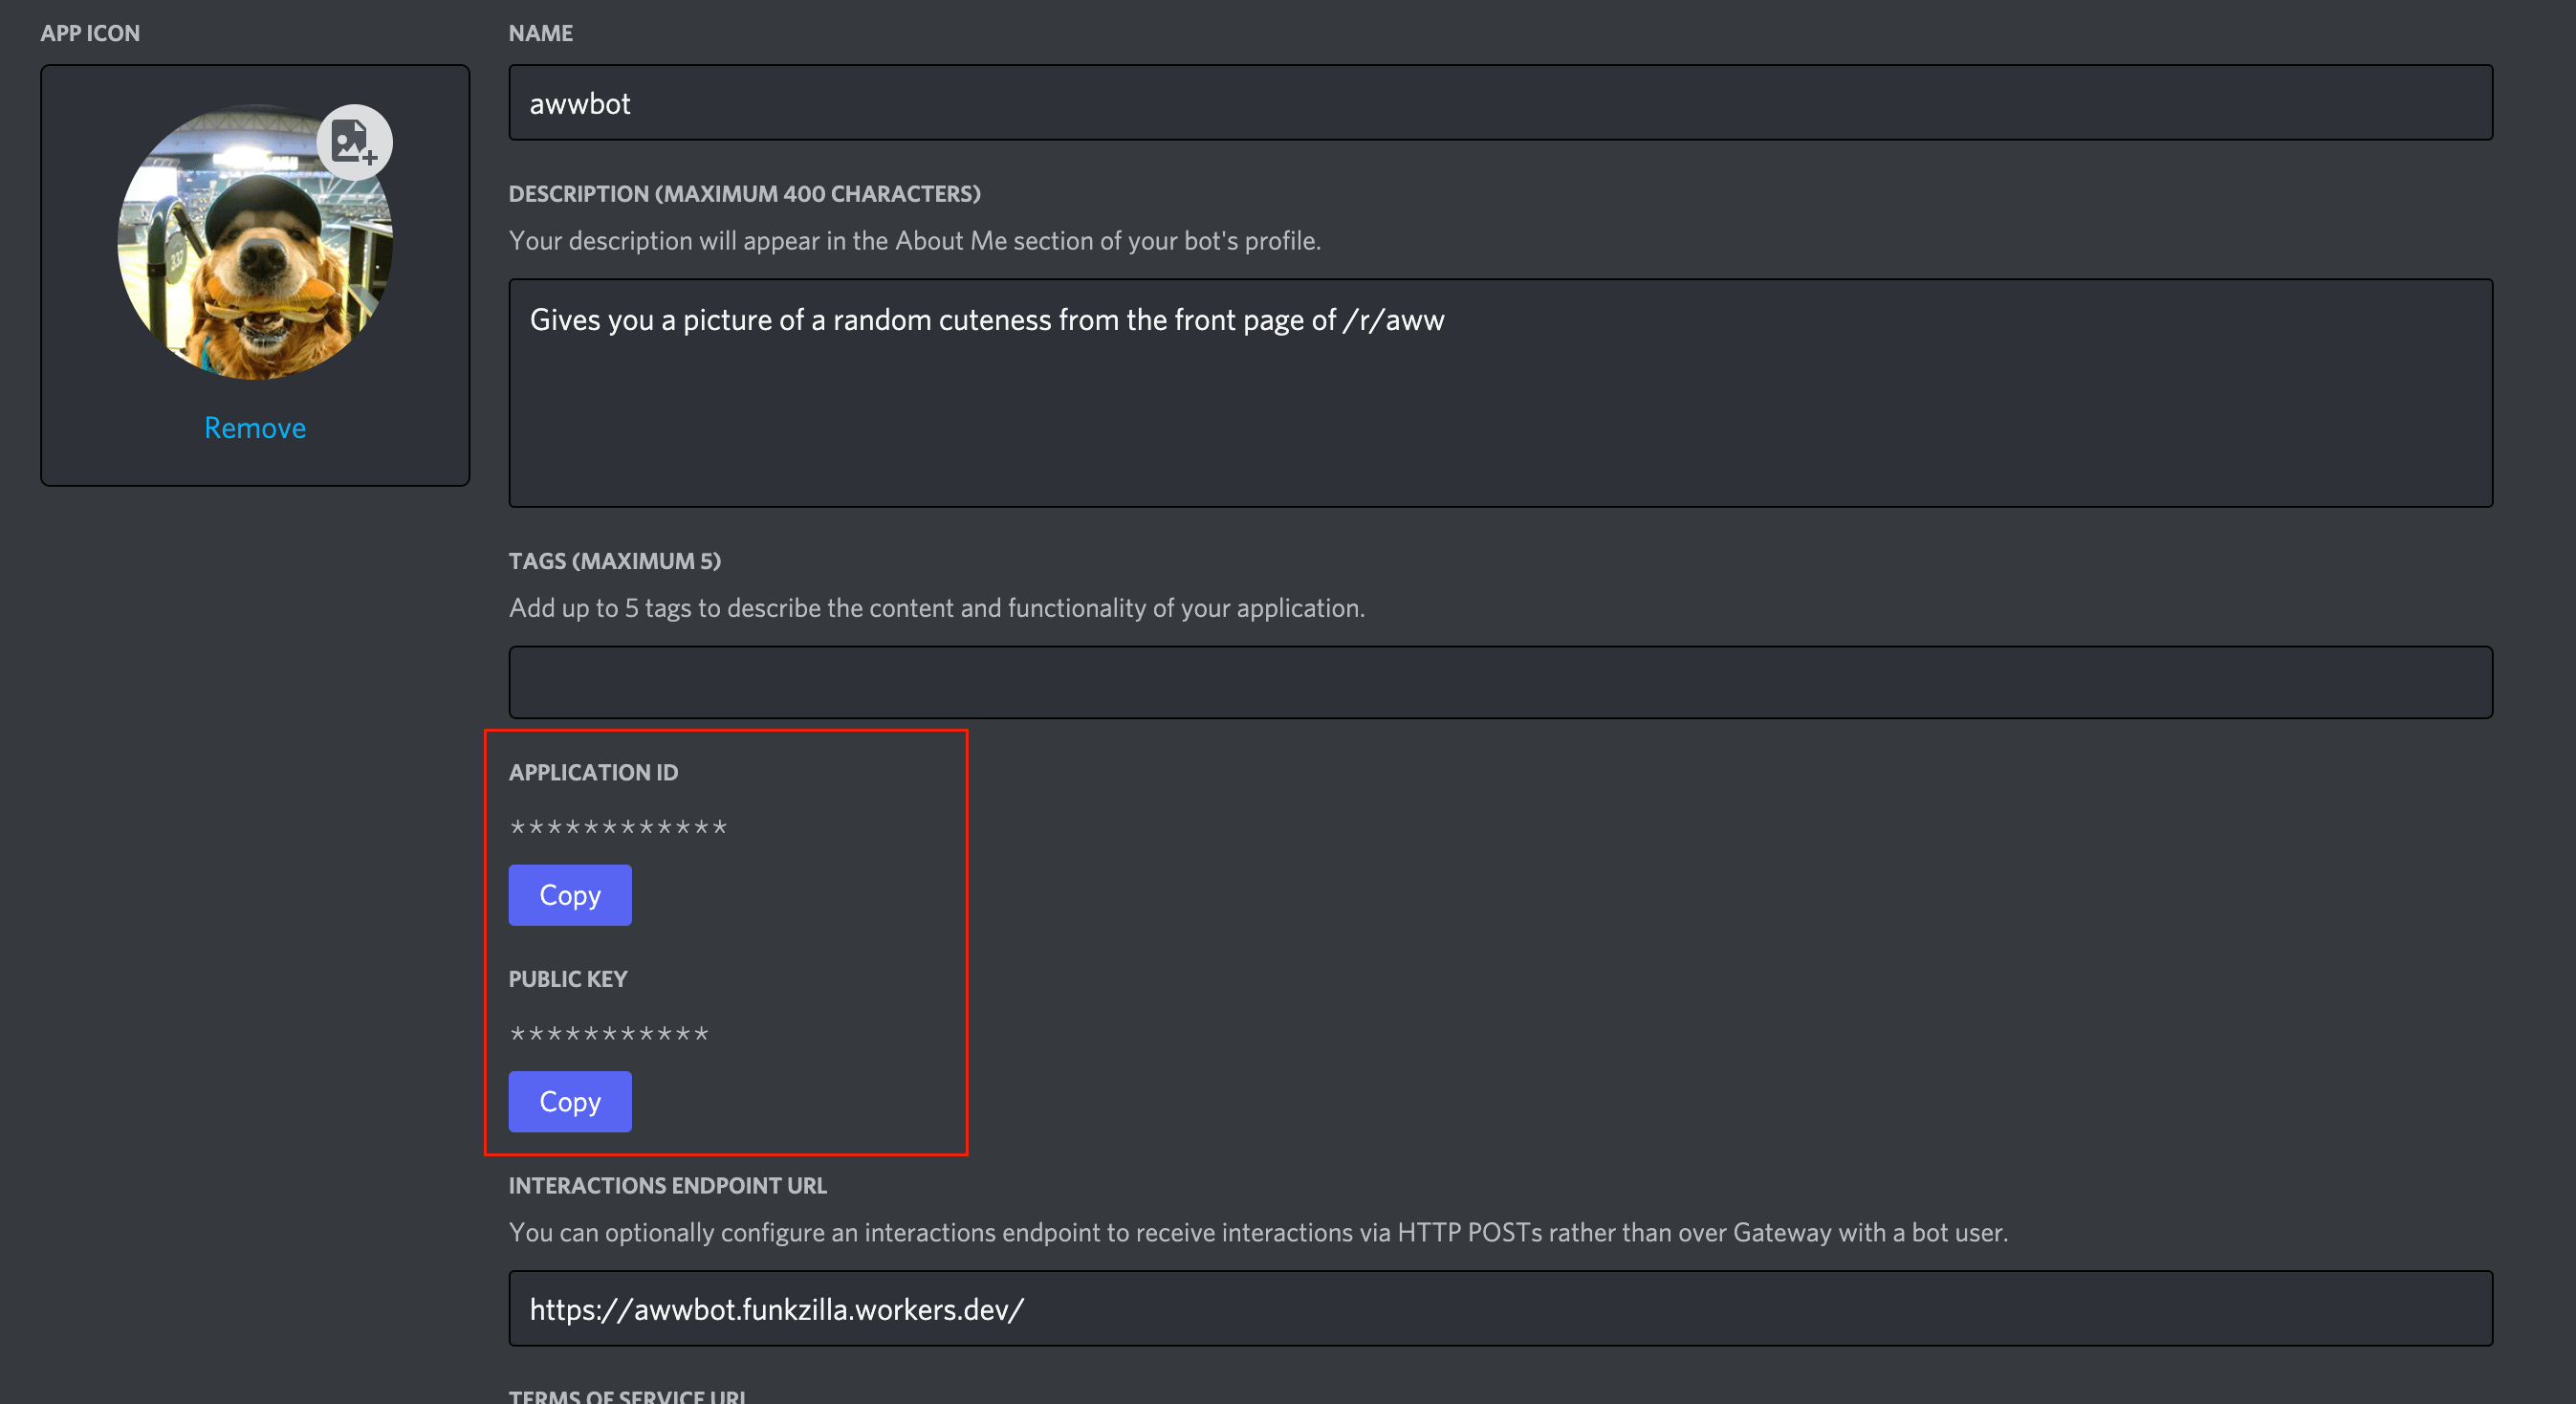
New Application, and choose a name - Copy your Public Key and Application ID, and put them somewhere locally (we'll need these later)
- Now click on the Bot tab on the left sidebar.
- Grab the
tokenfor your bot, and store it somewhere safe (I like to put these tokens in a password manager like 1password or lastpass).
Adding bot permissions
Section titled “Adding bot permissions”Now we'll configure the bot with permissions required to create and use slash commands, as well as send messages in channels.
- Click on the OAuth2 tab, and choose the
URL Generator. Click thebotandapplications.commandsscopes. - Check the boxes next to
Send MessagesandUse Slash Commands, then copy theGenerated URL.
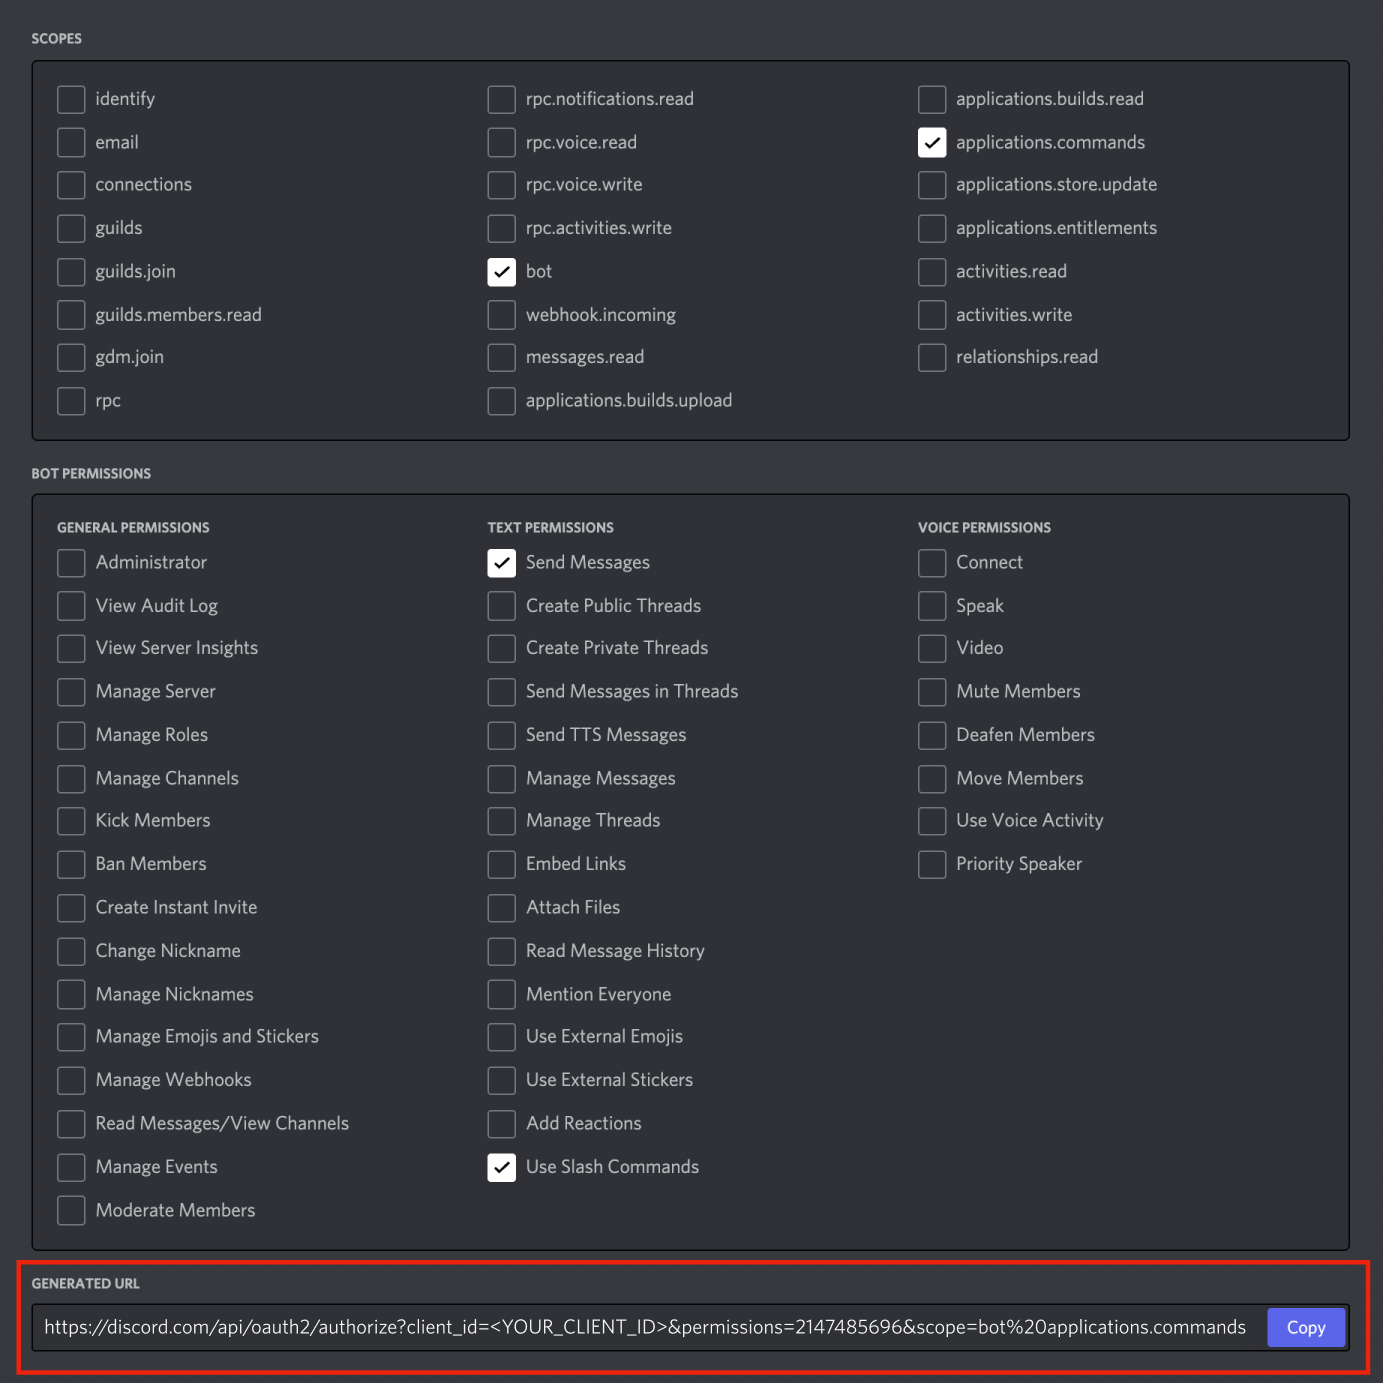
- Paste the URL into the browser and follow the OAuth flow, selecting the server where you'd like to develop and test your bot.
Creating your Cloudflare Worker
Section titled “Creating your Cloudflare Worker”Cloudflare Workers are a convenient way to host Discord apps due to the free tier, simple development model, and automatically managed environment (no VMs!).
- Visit the Cloudflare Dashboard
- Click on the
Workerstab, and create a new service using the same name as your Discord bot - Make sure to install the Wrangler CLI and set it up.
Storing secrets
Section titled “Storing secrets”The production service needs access to some of the information we saved earlier. To set those variables, run:
$ wrangler secret put DISCORD_TOKEN
$ wrangler secret put DISCORD_PUBLIC_KEY
$ wrangler secret put DISCORD_APPLICATION_ID
You'll also need the Guild ID for the server where your app is installed. This can be found in the URL when you visit any channel in that server.
Once you know your Guild ID, set that variable as well:
$ wrangler secret put DISCORD_TEST_GUILD_IDRunning locally
Section titled “Running locally”Let's start by cloning the repository and installing dependencies. This requires at least v16 of Node.js:
$ npm installProject structure
Section titled “Project structure”A brief look at the cloned app's project structure:
├── .github/workflows/ci.yaml -> GitHub Action configuration
├── src
├── ├── commands.js           -> JSON payloads for commands
├── ├── reddit.js             -> Interactions with the Reddit API
├── ├── register.js           -> Sets up commands with the Discord API
├── ├── server.js             -> Discord app logic and routing
├── test
├── ├── test.js               -> Tests for app
├── wrangler.toml             -> Configuration for Cloudflare Workers
├── package.json
├── README.md
├── renovate.json             -> Configuration for repo automation
├── .eslintrc.json
├── .prettierignore
├── .prettierrc.json
└── .gitignore
Registering commands
Section titled “Registering commands”Before testing our app, we need to register our desired slash commands. For this app, we'll have a /awwww command, and a /invite command. The name and description for these are kept separate in commands.js:
export const AWW_COMMAND = {
  name: 'awwww',
  description: 'Drop some cuteness on this channel.',
};

export const INVITE_COMMAND = {
  name: 'invite',
  description: 'Get an invite link to add the bot to your server',
};
The code to register commands lives in register.js. Commands can be registered globally, making them available for all servers with the app installed, or they can be registered on a single server.
In this example - we'll just focus on global commands:
import { AWW_COMMAND, INVITE_COMMAND } from './commands.js';
import fetch from 'node-fetch';

/**
 * This file is meant to be run from the command line, and is not used by the
 * application server.  It's allowed to use node.js primitives, and only needs
 * to be run once.
 */

const token = process.env.DISCORD_TOKEN;
const applicationId = process.env.DISCORD_APPLICATION_ID;

if (!token) {
  throw new Error('The DISCORD_TOKEN environment variable is required.');
}
if (!applicationId) {
  throw new Error(
    'The DISCORD_APPLICATION_ID environment variable is required.'
  );
}

/**
 * Register all commands globally.  This can take o(minutes), so wait until
 * you're sure these are the commands you want.
 */
async function registerGlobalCommands() {
  const url = `https://discord.com/api/v10/applications/${applicationId}/commands`;
  await registerCommands(url);
}

async function registerCommands(url) {
  const response = await fetch(url, {
    headers: {
      'Content-Type': 'application/json',
      Authorization: `Bot ${token}`,
    },
    method: 'PUT',
    body: JSON.stringify([AWW_COMMAND, INVITE_COMMAND]),
  });

  if (response.ok) {
    console.log('Registered all commands');
  } else {
    console.error('Error registering commands');
    const text = await response.text();
    console.error(text);
  }
  return response;
}

await registerGlobalCommands();
Running the server
Section titled “Running the server”This command needs to be run locally, once before getting started:
$ DISCORD_TOKEN=**** DISCORD_APPLICATION_ID=**** node src/register.jsWe're finally ready to run this code locally! Let's start by running our local development server:
$ npm run devSetting up ngrok
Section titled “Setting up ngrok”When a user types a slash command, Discord will send an HTTP request to a public endpoint. During local development this can be a little challenging, so we're going to use a tool called ngrok to create an HTTP tunnel.
$ npm run ngrok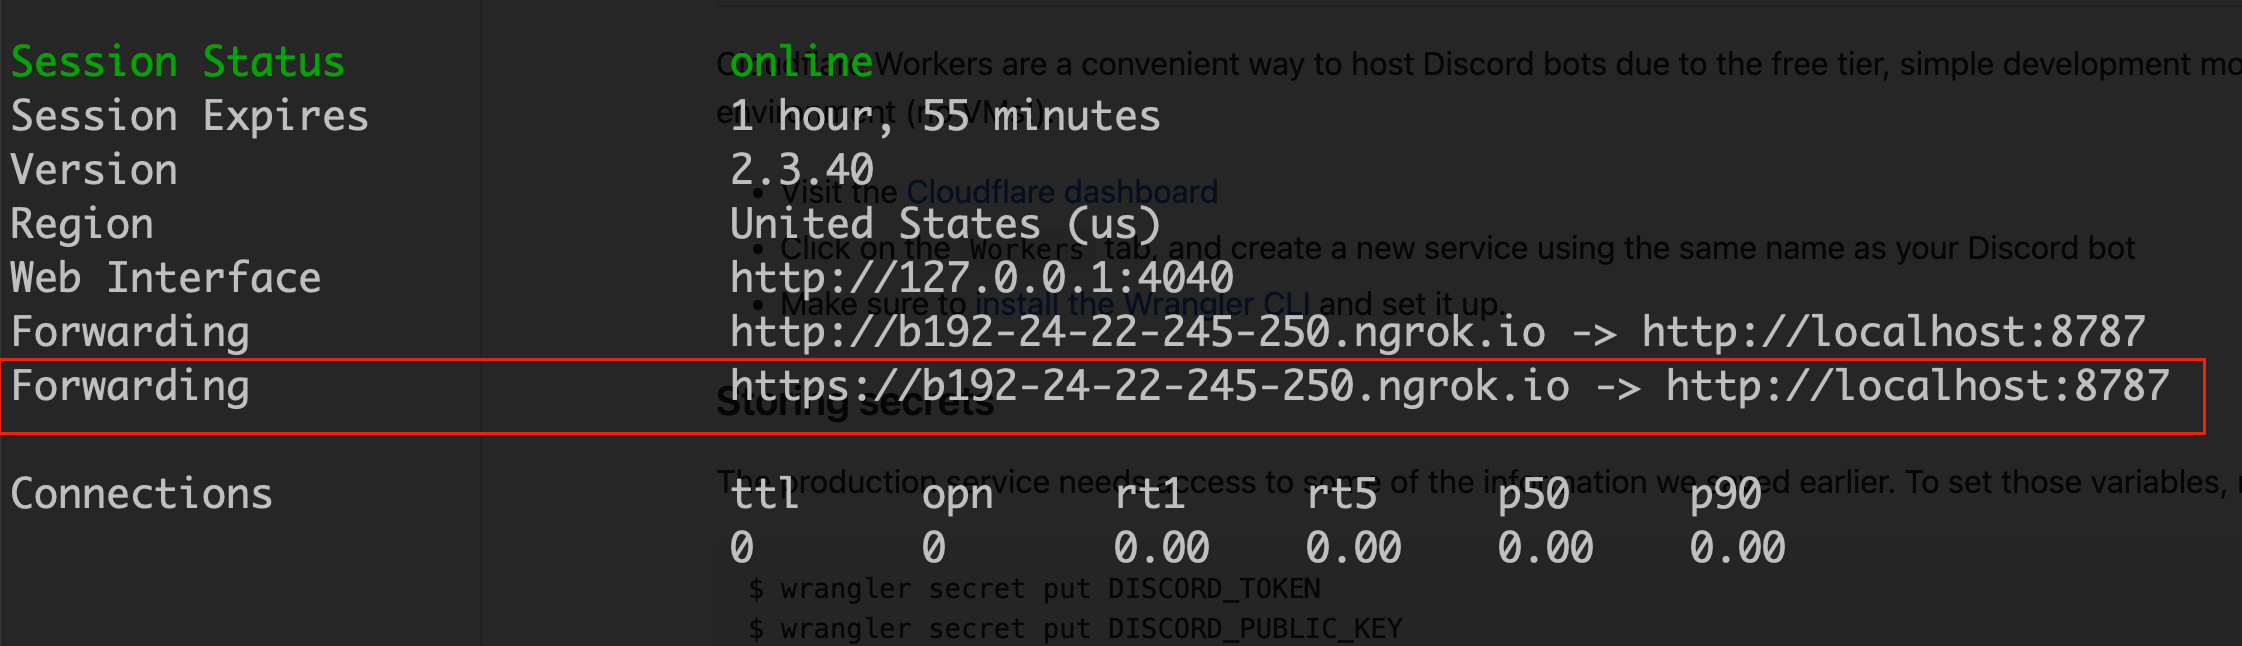
This is going to bounce requests off of an external endpoint, and forward them to your machine. Copy the HTTPS link provided by the tool. It should look something like https://8098-24-22-245-250.ngrok.io.
Now head back to the Discord Developer Dashboard, and update the Interactions Endpoint URL for your app:
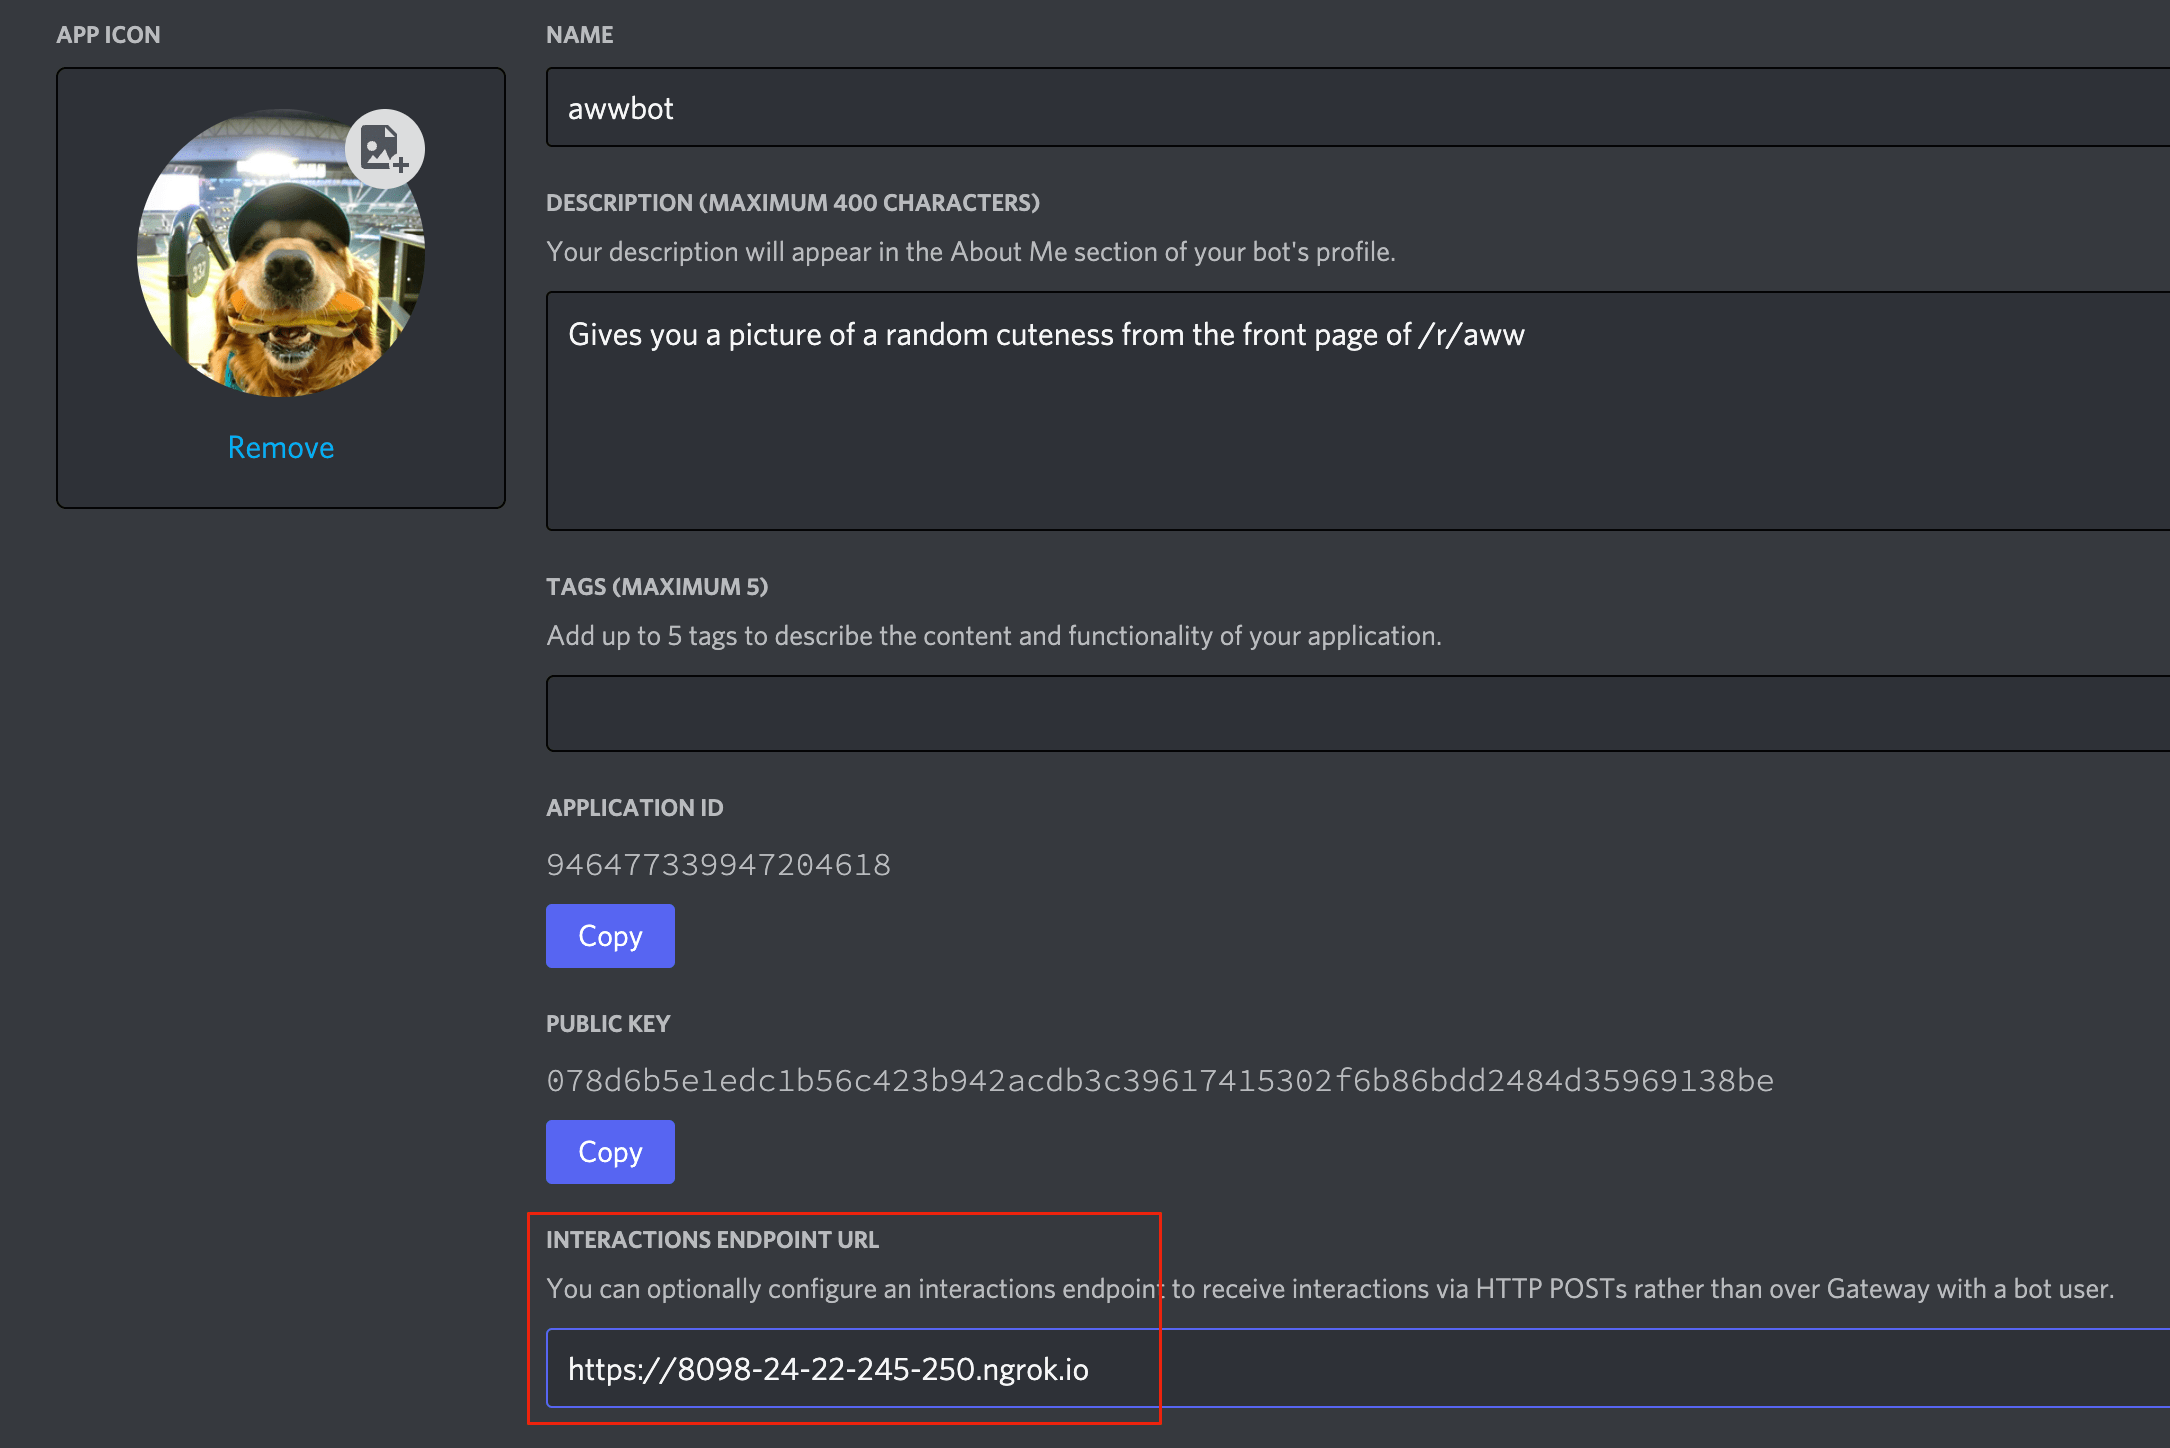
This is the process we'll use for local testing and development. When you've published your app to Cloudflare, you will want to update this field to use your Cloudflare Worker URL.
Deployment
Section titled “Deployment”This repository is set up to automatically deploy to Cloudflare Workers when new changes land on the main branch. To deploy manually, run npm run publish, which uses the wrangler publish command under the hood.
Publishing via a GitHub Action requires obtaining an API Token and your Account ID from Cloudflare. These are stored as secrets in the GitHub repository, making them available to GitHub Actions.
The following configuration in .github/workflows/ci.yaml demonstrates how to tie it all together:
release:
  if: github.ref == 'refs/heads/main'
  runs-on: ubuntu-latest
  needs: [test, lint]
  steps:
    - uses: actions/checkout@v2
    - uses: actions/setup-node@v2
      with:
        node-version: 16
    - run: npm install
    - run: npm run publish
      env:
        CF_API_TOKEN: ${{ secrets.CF_API_TOKEN }}
        CF_ACCOUNT_ID: ${{ secrets.CF_ACCOUNT_ID }}
Code deep dive
Section titled “Code deep dive”Most of the interesting code in this app lives in src/server.js. Cloudflare Workers require exposing a fetch function, which is called as the entry point for each request. This code will largely do two things for us: validate the request is valid and actually came from Discord, and hand the request over to a router to help give us a little more control over execution.
export default {
  /**
   * Every request to a worker will start in the `fetch` method.
   * Verify the signature with the request, and dispatch to the router.
   * @param {*} request A Fetch Request object
   * @param {*} env A map of key/value pairs with env vars and secrets from the cloudflare env.
   * @returns
   */
  async fetch(request, env) {
    if (request.method === 'POST') {
      // Using the incoming headers, verify this request actually came from discord.
      const signature = request.headers.get('x-signature-ed25519');
      const timestamp = request.headers.get('x-signature-timestamp');
      const body = await request.clone().arrayBuffer();
      const isValidRequest = verifyKey(
        body,
        signature,
        timestamp,
        env.DISCORD_PUBLIC_KEY
      );
      if (!isValidRequest) {
        console.error('Invalid Request');
        return new Response('Bad request signature.', { status: 401 });
      }
    }

    // Dispatch the request to the appropriate route
    return router.handle(request, env);
  },
};
All of the API calls from Discord in this example will be POSTed to /. From here, we will use the discord-interactions npm module to help us interpret the event, and to send results.
/**
 * Main route for all requests sent from Discord.  All incoming messages will
 * include a JSON payload described here:
 * /developers/docs/interactions/receiving-and-responding#interaction-object
 */
router.post('/', async (request, env) => {
  const message = await request.json();
  console.log(message);
  if (message.type === InteractionType.PING) {
    // The `PING` message is used during the initial webhook handshake, and is
    // required to configure the webhook in the developer portal.
    console.log('Handling Ping request');
    return new JsonResponse({
      type: InteractionResponseType.PONG,
    });
  }

  if (message.type === InteractionType.APPLICATION_COMMAND) {
    // Most user commands will come as `APPLICATION_COMMAND`.
    switch (message.data.name.toLowerCase()) {
      case AWW_COMMAND.name.toLowerCase(): {
        console.log('handling cute request');
        const cuteUrl = await getCuteUrl();
        return new JsonResponse({
          type: InteractionResponseType.CHANNEL_MESSAGE_WITH_SOURCE,
          data: {
            content: cuteUrl,
          },
        });
      }
      case INVITE_COMMAND.name.toLowerCase(): {
        const applicationId = env.DISCORD_APPLICATION_ID;
        const INVITE_URL = `https://discord.com/oauth2/authorize?client_id=${applicationId}&scope=applications.commands`;
        return new JsonResponse({
          type: InteractionResponseType.CHANNEL_MESSAGE_WITH_SOURCE,
          data: {
            content: INVITE_URL,
            flags: InteractionResponseFlags.EPHEMERAL,
          },
        });
      }
      default:
        console.error('Unknown Command');
        return new JsonResponse({ error: 'Unknown Type' }, { status: 400 });
    }
  }

  console.error('Unknown Type');
  return new JsonResponse({ error: 'Unknown Type' }, { status: 400 });
});
Next steps
Section titled “Next steps”With your app built and deployed, you can start customizing it to be your own:
- Use message components in your app to add more interactivity (like buttons and select menus).
- Take a look at different public APIs on GitHub.
- Join the Discord Developers server to ask questions about the API, attend events hosted by the Discord API team, and interact with other developers.