Building your first Discord Bot
Discord apps let you customize and extend Discord using a collection of APIs and interactive features. This guide will walk you through building your first Discord app using JavaScript and by the end you'll have an app that uses slash commands, sends messages, and responds to component interactions.
We'll be building a Discord app that lets users play rock-paper-scissors (with 7 choices instead of 3). This guide is beginner-focused, but it assumes a basic understanding of JavaScript.
What we'll be building
Here's what the finished app will look like:
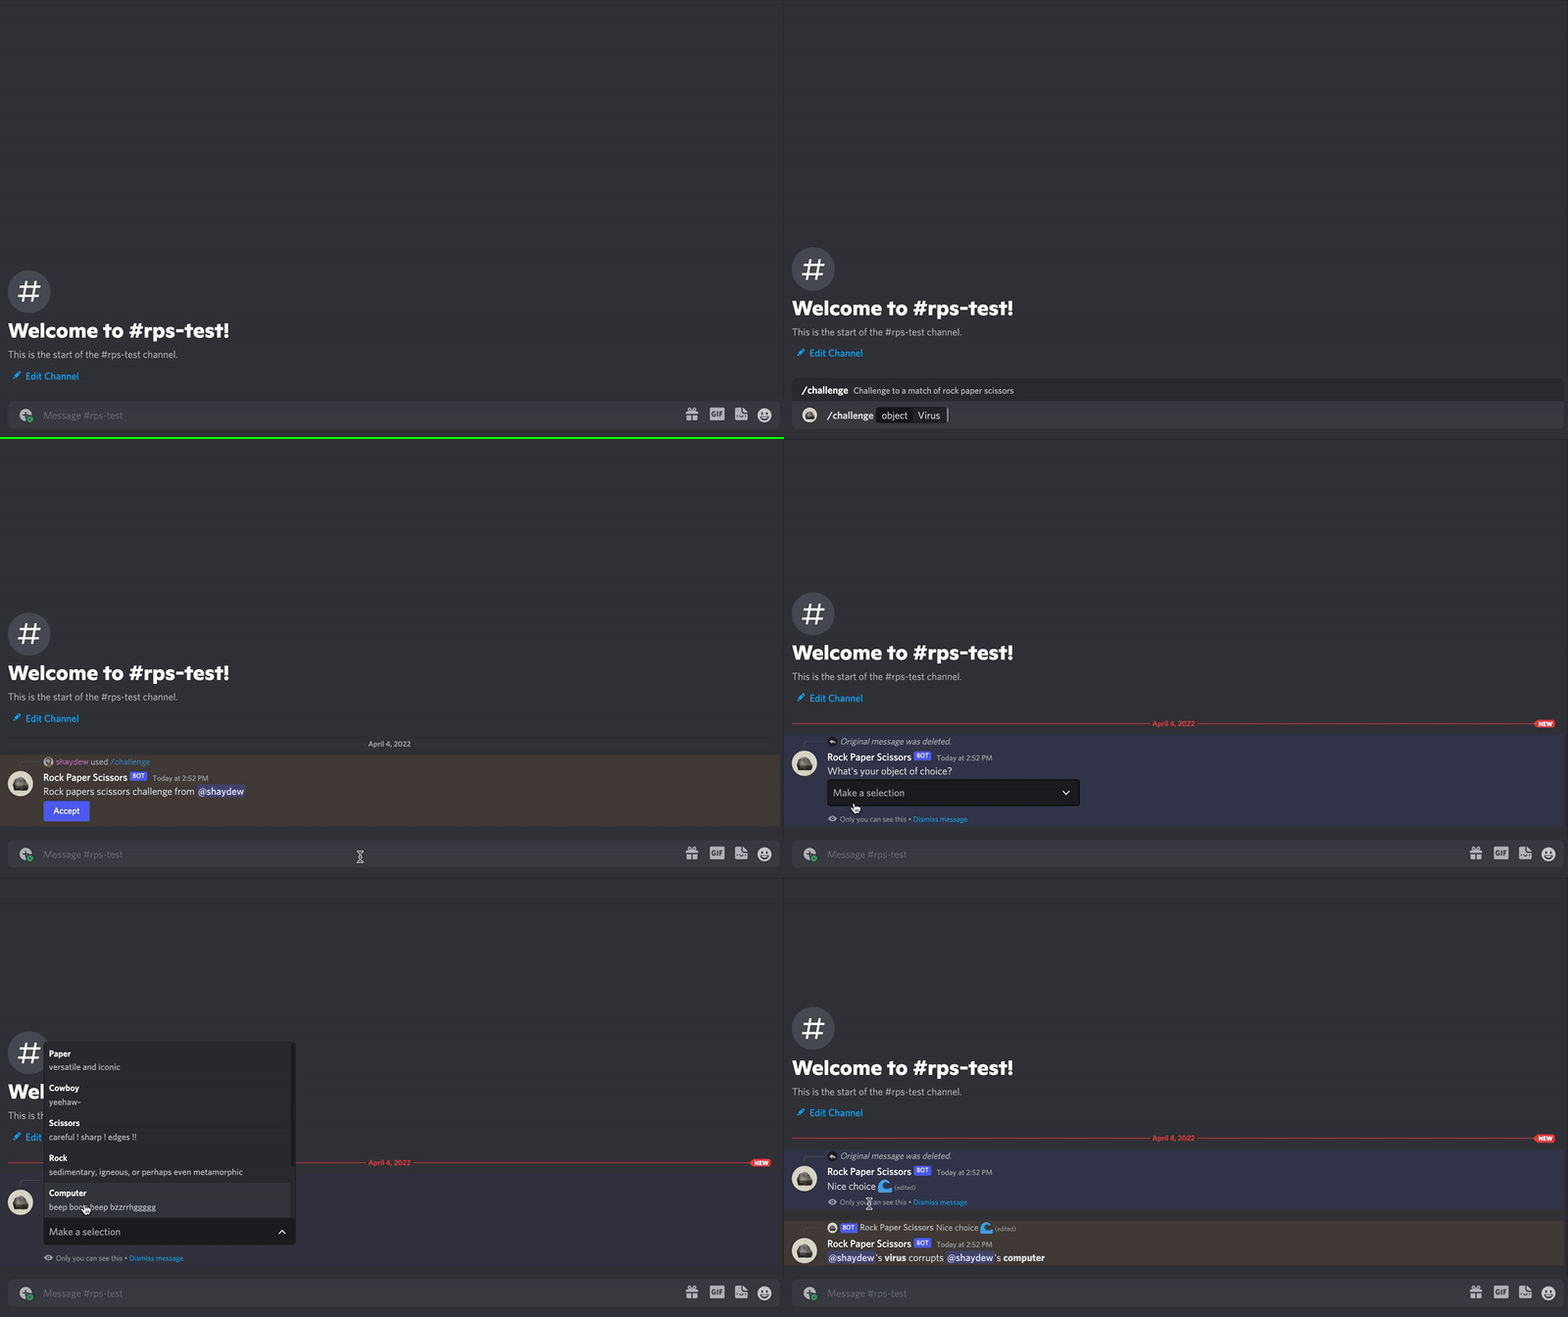
To make the user flow a bit more explicit:
- User A initiates a new game and picks their object using the app's
/challengeslash command - A message is sent to channel with a button inviting others to accept the challenge
- User B presses the Accept button
- User B is sent an ephemeral message where they select their object of choice
- The result of the game is posted back into the original channel for all to see
Resources used in this guide
- GitHub repository where the code from this guide lives along with some additional feature-specific code examples.
- discord-interactions, a library that provides types and helper functions for Discord apps.
- Express, a popular JavaScript web framework we'll use to create a server where Discord can send us requests.
- ngrok, a tool that lets us tunnel our local server to a public URL where Discord can send requests.
Step 0: Project Setup
Section titled “Step 0: Project Setup”Before we get started, you'll need to set up your local environment and get the project code from the sample app repository.
If you don't have NodeJS installed, install that first.
After NodeJS is installed, open your command line and clone the project code:
git clone https://github.com/discord/discord-example-app.gitThen navigate to the directory and install the project's dependencies:
# navigate to directory
cd discord-example-app

# install dependencies
npm install
Project structure
├── examples    -> short, feature-specific sample apps
├──── app.js  -> finished app.js code
├──── button.js
├──── command.js
├──── modal.js
├──── selectMenu.js
├── .env        -> your credentials and IDs
├── app.js      -> main entrypoint for app
├── commands.js -> slash command payloads + helpers
├── game.js     -> logic specific to Rock, Paper, Scissors
├── utils.js    -> utility functions and constants
├── package.json
├── README.md
└── .gitignore
With that out of the way, open your new project in the code editor of your choice, and we'll move ahead to setting up your Discord app.
Step 1: Creating an app
Section titled “Step 1: Creating an app”First, you'll need to create an app in the developer portal if you don't have one already:
Create App
Enter a name for your app, then press Create.
After you create your app, you'll land on the General Information page of the app's settings where you can update basic information about your app like its description and icon. You'll also see an Application ID and Interactions Endpoint URL, which we'll use a bit later in the guide.
Fetching your credentials
Section titled “Fetching your credentials”We'll need to set up and fetch a few sensitive values for your app, like its token and ID.
Back in your project folder, rename the .env.sample file to .env. This is where we'll store all of your app's credentials.
We'll need three values from your app's settings for your .env file:
- On the General Information page, copy the value for Application ID. In
.env, replace<YOUR_APP_ID>with the ID you copied. - Back on the General Information page, copy the value for Public Key, which is used to ensure HTTP requests are coming from Discord. In
.env, replace<YOUR_PUBLIC_KEY>with the value you copied. - On the Bot page under Token, click "Reset Token" to generate a new bot token. In
.env, replace<YOUR_BOT_TOKEN>with your new token.
Now that you have the credentials you need, lets configure your bot user and installation settings.
Configuring your bot
Section titled “Configuring your bot”Newly-created apps have a bot user enabled by default. Bot users allow your app to appear and behave similarly to other server members when it's installed to a server.
On the left hand sidebar in your app's settings, there's a Bot page (where we fetched the token from). On this page, you can also configure settings like its privileged intents or whether it can be installed by other users.
What are intents?
Intents determine which events Discord will send your app when you're creating a Gateway API connection. For example, if you want your app to perform an action when users add a reaction to a message, you can pass the GUILD_MESSAGE_REACTIONS (1 << 10) intent.
Some intents are privileged, meaning they allow your app to access data that may be considered sensitive (like the contents of messages). Privileged intents can be toggled on the Bot page in your app's settings, but they must be approved before you verify your app. Standard, non-privileged intents don't require any additional permissions or configurations.
More information about intents and a full list of available intents (along with their associated events) is in the Gateway documentation.
For now, we don't need to configure anything additional here, but you may need to in the future depending on your app's use case. Let's go ahead and get our app ready for installation.
Choosing installation contexts
Section titled “Choosing installation contexts”Now we'll select where your app can be installed in Discord, which is determined by the installation contexts that your app supports.
What are installation contexts?
Installation contexts determine where your app can be installed: to servers, to users, or both. Apps can choose which installation contexts they support within the app's settings.
- Apps installed in a server context (server-installed apps) must be authorized by a server member with the
MANAGE_GUILDpermission, and are visible to all members of the server. - Apps installed in a user context (user-installed apps) are visible only to the authorizing user, and therefore don't require any server-specific permissions. Apps installed to a user context are visible across all of the user's servers, DMs, and GDMs—however, they're limited to using commands.
Click on Installation in the left sidebar, then under Installation Contexts make sure both "User Install" and "Guild Install" are selected.
Setting up an install link
Section titled “Setting up an install link”Install links provide an easy way for users to install your app in Discord. We'll set up the default Discord Provided Link, but you can read more about the different type of install links in the Application documentation.
On the Installation page, go to the Install Link section and select "Discord Provided Link" if it's not already selected.
When Discorded Provided Link is selected, a new Default Install Settings section will appear, which we'll configure next.
Adding scopes and bot permissions
Section titled “Adding scopes and bot permissions”Apps need approval from installing users to perform actions in Discord (like creating a slash command or fetching a list of server members). Let's add scopes and permissions before installing the app.
What are scopes and permissions?
When creating an app, scopes and permissions determine what your app can do and access in Discord.
- OAuth2 Scopes determine what data access and actions your app can take, granted on behalf of an installing or authenticating user.
- Permissions are the granular permissions for your bot user, the same as other users in Discord have. They can be approved by the installing user or later updated within server settings or with permission overwrites. Since apps installed to a user context can only respond to commands, these permissions are only relevant to apps installed to a server.
On the Installation page in the Default Install Settings section:
- For User Install, add the
applications.commandsscope - For Guild Install, add the
applications.commandsscope andbotscope. When you selectbot, a new Permissions menu will appear to select the bot user's permissions. Select any permissions that you may want for your app—for now, I'll just selectSend Messages.
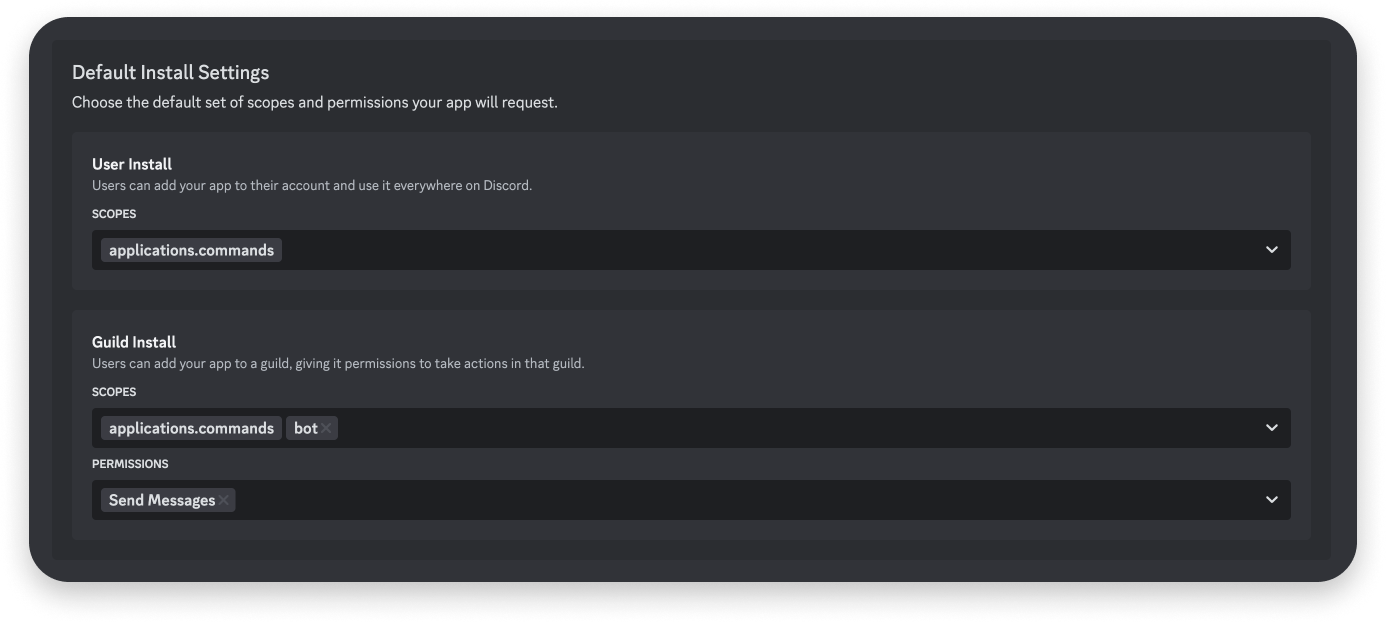
See a list of all OAuth2 scopes, or read more on permissions in the documentation.
Installing your app
Section titled “Installing your app”Once you add scopes, copy the URL from the Install Link section from before.
Since our app is supporting both installation contexts, we'll install your new app to both a test server and your user account so that we can test in both installation contexts.
Install to server
Section titled “Install to server”To install your app to your test server, copy the default Install Link for your app from the Installation page. Paste the link in your browser and hit enter, then select "Add to server" in the installation prompt.
Select your test server, and follow the installation prompt. Once your app is added to your test server, you should see it appear in the member list.
Install to user account
Section titled “Install to user account”Next, install your app to your user account. Paste the same Install Link in your browser and hit enter. This time, select "Add to my apps" in the installation prompt.
Follow the installation prompt to install your app to your user account. Once it's installed you can open a DM with it.
Step 2: Running your app
Section titled “Step 2: Running your app”With your app configured and installed to your test server and account, let's take a look at the code.
Installing slash commands
Section titled “Installing slash commands”The project contains a register script you can use to install the commands in ALL_COMMANDS, which is defined at the bottom of commands.js. It installs the commands as global commands by calling the HTTP API's PUT /applications/<APP_ID>/commands endpoint.
If you want to customize your commands or add additional ones, you can reference the command structure in the commands documentation.
In your terminal within the project folder, run the following command:
npm run registerIf you navigate back to your server, you should see the slash commands appear. But if you try to run them, nothing will happen since your app isn't receiving or handling any requests from Discord.
What are Discord's APIs?
Apps have access to APIs that you can mix-and-match to build apps:
- HTTP API is a REST-like API for general operations like sending and updating data in Discord, or fetching data about a resource.
- Gateway API is a WebSocket-based API that is helpful for maintaining state or listening to events happening in a Discord server. We won't be using it in this guide, but more information about how to create a Gateway connection and the different events you can listen to are in the Gateway documentation.
Step 3: Handling interactivity
Section titled “Step 3: Handling interactivity”To enable your app to receive slash command and other interactions requests, Discord needs a public URL to send them. This URL can be configured in your app's settings as Interaction Endpoint URL.
Set up a public endpoint
Section titled “Set up a public endpoint”To set up a public endpoint, we'll start our app which runs an Express server, then use ngrok to expose our server publicly.
First, go to your project's folder and run the following to start your app:
npm run startThere should be output indicating your app is running on port 3000. Behind the scenes, our app is ready to handle interactions from Discord, which includes verifying security request headers and responding to PING requests. We're skipping over a lot of the details in this tutorial, but details about preparing apps for interactions is in the Interactions Overview documentation.
Next, we'll start our ngrok tunnel. If you don't have ngrok installed locally, you can install it by following the instructions on the ngrok download page.
After ngrok is installed, open a new terminal and create a public endpoint that will forward requests to your Express server:
ngrok http 3000You should see your connection open with output similar to the following:
Tunnel Status                 online
Version                       2.0/2.0
Web Interface                 http://127.0.0.1:4040
Forwarding                    https://1234-someurl.ngrok.io -> localhost:3000

Connections                  ttl     opn     rt1     rt5     p50     p90
                              0       0       0.00    0.00    0.00    0.00
We'll use Forwarding URL as the publicly-accessible URL where Discord will send interactions requests in the next step.
Adding an interaction endpoint URL
Section titled “Adding an interaction endpoint URL”Go to your app's settings and on the General Information page under Interaction Endpoint URL, paste your new ngrok forwarding URL and append /interactions.
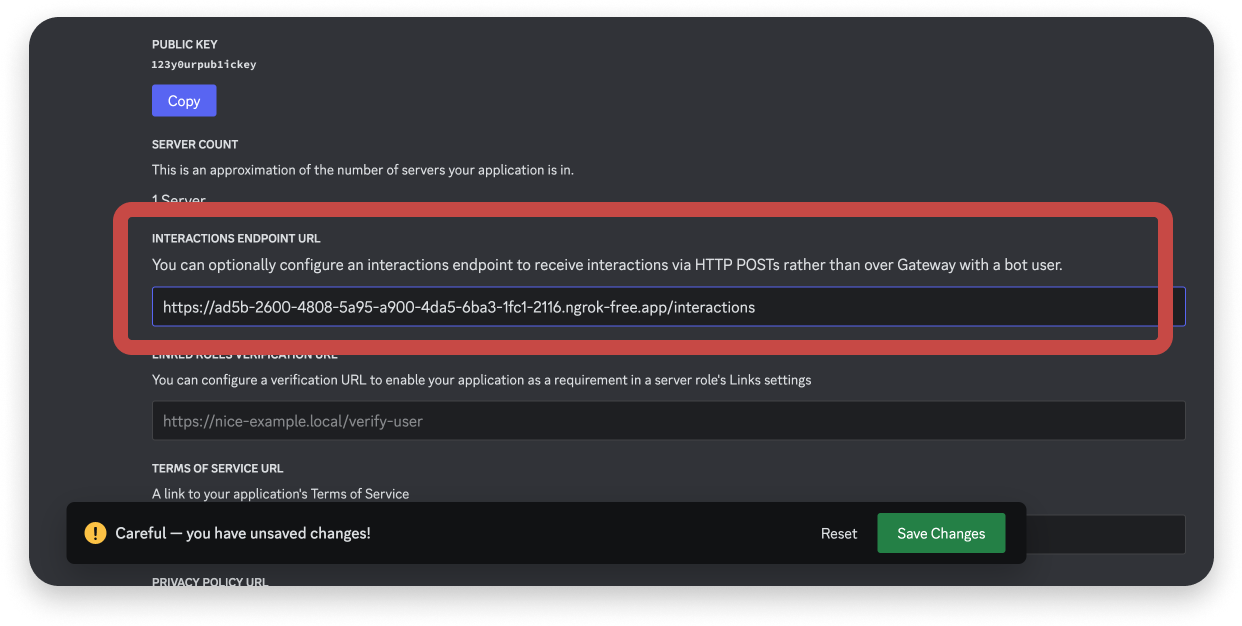
Click Save Changes and ensure your endpoint is successfully verified.
The verification is handled automatically by the sample app in two ways:
- It uses the
PUBLIC_KEYand discord-interactions package with a wrapper function (imported fromutils.js) that makes it conform to Express'sverifyinterface. This is run on every incoming request to your app. - It responds to incoming
PINGrequests.
You can learn more about preparing your app to receive interactions in the interactions documentation.
Handling slash command requests
Section titled “Handling slash command requests”With the endpoint verified, navigate to your project's app.js file and find the code block that handles the /test command:
// "test" command
if (name === 'test') {
  // Send a message into the channel where command was triggered from
  return res.send({
    type: InteractionResponseType.CHANNEL_MESSAGE_WITH_SOURCE,
    data: {
      flags: InteractionResponseFlags.IS_COMPONENTS_V2,
      components: [
        {
          type: MessageComponentTypes.TEXT_DISPLAY,
          // Fetches a random emoji to send from a helper function
          content: `hello world ${getRandomEmoji()}`
        }
      ]
    },
  });
}
The code above is responding to the interaction with a message in the channel, DM, or Group DM it originated from. You can see all available response types, like responding with a modal, in the documentation.
Go to your server and make sure your app's /test slash command works. When you trigger it, your app should send a message that contains “hello world” followed by a random emoji.
In the following section, we'll add an additional command that uses slash command options, buttons, and select menus to build the rock-paper-scissors game.
Step 4: Adding message components
Section titled “Step 4: Adding message components”The /challenge command will be how our rock-paper-scissors-style game is initiated. When the command is triggered, the app will send message components to the channel, which will guide the users to complete the game.
Adding a command with options
Section titled “Adding a command with options”The /challenge command, called CHALLENGE_COMMAND in commands.js, has an array of options. In our app, the options are objects representing different things that a user can select while playing rock-paper-scissors, generated using keys of RPSChoices in game.js.
You can read more about command options and their structure in the documentation.
Handling the command interaction
To handle the /challenge command, add the following code after the if name === “test” if block:
// "challenge" command
if (name === 'challenge' && id) {
  // Interaction context
  const context = req.body.context;
  // User ID is in user field for (G)DMs, and member for servers
  const userId = context === 0 ? req.body.member.user.id : req.body.user.id;
  // User's object choice
  const objectName = req.body.data.options[0].value;

  // Create active game using message ID as the game ID
  activeGames[id] = {
    id: userId,
    objectName,
  };

  return res.send({
    type: InteractionResponseType.CHANNEL_MESSAGE_WITH_SOURCE,
    data: {
      flags: InteractionResponseFlags.IS_COMPONENTS_V2,
      components: [
        {
          type: MessageComponentTypes.TEXT_DISPLAY,
          // Fetches a random emoji to send from a helper function
          content: `Rock papers scissors challenge from <@${userId}>`,
        },
        {
          type: MessageComponentTypes.ACTION_ROW,
          components: [
            {
              type: MessageComponentTypes.BUTTON,
              // Append the game ID to use later on
              custom_id: `accept_button_${req.body.id}`,
              label: 'Accept',
              style: ButtonStyleTypes.PRIMARY,
            },
          ],
        },
      ],
    },
  });
}The above code is doing a few things:
- Parses the request body to get the ID of the user who triggered the slash command (
userId), and the option (object choice) they selected (objectName). If the interaction is run in a server (context === 0), the user ID will be nested in thememberobject. If it's in a DM or Group DM, it will be in theuserobject. - Adds a new game to the
activeGamesobject using the interaction ID. The active game records theuserIdandobjectName. - Sends a message back to the channel with a button with a
custom_idofaccept_button_<SOME_ID>.
When sending a message with message components, the individual payloads are appended to a components array. Actionable components (like buttons) need to be inside of an action row, which you can see in the code sample.
Note the unique custom_id sent with message components, in this case accept_button_ with the active game's ID appended to it. A custom_id can be used to handle requests that Discord sends you when someone interacts with the component, which you'll see in a moment.
Now when you run the /challenge command and pick an option, your app will send a message with an Accept button. Let's add code to handle the button press.
Handling button interactions
When users interact with a message component, Discord will send a request with an interaction type of 3 (or the MESSAGE_COMPONENT value when using discord-interactions).
To set up a handler for the button, we'll check the type of interaction, followed by matching the custom_id.
Paste the following code under the type handler for APPLICATION_COMMANDs:
if (type === InteractionType.MESSAGE_COMPONENT) {
  // custom_id set in payload when sending message component
  const componentId = data.custom_id;

  if (componentId.startsWith('accept_button_')) {
    // get the associated game ID
    const gameId = componentId.replace('accept_button_', '');
    // Delete message with token in request body
    const endpoint = `webhooks/${process.env.APP_ID}/${req.body.token}/messages/${req.body.message.id}`;
    try {
      await res.send({
        type: InteractionResponseType.CHANNEL_MESSAGE_WITH_SOURCE,
        data: {
          // Indicates it'll be an ephemeral message
          flags: InteractionResponseFlags.EPHEMERAL | InteractionResponseFlags.IS_COMPONENTS_V2,
          components: [
            {
              type: MessageComponentTypes.TEXT_DISPLAY,
              content: 'What is your object of choice?',
            },
            {
              type: MessageComponentTypes.ACTION_ROW,
              components: [
                {
                  type: MessageComponentTypes.STRING_SELECT,
                  // Append game ID
                  custom_id: `select_choice_${gameId}`,
                  options: getShuffledOptions(),
                },
              ],
            },
          ],
        },
      });
      // Delete previous message
      await DiscordRequest(endpoint, { method: 'DELETE' });
    } catch (err) {
      console.error('Error sending message:', err);
    }
  }
  return;
}
The above code:
- Checks for a
custom_idthat matches what we originally sent (in this case, it starts withaccept_button_). The custom ID also has the active game ID appended, so we store that ingameID. - Deletes the original message calling a webhook using
node-fetchand passing the unique interactiontokenin the request body. This is done to clean up the channel, and so other users can't click the button. - Responds to the request by sending a message that contains a select menu with the object choices for the game. The payload should look fairly similar to the previous one, with the exception of the
optionsarray andflags: 64, which indicates that the message is ephemeral.
The options array is populated using the getShuffledOptions() method in game.js, which manipulates the RPSChoices values to conform to the shape of string select options.
....and that's it 🎊 Go ahead and test your app and make sure everything works.
Next steps
Section titled “Next steps”Congrats on building your first Discord app! 🤖
Hopefully you learned a bit about Discord apps, how to configure them, and how to make them interactive. From here, you can continue building out your app or explore what else is possible.
Overview of Apps
Explore the platform features and APIs you have access to when building an app on Discord
Explore developer tools
Explore 1st party and community-built libraries and tools to speed up and simplify your development
Developing User-Installable Apps
Tutorial on building and handling interactions for apps installed to a user
Discord Developers
Join our community to ask questions about the API, attend events hosted by the Discord platform team, and interact with other devs